Oracle Autonomous Database for Google Sheets
The Oracle Autonomous Database add-on enables you to query tables using SQL or Analytic Views using a wizard directly from Google Sheets for analysis.
The Oracle Autonomous Database add-on for Google Sheets must comply with Privacy Policy. For information on details of privacy policy, see Oracle Autonomous Database for Google Sheets Privacy Policy Details.
How does the add-on for Google Sheets work?
To query an Analytic View or Tables from the Autonomous Database, you must select an Analytic View or Table to work with. While retrieving data from the Analytic View, you can configure the query according to your requirements. You can select specific hierarchies and create custom calculations on the wizard. The add-on configures your query and returns the result to the Google Sheets. You can save the results of your queries locally in the Google Sheet. The add-on can also query the schema directly to which you have access. Using the Web UI, you can also view reports and analyses you create in the Data Analysis menu in the Data Studio tool.
To use the add-on, you must enable Web Access on the Autonomous Database account. You must have the CONNECT, DWROLE, and RESOURCE roles grant in the SQL worksheet to access the Google Sheets add-on.
The Oracle Autonomous Database add-on for Google Sheets is not supported in Safari web browser.
- Install and setup the add-on for Google Sheets
Before you install the Oracle Autonomous Database add-on for Google Sheets, download the oracleGoogleAddin zip file from your Database Actions instance. - Download Connection File
To connect to the Autonomous Database, you can download a connection file from the Database Actions instance and import it to the Google Sheet add-on you have setup. - Connecting to Autonomous Database
The Oracle Autonomous Database add-on for Google Sheets enables you to connect to multiple Autonomous Databases with a single add-on using the Connections feature. The add-on connects to Google Sheets by providing authentication to Google. Multiple users or databases can connect simultaneously to the add-on. However, only one connection can remain active. - Generate Client ID and Client Secret using UI
In this section you use the Web UI to obtain theclient_id
andclient_secret
. - Authorize Google Sheets to use Autonomous Database
After your identity is determined using OAuth authentication, Google Sheets needs permission to access the Autonomous Database. - Data Analysis in Google Sheets
Selecting Data Analysis opens an Oracle Autonomous Database wizard in the Google sheet. - Run Direct SQL Queries
The Oracle Autonomous Database add-on for Google Sheets lets you run SQL queries to work with your data in a Google Sheet. With the add-on, you can type your SQL code in the SQL editor area and click Run to run the command. - Reporting and Analysis in Google Sheets
You can view Reports and Analytic Views or visualize data for analysis purposes. - Clear Sheet
Once the add-on runs the query and retrieves the data into the worksheet, you can view the Timestamp, User, AV-query and SQL-query of the Analytic View in the automatically generated query results. - Delete all sheets
Use this option to delete all the sheets existing in the spreadsheet. - About Oracle Autonomous Database menu
Use this option to view details about the add-in - Share or Publish
Once you generate the query results in the Google Sheet, you can share it with other users. With sharing, creates a copy of the worksheet and sends it with the design tools hidden and worksheet protection turned on. - Oracle Autonomous Database for Google Sheets Privacy Policy Details
Effective Date:10/4/2024
- Oracle Autonomous Database for Google Sheets Support
Welcome to the support page for the Oracle Autonomous Database for Google Sheets. This resource is designed to assist you with any issues or questions you may have while using the add-on.
Parent topic: The Data Analysis Tool
Download Connection File
To connect to the Autonomous Database, you can download a connection file from the Database Actions instance and import it to the Google Sheet add-on you have setup.
- Navigate to the launchpad of your Database Actions instance, and select the DOWNLOAD MICROSOFT EXCEL/ GOOGLE SHEETS ADD-IN Card. Click the Download Connection File button in the Google Sheets tab of the Downloads page to import the connection file to the Google Add-in.
-
This connection file will allow you to connect to the Autonomous Database with the logged-in user. You can import only those connection files to Google Add-ins that you download from the current Autonomous Database instance.
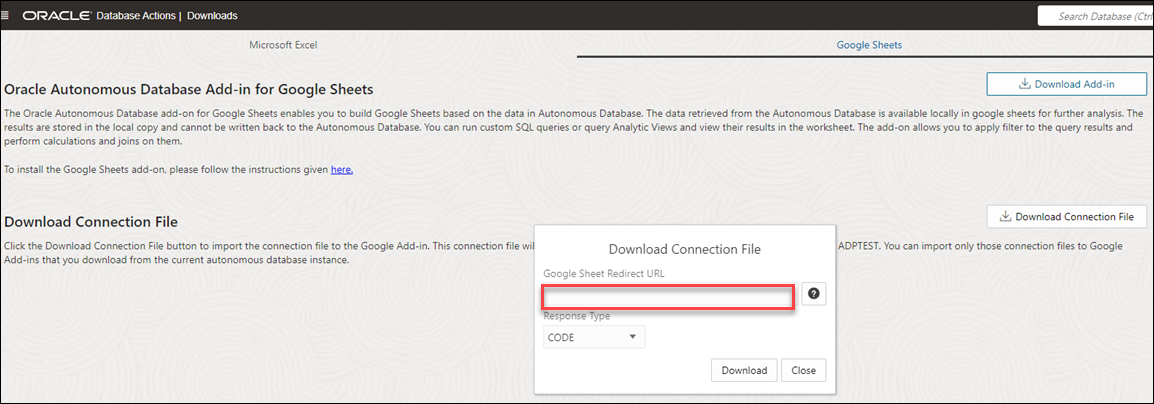
- Selecting the Download Connection File button opens a Download Connection File wizard. Specify the following field values in the wizard:
- Google Sheet Redirect URL: This is the Web application deployment URL you copied from step number nine of Deploy the Google Script as a Web app section.
- Choose a Response Type:
- Explicit Connection
You use the OAuth Client ID and OAuth Client Secret values to authenticate and authorize Google Sheets to use the Autonomous Database. Use this when you use CODE as the Response Type while downloading the connection file from the Database Actions page. This is the more secure method and is preferred to use if the Autonomous database has public access.
- Implicit Connection
You will need an OAuth Client ID to implicitly access the Autonomous Database. Use this when you use Token as the Response Type while downloading the connection file from the Database Actions page. Use this when the autonomous database is in a private subnet or within a customer firewall.
- Explicit Connection
Parent topic: Oracle Autonomous Database for Google Sheets
Generate Client ID and Client Secret using UI
In this section you use the Web UI to obtain the client_id
and client_secret
.
You generate the client keys by accessing the Autonomous Database instance URL appending with oauth/clients.
For example, if your instance is “ https://<hostname>-<databasename>.adb.<region>.oraclecloudapps.com/ords/<schema Name>/_sdw/", you need to sign in to the link " https://<hostname>-<databasename>.adb.<region>.oraclecloudapps.com/ords/<schema Name>/oauth/clients/". Be sure to include the trailing slash.
- Sign in to Database Actions with the "https://machinename.oraclecloudapps.com/ords/SchemaName/oauth/clients/" link. You can view an OAuth Clients page in the link "https://localhost:port/ords/schemaName/_sdw/?nav=rest-workshop&rest-workshop=oauth-clients".
- Click the +Create OAuth Client button to create a new client.
- From the Grant type drop-down, select the type of client connection you want. You can select the following options:
- AUTH_CODE: Select this option for implicit connection. Use this response type when the autonomous database is in a private subnet or within a customer firewall.
- IMPLICIT: Select this option for explicit connection. This is the more secure method and is preferred to use if the Autonomous database has public access.
- Enter the following fields. The fields with an asterisk (*) are mandatory:
- Name: Name of the client.
- Description: Description of the purpose of the client.
- Redirect URI: web application deployment URL you copied from step 10 of Deploy the Google Script as a Web app
- Support URI: Enter the URI where end users can contact the client for support. Example: https://script.google.com/
- Support Email: Enter the email where end users can contact the client for support.
- Logo: Optionally, select an image from your local system to insert a logo for your new client.
- Progress to the Allowed Origins tab. Specify and add the list of URL prefixes in the text field. This is not a mandatory field.
- Progress to the Privileges tab to add any privilege. You are not required to have any privileges to create an OAuth Client.
- Click Create to create the new OAuth Client. This registers the OAuth Client which you can view on the OAuth Clients page.
- Click the show icon to view the
Client ID
and theClient Secret
fields.
How do I connect manually?
The following sections demonstrate how to connect using implicit and explicit connections. Google Sheets needs permission to access the Autonomous Database. You must first complete the authorization to connect to the autonomous database. The add-on requires one-time authentication for the setup.
- On the Google Sheet, click Oracle Autonomous Database and select Connections.
Selecting Connections requires one-time Google authentication.
- Clicking Connections opens a pop-up window that asks your permission to run the authorization. Click Continue.
- You will now view a window that informs you that the application requests access to sensitive information in your Google account.
- Click Advanced and select the Go to Untitled project (unsafe) link. Selecting the link opens new window, ensuring you trust the application. Click Allow to continue. You have now completed the setup.
- Clicking Connections opens a pop-up window that asks your permission to run the authorization. Click Continue.
- On the Connections wizard, click Add Connection from the Manage Connections drop-down menu to add a connection.
- Selecting Add Connection opens an Add Connection wizard in the Connections wizard's connection list panel.
-
Specify the following field values in the wizard:
Connection Name: Enter the connection's name—for example, TestConnection.
Autonomous Database URL: Enter the URL of the Autonomous Database you wish to connect to. For example, “https://<hostname>-<databasename>.adb.<region>.oraclecloudapps.com/”
In the OAuth Client Grant Type field, select one of the two options based on the type of connections you want. Refer to the Generate Client ID and Client Secret using the UI section.
This option varies with implicit and explicit connections.
Implicit: Select this option for implicit connection. Use this response type when the autonomous database is in a private subnet or within a customer firewall.AUTH_CODE: Select this option for explicit connection. This is the more secure method and is preferred to use.
When you select the Implicit option, you can view the following fields:
OAuth Client ID:
client_id
you generate using the Create New Client wizard in the UI. Refer to the Generate Client ID and Client Secret using the UI section.Schema Name: Specify the name of the schema.
When you select AUTH_CODE, you can view the following fields:
OAuth Client ID:
client_id
you generate using the Create New Client wizard in the UI. Refer to the Generate Client ID and Client Secret using the UI section.OAuth Client Secret:
client_secret
you generate using the Create New Client wizard in the UI. Refer to the Generate Client ID and Client Secret using the UI section.Schema Name: Specify the name of the schema.
Click Save.
After you click Save, you can view the new connection in the connection list panel. The connection list displays the connection's name, the schema's name, and the OAuth type you grant. However, it is still in a disconnected state.
-
Click the three vertical dots beside the connection name and perform the following operations:
Connect: Select Connect to the Autonomous Database and change the connection status to active. Selecting Connect opens the sign-in page of the Autonomous database. After you log in, you will view a page that shows that database access has been granted to you. Close the window and return to Google Sheets. You will now see that the connection is active.
Edit: Select Edit to update any value of the connection. Click Save to update the edited values.
Duplicate: Select Duplicate to create a duplicate connection.
Remove: Select Remove to remove the connection from the connection list.
Exporting Connections
- Click Export Connection from the Manage Connections drop-down menu to export the selected connection.
- Select the connection you want to export, and click Export.
- Click Export.
-
The exported connection downloads in your local system. The connection file is saved as spreadsheet_addin_connections.json.
Parent topic: Oracle Autonomous Database for Google Sheets
Authorize Google Sheets to use Autonomous Database
After your identity is determined using OAuth authentication, Google Sheets needs permission to access the Autonomous Database.
The client_id
and client_secret
values you generate during OAuth authentication are used for authorization.
- Click on the Oracle Autonomous Database menu in the Google Sheet you are working on and select Register. This requires one-time Google authentication.
- Clicking Register opens a pop-up window that asks your permission to run the authorization. Click Continue. Selecting Continue will redirect you to the Google Accounts page, where you must select your Gmail account.
- You will now view a window that informs you that the application requests access to sensitive information in your Google account. Click Advanced and select the Go to Untitled project (unsafe) link.
- Selecting the link opens a new window, ensuring you trust the application. Click Allow to continue.
- You have now completed the setup. Select Register from the Oracle Autonomous Database menu in the Google sheet.
This opens an Oracle Autonomous Database wizard in the Google sheet. Specify the following fields:
- ADB URL: Enter the ADB URL. For example, "https://<hostname>-<databasename>.adb.<region>.oraclecloudapps.com/ords/<Schema Name>".
- OAuth Client ID: client_id you generate during authentication.
- OAuth Client Secret: client_secret you generate during authentication. Refer to the Create Connections with the Google spreadsheet section for more details.
- Select Authorize.
After successfully authorizing the credentials, you can view Connections, Direct SQL, Data Analysis, Analyses and Reports Clear Sheet, Delete All Sheets, About Autonomous Database, and Sign Out menu items under Oracle Autonomous Database.
Parent topic: Oracle Autonomous Database for Google Sheets
Run Direct SQL Queries
The Oracle Autonomous Database add-on for Google Sheets lets you run SQL queries to work with your data in a Google Sheet. With the add-on, you can type your SQL code in the SQL editor area and click Run to run the command.
The add-on loads the result in the Google Sheet. The time taken to load the results depends on the number of records and the complexity of the query.
- In the Google Sheet, select the menu item Oracle Autonomous Database.
- Select Direct SQL to type and run the SQL command.
- The Oracle Autonomous Database wizard opens Tables and Views icons and a search field beside it.
- Select Table to view all the tables in the database. Perform the same operations for Views.
- You can right-click on the table whose data you want to query and choose Select to view all the table's columns. The column names will be displayed in the Write a Query section. You can click on the table and view individual columns as well.
- Click Run to run the query and display the results in the worksheet. You can click the + sign beside the Select worksheet drop-down to display the results in a new worksheet.
- The worksheet also displays the timestamp, the user who creates and runs the query, the ADB URL, and the SQL Query.
Parent topic: Oracle Autonomous Database for Google Sheets
Reporting and Analysis in Google Sheets
You can view Reports and Analytic Views or visualize data for analysis purposes.
The reports and charts can be viewed in various charts: Bar Charts, Area charts, Line Charts, and Pie Charts. Reports provide analytical insights that you create from the Analytic Views. An Analysis can contain multiple reports. The Analyses and Reports icon enables you to retrieve Analyses and Reports from the Autonomous Database.
View Analysis
- Select Analysis under Output format.
- Use the Select an Analysis drop-down to choose the Analysis you want to view.
- Click View Analysis to view the analysis in the Google Sheet.
View Report
To view Reports :
- Select the Analyses and Reports menu from the Oracle Autonomous Database menu. This opens the Analyses and Reports wizard.
- Select Report under Output Format.
- Use the Select an Analysis drop-down under Choose Analysis to choose the Analysis you want to view.
- After you select the Analysis, to view the report present in the Analysis, click the Select a report drop-down and select the report you wish to view.
- Click View Report Detail to view more information about the report: Analytic View Name, Type of visualization, and rows, columns, and values you select while creating the report.
- Select the worksheet from the drop-down where you would want to view the report.
- Click View Report to view the report in the selected sheet from the previous step. You can now view the report in the worksheet you select.
Parent topic: Oracle Autonomous Database for Google Sheets
Clear Sheet
Once the add-on runs the query and retrieves the data into the worksheet, you can view the Timestamp, User, AV-query and SQL-query of the Analytic View in the automatically generated query results.
Once the add-on runs the query and retrieves the data into the worksheet, you can view the Timestamp, User, AV query, and SQL query of the Analytic View in the automatically generated query results.
The worksheet displays the result of the query in one go. Consider, for example, if you want to modify the query and generate the query result in the same sheet. You must clear the existing data in the sheet.
To clear query results in the Google sheet, click the menu item Oracle Autonomous Database and select Clear Sheet.
This option erases all data types in the selected sheet, including images and formatting.
Parent topic: Oracle Autonomous Database for Google Sheets
Delete all sheets
Use this option to delete all the sheets existing in the spreadsheet.
Select Delete All Sheets from the Oracle Autonomous Database menu to delete all sheets from the spreadsheet.
Parent topic: Oracle Autonomous Database for Google Sheets
About Oracle Autonomous Database menu
Use this option to view details about the add-in
The About Oracle Autonomous Database menu from Oracle Autonomous Database displays if the add-on is connected to server, the ORDS version, the Add-in version, the ORDS Schema version, the database major and minor version, the ADB URL and the Schema.
Parent topic: Oracle Autonomous Database for Google Sheets
Share or Publish
Once you generate the query results in the Google Sheet, you can share it with other users. With sharing, creates a copy of the worksheet and sends it with the design tools hidden and worksheet protection turned on.
- Review and inspect to remove personal or sensitive information.
- Save the source version of the worksheet. Consider adding a file name suffix of –src for the source worksheet. Then, remove the suffix in the distributed copy.
Once you are ready to distribute to the users, click Share.
- In the Share window that appears, add the user email IDs with whom you want to share the Sheets and to whom you want to provide permissions for accessing the Sheets.
- You can select the permission of the users from the drop-down. Select Editors if you want the user to share the worksheet. Viewers and commenters can see the option to download, print and copy but not share the sheets.
- Select Notify people check-box to notify the users of the share.
- Under General access, select Restricted from the drop-down to share it with people who have access to the link. You could also share it with people who do not have access by selecting Anyone with the link from the drop-down.
Parent topic: Oracle Autonomous Database for Google Sheets