Using JupyterHub in Big Data Service 3.0.27 or Later

Use JupyterHub to manage Big Data Service 3.0.27 or later ODH 2.x notebooks for groups of users.

Prerequisites

Accessing JupyterHub

Access JupyterHub through the browser for Big Data Service 3.0.27 or later ODH 2.x clusters.
  1. Access Apache Ambari.
  2. From the side toolbar, under Services click JupyterHub.

Spawning Notebooks

The following Spawner configurations are supported on Big Data Service 3.0.27 and later ODH 2.x clusters.

Complete the following:

  1. Native Authentication:
    1. Sign in using signed in user credentials
    2. Enter username.
    3. Enter password.
  2. Using SamlSSOAuthenticator:
    1. Sign in with SSO sign in.
    2. Complete sign in with the configured SSO application.

Spawning Notebooks on an HA Cluster

For AD integrated cluster:

  1. Sign in using either of the preceding methods. The authorization works only if the user is present on the Linux host. JupyterHub searches for the user on the Linux host while trying to spawn the notebook server.
  2. You're redirected to a Server Options page where you must request a Kerberos ticket. This ticket can be requested using either Kerberos principal and the keytab file, or the Kerberos password. The cluster admin can provide the Kerberos principal and the keytab file, or the Kerberos password. The Kerberos ticket is needed to get access on the HDFS directories and other big data services that you want to use.

Spawning Notebooks on a non-HA Cluster

For AD integrated cluster:

Sign in using either of the preceding methods. The authorization works only if the user is present on the Linux host. JupyterHub searches for the user on the Linux host while trying to spawn the notebook server.

Manage JupyterHub

A JupyterHub admin user can perform the following tasks to manage notebooks in JupyterHub on Big Data Service 3.0.27 or later ODH 2.x nodes.

To manage Oracle Linux 7 services with the systemctl command, see Working With System Services.

To sign in an Oracle Cloud Infrastructure instance, see Connecting to Your Instance.

Stopping, Starting, or Restarting JupyterHub Through Ambari

As an admin, you can stop or disable JupyterHub so it doesn't consume resources, such as memory. Restarting might also help with unexpected issues or behavior.

Note

Stop or start JupyterHub through Ambari for Big Data Service 3.0.27 or later clusters.
  1. Access Apache Ambari.
  2. From the side toolbar, under Services click JupyterHub.
  3. Click Actions:
    • To start JupyterHub, click Start.
    • To stop JupyterHub, click Stop.
    • To restart JupyterHub, click Restart.
Adding JupyterHub Server

As an admin, you can add JupyterHub Server to a Big Data Service node.

Note

This is available for Big Data Service 3.0.27 or later clusters.
  1. Access Apache Ambari.
  2. From the side toolbar, click Hosts.
  3. To add JupyterHub Server, select a host where JupyterHub isn't installed.
  4. Click Add.
  5. Select JupyterHub Server.
Moving JupyterHub Server

As an admin, you can move JupyterHub Server to a different Big Data Service node.

Note

This is available for Big Data Service 3.0.27 or later clusters.
  1. Access Apache Ambari.
  2. From the side toolbar, under Services click JupyterHub.
  3. Click Actions, and then click Move JupyterHub Server.
  4. Click Next.
  5. Select the host to move JupyterHub Server to.
  6. Complete the move wizard.
Running JupyterHub Service/Health Checks

As an admin, you can run JupyterHub service/health checks through Ambari.

Note

This is available for Big Data Service 3.0.27 or later clusters.
  1. Access Apache Ambari.
  2. From the side toolbar, under Services click JupyterHub.
  3. Click Actions, and then click Run Service Check.

Manage Users and Permissions

Use one of the two authentication methods to authenticate users to JupyterHub so that they can create notebooks, and optionally administer JupyterHub on Big Data Service 3.0.27 or later ODH 2.x clusters.

JupyterHub users must be added as OS users on all Big Data Service cluster nodes for Non-Active Directory (AD) Big Data Service clusters, where users aren't automatically synced across all cluster nodes. Administrators can use the JupyterHub User Management script to add users and groups before signing in to JupyterHub.

Prerequisite

Complete the following before accessing JupyterHub:

  1. SSH sign in to the node where JupyterHub is installed.
  2. Navigate to /usr/odh/current/jupyterhub/install.
  3. To provide the details of all users and groups in the sample_user_groups.json file, run:
    sudo python3 UserGroupManager.py sample_user_groups.json
              
              Verify user creation by executing the following command:
              id <any-user-name>

Supported Authentication Types

  • NativeAuthenticator: This authenticator is used for small or medium-sized JupyterHub applications. Sign up and authentication are implemented as native to JupyterHub without relying on external services.
  • SSOAuthenticator: This authenticator provides a subclass of jupyterhub.auth.Authenticator that acts as an SAML2 Service Provider. Direct it to an appropriately configured SAML2 Identity Provider and it enables single sign-on for JupyterHub.
Native Authentication

Native authentication depends on the JupyterHub user database for authenticating users.

Native authentication applies to both HA and non-HA clusters. Refer native authenticator for details on the native authenticator.

Prerequisites for Authorizing a User in an HA Cluster

These prerequisites must be met to authorize a user in a Big Data Service HA cluster using native authentication.

  1. The user must be existing in the Linux host. Run the following command to add a new Linux user on all the nodes of a cluster.
    # Add linux user
    dcli -C "useradd -d /home/<username> -m -s /bin/bash <username>"
  2. To start a notebook server, a user must provide the principal and the keytab file path/password and request a Kerberos ticket from the JupyterHub interface. To create a keytab, the cluster admin must add Kerberos principal with a password and with a keytab file. Run the following commands on the first master node (mn0) in the cluster.
    # Create a kdc principal with password or give access to existing keytabs.
    kadmin.local -q "addprinc <principalname>"
    Password Prompt: Enter passwrod
     
    # Create a kdc principal with keytab file or give access to existing keytabs.
    kadmin.local -q 'ktadd -k /etc/security/keytabs/<principal>.keytab principal'
  3. The new user must have correct Ranger permissions to store files in the HDFS directory hdfs:///users/<username> as the individual notebooks are stored in /users/<username>/notebooks. The cluster admin can add the required permission from the Ranger interface by opening the following URL in a web browser.
    https://<un0-host-ip>:6182
  4. The new user must have correct permissions on Yarn, Hive, and Object Storage to read and write data, and run Spark jobs. Alternatively, user can use Livy impersonation (run Big Data Service jobs as Livy user) without getting explicit permissions on Spark, Yarn, and other services.
  5. Run the following command to give the new user access to the HDFS directory.
    # Give access to hdfs directory
    # kdc realm is by default BDSCLOUDSERVICE.ORACLE.COM
    kinit -kt /etc/security/keytabs/hdfs.headless.keytab hdfs-<clustername>@<kdc_realm> 
    sudo su hdfs -c "hdfs dfs -mkdir /user/<username>"
    sudo su hdfs -c "hdfs dfs -chown -R jupy5 /user/<username>"
Prerequisites for Authorizing a User in a non-HA Cluster

These prerequisites must be met to authorize a user in a Big Data Service non-HA cluster using native authentication.

  1. The user must be existing in the Linux host. Run the following command to add a new Linux user on all the nodes of a cluster.
    # Add linux user
    dcli -C "useradd -d /home/<username> -m -s /bin/bash <username>"
  2. The new user must have correct permissions to store files in the HDFS directory hdfs:///users/<username>. Run the following command to give the new user access to the HDFS directory.
    # Give access to hdfs directory
    sudo su hdfs -c "hdfs dfs -mkdir /user/<username>"
    sudo su hdfs -c "hdfs dfs -chown -R jupy5 /user/<username>"
Adding an Admin User

Admin users are responsible for configuring and managing JupyterHub. Admin users are also responsible for authorizing newly signed up users on JupyterHub.

Before adding an admin user, the prerequisites must be met for an HA cluster or non-HA cluster.

  1. Access Apache Ambari.
  2. From the side toolbar, under Services click JupyterHub.
  3. Click Configs, and then click Advanced Configs.
  4. Select Advanced jupyterhub-config.
  5. Add admin user to c.Authenticator.admin_users.
  6. Click Save.
An admin user in the JupyterHub config file isn't required to have explicit authorization during sign-in. After signing up, you can sign in directly.
Adding Other Users

Before adding other users, the prerequisites must be met for a Big Data Service cluster.

  1. Access JupyterHub.
  2. Sign up for the new user. Non-admin users need explicit authorization from the admin users.
  3. Admin user must sign in JupyterHub and from the new menu option to authorize signed in users, authorise the new user.
    Screenshot of the Authorize Users page in Jupyterhub
  4. New user can now sign-in.
Deleting Users

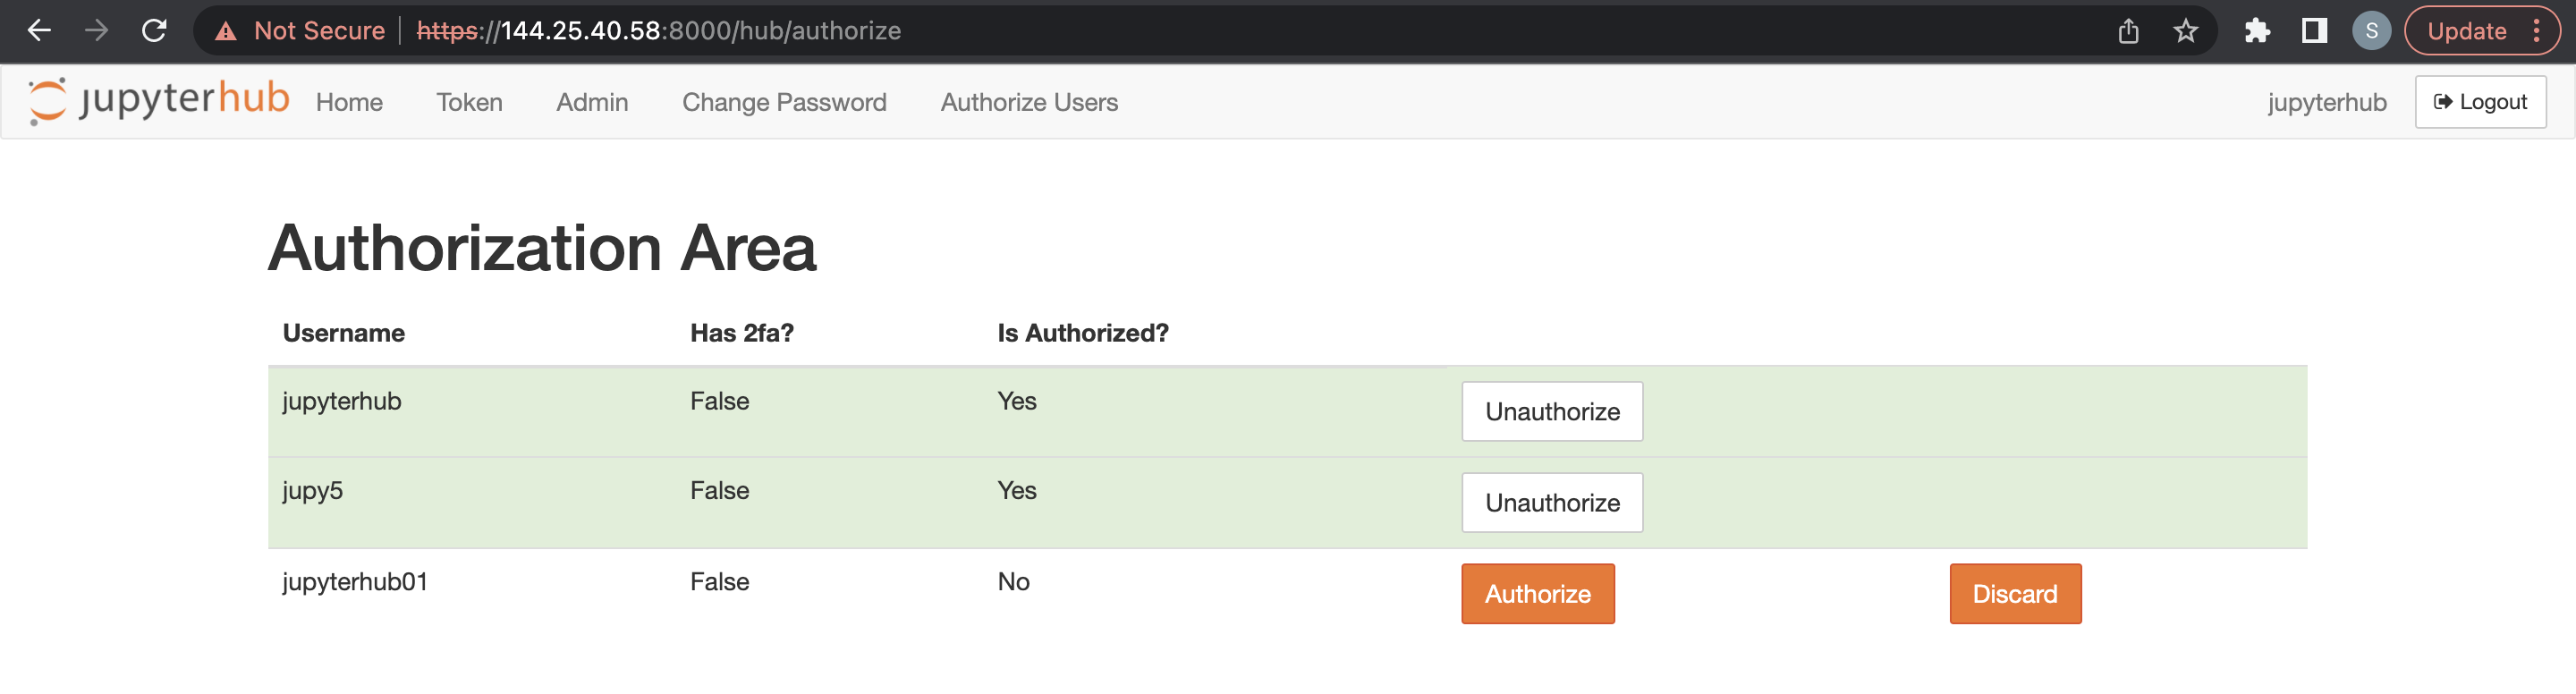
An admin user can delete JupyterHub users.

  1. Access JupyterHub.
  2. Open File > HubControlPanel.
  3. Navigate to the Authorize Users page.
  4. Delete the users you want to remove.
LDAP Authentication

You can use LDAP authentication through Ambari for Big Data Service 3.0.27 or later ODH 2.x clusters.

Using LDAP Authentication Using Ambari

To use LDAP authenticator, you must update the JupyterHub config file with the LDAP connection details.

Note

Use Ambari for LDAP authentication on Big Data Service 3.0.27 or later clusters.

Refer LDAP authenticator for details on the LDAP authenticator.

  1. Access Apache Ambari.
  2. From the side toolbar, under Services click JupyterHub.
  3. Click Config, and then under the Advanced jupyterhub config > Base Settings, enter the following:
    c.JupyterHub.authenticator_class = 'ldapauthenticator.LDAPAuthenticator'
              c.LDAPAuthenticator.server_port = <port>
              c.LDAPAuthenticator.server_address = 'ldaps://<host>'
              c.LDAPAuthenticator.lookup_dn = False
              c.LDAPAuthenticator.use_ssl = True
              c.LDAPAuthenticator.lookup_dn_search_filter = '({login_attr}={login})'
              c.LDAPAuthenticator.lookup_dn_search_user = '<user>'
              c.LDAPAuthenticator.lookup_dn_search_password = '<example-password>'
              #c.LDAPAuthenticator.user_search_base = 'ou=KerberosPrincipals,ou=Hadoop,dc=cesa,dc=corp'
              c.LDAPAuthenticator.user_attribute = 'sAMAccountName'
              c.LDAPAuthenticator.lookup_dn_user_dn_attribute = 'cn'
              c.LDAPAuthenticator.escape_userdn = False
              c.LDAPAuthenticator.bind_dn_template = ["cn={username},ou=KerberosPrincipals,ou=Hadoop,dc=cesa,dc=corp"]
  4. Restart JupyterHub.
Configure SSO Auth in Big Data Service JupyterHub Service

pConfigure SSO Auth in Big Data Service 3.0.27 or later ODH 2.x JupyterHub service.

Using Oracle Identity Domain

You can use Oracle Identity Domain to set up SSO Auth in Big Data Service 3.0.27 or later ODH 2.x JupyterHub clusters.

  1. Create an Identity domain. For more information, see .
  2. In the domain, under Integrated Applications, add an SAML Application.
  3. Provide the following required details while creating the application:
    • Entity ID: This is a unique ID. You can use the base URL of JupyterHub, for example, https://myjupyterhub/saml2_auth/ent.
    • Assertion consumer URL:
      • JupyterHub URL: https://<Jupyterhub-Host>:<Port>/hub/saml2_auth/acs
      • Load Balancer URL: https://<Load-Balancer>:<Port>/hub/saml2_auth/acs
    • Single logout URL, Logout response URL: https://<Jupyterhub-Host>:<Port>/hub/logout
  4. Activate the application.
  5. Assign users to the application.
  6. Navigate to the created application and click Download Identity Provider Metadata, and then copy this metadata file to the JupyterHub host and ensure it has Read access for all users.
  7. Update the user's session parameters. For more information, see Setting Session Limits.
Using OKTA Through Ambari

You can use OKTA to set up SSO Auth in Big Data Service 3.0.27 or later ODH 2.x JupyterHub clusters.

  1. Sign in to OKTA.
  2. From the side toolbar, click Applications > Applications > Create App Integration.
  3. Select SAML 2.0.
  4. Provide the following details and create the Application.
    • App Name: The name of the application. For example, JupyterHub-SSO.
    • Single sign-on URL: The Single sign-on URL. For example: https://<Jupyterhub-Host>:<Port>/hub/saml2_auth/acs.
    • Audience URI (SP Entity ID): The unique ID. You can use the base URL of JupyterHub. For example: https://myjupyterhub/saml2_auth/ent.
  5. Assign users to the application.
  6. Click the sign on tab and obtain the following details:
    • Metadata URL: Download the metadata file, and then copy to the JupyterHub host.
    • Sign on URL: Copy the sign on URL, and then update the same in the JupyterHub configs (saml2_login_url).
Enabling SSO
  1. Access Apache Ambari.
  2. From the side toolbar, under Services click JupyterHub.
  3. Click Config > Settings > Notebook Server Authenticator.
  4. Select SamlSSOAuthenticator.
  5. Click Save.
  6. Click Advanced.
  7. Update the parameters in the Advanced Jupiter-config SamlSSOAuthenticator-Configs section:
    • c.Saml2Authenticator.saml2_metadata_file name: The path to the Identity Provider (IDP) metadata file in the JupyterHub installed node. For example: '/tmp/IDCSMetadata.xml'.

    • c.Saml2Authenticator.saml2_entity_id: A unique identifier for maintaining the mapping from the Identity Provider (IDP) to the Service Provider (JupyterHub). This identifier must be the same in both the IDP application configurations and the Service Provider (JupyterHub). For example: https://myjupyterhub/saml2_auth/ent

    • c.Saml2Authenticator.saml2_login_URL: The Single Sign-On (SSO) sign in URL. For Oracle IDCS Users can obtain this from the IDP metadata.xml file. In metadata.xml file file search for AssertionConsumerService tag and get the value of location attribute. For OKTA, copy the value of sign in URL present on the sign in tab. For example: https://idcs-1234.identity.oraclecloud.com/fed/v1/sp/sso

    • #c.Saml2Authenticator.saml2_metadata_URL: Optional. The URL of the Identity Provider (IDP) metadata file. Be sure the provided URL is reachable from the JupyterHub installed node. Either saml2_metadata_filename or saml2_metadata_url is required. For example: https://idcs-1234.identity.oraclecloud.com/sso/saml/metadata

    • #c.Saml2Authenticator.saml2_attribute_username: Optional. Specify an attribute to be considered as the user from the SAML assertion. If no attribute is specified, the sign-in username is treated as the user. Enter 'Email'.

    • #c.Saml2Authenticator.saml2_private_file_path and #c.Saml2Authenticator.saml2_public_file_path: Optional. If the Identity Provider (IDP) encrypts assertion data, the Service Provider (SP) JupyterHub, must provide the necessary private and public keys to decrypt the assertion data. For example:

      #c.Saml2Authenticator.saml2_public_file_path: '/etc/security/serverKeys/jupyterhubsso.key'

      #c.Saml2Authenticator.saml2_public_file_path: '/etc/security/serverKeys/jupyterhubsso.crt'

    • #c.Saml2Authenticator.login_service: Optional. This configures the sign in button to display as 'Sign in with {login_service}'. Enter 'Oracle IDCS'.

  8. Restart JupyterHub.
Configure JupyterHub Through Ambari

As an admin, you can manage JupyterHub configurations through Ambari for Big Data Service 3.0.27 or later ODH 2.x clusters.

  1. Access Apache Ambari.
  2. From the side toolbar, under Services click JupyterHub.
  3. Click Configs. The following configs are supported:
    • Spawner Configuration:
      • ODHSystemdSpawner: A custom spawner used to spawn single-user notebook servers using systemd on the local node where JupyterHub Server is installed.
      • ODHYarnSpawner: A custom Spawner for JupyterHub that launches notebook servers on YARN clusters. This is the default spawner used by Big Data Service.
    • Common Configuration: These are configurations such as Binding IP and port where JupyterHub would run.
    • Authenticator Configuration: We support two Authenticators that can be used for authenticating users signing in to JupyterHub. For more information on the authentication types, see Manage Users and Permissions.
    • Persistence mode:
      • HDFS: This allows you to persist notebooks over HDFS
      • Git: This allows you to use a JupyterLab extension for version control using Git, this allows persistence of notebooks on remote servers through Git.

Spawning Notebooks

The following Spawner configurations are supported on Big Data Service 3.0.27 and later ODH 2.x clusters.

Complete the following:

  1. Native Authentication:
    1. Sign in using signed in user credentials
    2. Enter username.
    3. Enter password.
  2. Using SamlSSOAuthenticator:
    1. Sign in with SSO sign in.
    2. Complete sign in with the configured SSO application.

Spawning Notebooks on an HA Cluster

For AD integrated cluster:

  1. Sign in using either of the preceding methods. The authorization works only if the user is present on the Linux host. JupyterHub searches for the user on the Linux host while trying to spawn the notebook server.
  2. You're redirected to a Server Options page where you must request a Kerberos ticket. This ticket can be requested using either Kerberos principal and the keytab file, or the Kerberos password. The cluster admin can provide the Kerberos principal and the keytab file, or the Kerberos password. The Kerberos ticket is needed to get access on the HDFS directories and other big data services that you want to use.

Spawning Notebooks on a non-HA Cluster

For AD integrated cluster:

Sign in using either of the preceding methods. The authorization works only if the user is present on the Linux host. JupyterHub searches for the user on the Linux host while trying to spawn the notebook server.

Setting Up Git Environment
  1. Configure SSH keys/ Access tokens for the Big Data Service cluster node.
  2. Select notebook persistence mode as Git.
Set Up the Git Connection

To set up Git connection for JupyterHub, complete the following:

  1. Configure SSH keys/ Access tokens for the Big Data Service cluster node.
  2. Select notebook persistence mode as Git

Generating SSH Key Pair

  1. Open a terminal or command prompt.
  2. To generate a new SSH key pair, run:
    ssh-keygen -t rsa -b 4096 -C "your_email@example.com"
  3. (Optional) Follow the prompts to specify the file location and passphrase (optional).
  4. Register the public key:
    1. Sign in to your Git server account.
    2. Navigate to the settings or SSH keys section of your account.
    3. Add the content of the public key (~/.ssh/id_rsa.pub) to the Git server account.
  5. Configure the SSH agent:

    If you have many SSH keys managed by the SSH agent, you can create a config file to specify which key to use for each Git server.

    1. Open or create the SSH config file (~/.ssh/config) in a text editor.
    2. Add entries for each Git server specifying the identity file associated with each SSH key.
  6. Connect the local Git repository to remote using SSH:
    1. Open a terminal or command prompt.
    2. Navigate to the local Git repository.
    3. To switch the remote URL from HTTPS to SSH, run:
      
      git remote set-url origin git@github.com:username/repository.git

      Replace username/repository.git with the appropriate Git repository URL.

  7. Verify SSH connection:
    1. Test the SSH connection to the Git server:
      ssh -T git@github.com
  8. (Optional) If you're prompted to confirm the authenticity of the host, enter yes to continue.

Using Access Tokens

You can use access tokens in the following ways:

  • GitHub:
    1. Sign in to your GitHub account.
    2. Navigate to the Settings > Developer settings > Personal access tokens.
    3. Generate a new access token with the appropriate permissions.
    4. Use the access token as your password when prompted for authentication.
  • GitLab:
    1. Sign in to your GitHub account.
    2. Navigate to the Settings > Access Tokens.
    3. Generate a new access token with the appropriate permissions.
    4. Use the access token as your password when prompted for authentication.
  • BitBucket:
    1. Sign in to your BitBucket account.
    2. Navigate to the Settings > App passwords.
    3. Generate a new app password token with the appropriate permissions.
    4. Use the new app password as your password when prompted for authentication.

Selecting Persistence Mode as Git

  1. Access Apache Ambari.
  2. From the side toolbar, under Services click JupyterHub.
  3. Click Configs, and then click Settings.
  4. Search for Notebook persistence mode, and then select Git from the dropdown.
  5. Click Actions, and then click Restart All.
Setting Up HDFS in the JupyterHub for Storing Notebooks
To setup HDFS as the default storage for JupyterHub notebooks, select persistence mode as HDFS.
  1. Access Apache Ambari.
  2. From the side toolbar, under Services click JupyterHub.
  3. Click Configs, and then click Settings.
  4. Search for Notebook persistence mode, and then select HDFS from the dropdown.
  5. Click Actions, and then click Restart All.
Setting Up Object Storage in JupyterHub for Storing Notebooks

As an admin user, you can store the individual user notebooks in Object Storage instead of HDFS. When you change the content manager from HDFS to Object Storage, the existing notebooks aren't copied over to Object Storage. The new notebooks are saved in Object Storage.

  1. Access Apache Ambari.
  2. From the side toolbar, under Services click JupyterHub.
  3. Click Configs, and then click Advanced.
  4. Navigate to the c.YarnSpawner.args = yarn_spawner_default_rags section, and then replace content with:
    c.YarnSpawner.args = ['--ServerApp.contents_manager_class="s3contents.S3ContentsManager"', '--S3ContentsManager.bucket="<bucket-name>"', '--S3ContentsManager.access_key_id="<accesskey>"', '--S3ContentsManager.secret_access_key="<secret-key>"', '--S3ContentsManager.endpoint_url="https://<object-storage-endpoint>"', '–S3ContentsManager.region_name=""','–ServerApp.root_dir=""']
  5. Restart all JupyterHub servers from Actions menu.

Mounting Oracle Object Storage Bucket Using rclone with User Principal Authentication

You can mount Oracle Object Storage using rclone with User Principal Authentication (API Keys) on a Big Data Service cluster node using rclone and fuse3, tailored for JupyterHub users.

Complete this procedure for Big Data Service 3.0.28 or later ODH 2.x clusters to enable seamless access and management of Object Storage directly from your JupyterHub environment, enhancing your data handling capabilities.
  1. Access Apache Ambari.
  2. From the side toolbar, under Services click JupyterHub.
  3. Click Summary, and then click JUPYTERHUB_SERVER.
  4. Obtain the host info from the host information displayed.
  5. Sign in to the Big Data Service host using the SSH credentials used while creating the cluster. For more information, see Connecting to a Cluster Node Using SSH.
  6. To verify the installation of rclone and fuse3 on the node, run:
    rclone version 
    # Ensure version is v1.66
    
    fusermount3 --version 
    # Ensure FUSE version 3 is installed
  7. Create API key and setup rclone configuration. For more information, see Set Up Authentication with an OCI User and API Key, Obtain the OCI Tenancy Namespace and Bucket Compartment.
  8. Set up the rclone configuration. For more information, see Configure Rclone for OCI Object Storage.
  9. To mount the Object Storage bucket, run the following command as a sign in user.

    The following runs the mount operation with signed in user `Jupyterhub`. The daemon process runs as a Linux process on the node where this operation is triggered.

    sudo -u jupyterhub rclone mount remote_name:bucket1 /home/jupyterhub/mount_dir --allow-non-empty --file-perms 0666 --dir-perms 0777 --vfs-cache-mode=full --dir-cache-time=30s --vfs-write-back=2m --cache-info-age=60m --daemon
    
    Note

    To work with Jupyter Notebooks ensure the mount location is inside the sign in user's home directory, and ensure the mount directory is empty.
    sudo -u jupyterhub ls -ltr /home/jupyterhub/mount_dir
  10. (Optional) To verify that mount is successful, run the following. This example lists the contents of mount_dir bucket.
    sudo -u jupyterhub ls -ltr /home/jupyterhub/mount_dir
    
  11. Run cleanup procedures.

    When running in background mode you must stop the mount manually. Use the following cleanup operations when JupyterHub and Notebook servers aren't in use.

    On Linux:
    sudo -u jupyterhub fusermount3 -u /home/jupyterhub/mount_dir
    The umount operation can fail, for example when the mountpoint is busy. When that happens, it's the user's responsibility to you must stop the mount manually.
    sudo -u jupyterhub umount -l /home/jupyterhub/mount_dir : lazy unmount
    sudo -u jupyterhub umount -f /home/jupyterhub/mount_dir : force unmount
    

Manage Conda Environments in JupyterHub

Note

You can manage Conda environments on Big Data Service 3.0.28 or later ODH 2.x clusters.
  • Create a conda environment with specific dependencies and create four kernels (Python/PySpark/Spark/SparkR) which point to the created conda environment.
  • Conda environments and kernels created using this operation are available to all notebook server users.
  • Separate create conda env operation is to decouple the operation with restart of service.
Prerequisites
  • JupyterHub is installed through the Ambari UI.
  • Verify internet access to the cluster to download dependencies during conda creation.
  • Conda environments and kernels created using this operation are available to all notebook server users.'
  • Provide:
    • Conda additional configs to avoid conda creation failure. For more information, see conda create.
    • Dependencies in the standard requirements.txt format.
    • A conda env name that doesn't exist.
  • Manually delete conda envs or kernels.
Customizing Global Configurations
  1. Access Apache Ambari.
  2. From the side toolbar, under Services click JupyterHub.
  3. Click Configs, and then click Advanced.
  4. Scroll to the jupyterhub-conda-env-configs section.
  5. Update the following fields:
    • Conda Additional Configurations: This field is used to provide additional parameters to be appended to the default conda creation command. The default conda creation command is 'conda create -y -p conda_env_full_path -c conda-forge pip python=3.8.

      If the additional configurations are given as '--override-channels --no-default-packages --no-pin -c pytorch', then, the final conda creation command run is 'conda create -y -p conda_env_full_path -c conda-forge pip python=3.8 --override-channels --no-default-packages --no-pin -c pytorch'.

    • Conda Environment Name: This field is to provide a unique name for the conda environment. Provide a unique conda environment each time a new env is created.
    • Python Dependencies: This field lists all python/R/Ruby/Lua/Scala/Java/JavaScript/C/C++/FORTRAN and so on dependencies accessible to your conda channels in the format of requirements.txt file.

      For more information on the .txt file requirements, see Requirements File Format.

  6. Click Save.
  7. Click Actions, and then select Activate Conda Env.
    After activation is complete, the following are displayed in the JupyterHub UI:
    • Python kernel: conda_python3_kernel_{conda_env_name}
    • PySpark kernel: conda_pyspark_kernel_{conda_env_name}
    • Spark kernel: conda_spark_kernel_{conda_env_name}
    • SparkR kernel: conda_sparkr_kernel_{conda_env_name}
    Note

    These kernels point to the created conda env.
Set Up User-Specific Conda Environment

This operation creates a conda environment with specified dependencies and creates the specified kernel (Python/PySpark/Spark/SparkR) pointing to the created conda environment.

  • If the specified conda env already exists, then the operation proceeds to the kernel creation step directly
  • Conda environments or kernels created using this operation are available only to a specific user
  • Manually run the python script kernel_install_script.py in sudo mode:
     '/var/lib/ambari-server/resources/mpacks/odh-ambari-mpack-2.0.8/stacks/ODH/1.1.12/services/JUPYTER/package/scripts/'

    Example:

    sudo python kernel_install_script.py --conda_env_name conda_jupy_env_1 --conda_additional_configs '--override-channels --no-default-packages --no-pin -c pytorch' --custom_requirements_txt_file_path ./req.txt --kernel_type spark --kernel_name spark_jupyterhub_1 --user jupyterhub

Prerequisites

  • Verify internet access to the cluster to download dependencies during conda creation. Otherwise, the creation fails.
  • If a kernel with name --kernel_name exists, then an exception is thrown.
  • Provide the following:
  • Manually delete conda envs or kernels for any user.

Available Configs for Customization

  • --user (mandatory): OS and JupyterHub user for whom kernel and conda env is created.
  • --conda_env_name (mandatory): Provide a unique name for the conda environment each time a new en is created for --user.
  • --kernel_name: (mandatory) Provide a unique kernel name.
  • --kernel_type: (mandatory) Must be one of the following (python / PysPark / Spark / SparkR)
  • --custom_requirements_txt_file_path: (optional) If any Python/R/Ruby/Lua/Scala/Java/JavaScript/C/C++/FORTRAN and so on., dependencies are installed using conda channels, you must specify those libraries in a requirements .txt file and provide the full path.

    For more information on a standard format to define requirements .txt file, see https://pip.pypa.io/en/stable/reference/requirements-file-format/.

  • --conda_additional_configs: (optional)
    • This field provides additional parameters to be appended to the default conda creation command.
    • The default conda creation command is: 'conda create -y -p conda_env_full_path -c conda-forge pip python=3.8'.
    • If --conda_additional_configs is given as '--override-channels --no-default-packages --no-pin -c pytorch', then, the final conda creation command run is 'conda create -y -p conda_env_full_path -c conda-forge pip python=3.8 --override-channels --no-default-packages --no-pin -c pytorch'.

Setting Up User-Specific Conda Environment

  1. Verify that JupyterHub is installed through the Ambari UI.
  2. SSH into the cluster, and then navigate to /var/lib/ambari-server/resources/mpacks/odh-ambari-mpack-2.0.8/stacks/ODH/1.1.12/services/JUPYTER/package/scripts/.
  3. Run with specifics to your environment:
    sudo python/python3 kernel_install_script.py --conda_env_name conda_jupy_env_1 --conda_additional_configs '--override-channels --no-default-packages --no-pin -c pytorch' --custom_requirements_txt_file_path ./req.txt --kernel_type spark --kernel_name spark_bds_1 --user bds

    This sample script execution with the given parameters creates a conda env conda_jupy_env_1 for the user bds, installs custom dependencies for conda_jupy_env_1, and creates a spark kernel with name spark_bds_1. After successful completion of this operation, spark_bds_1 kernel is displayed in JupyterHub UI of the bds user only.

Create a Load Balancer and Backend Set

For more information creating backend sets, see Creating a Load Balancer Backend Set.

Creating the Load Balancer

For more information on creating a public Load Balancer, see Creating a Load Balancer, and complete the following details.

  1. Open the navigation menu, click Networking, and then click Load balancers. Click Load balancer. The Load balancers page appears.
  2. Under List scope, select the Compartment where the cluster is located.
  3. In the Load balancer name field enter a name to identify the Load Balancer. For example, JupyterHub-LoadBalancer.
  4. In the Choose Visibility type section, select Public.
  5. In the Assign a public IP address section, select Reserved IP address.
  6. Select Create new reserved IP address.
  7. In the Public IP name field, enter a name. For example, jupyterhub-ip
  8. In the Create in compartment, select the compartment where the cluster is located.
  9. In the Choose networking section, complete the following:
    1. In the Virtual cloud network <Compartment> section, select the VCN used by the cluster.
    2. In the Subnet in <Compartment> field, select the subnet used by the cluster.
  10. Click Next. The Choose backends page appears.
  11. In the Specify a load balancing policy, select IP hash.
    Note

    Don't add Backends at this point.
  12. In the Specify health check policy section, complete the following:
    1. In the Port field, enter 8000.
    2. In the URL Path (URI), enter //hub/api.
  13. Select Use SSL.
  14. In the Certificate resource section, complete the following:
    1. Select Load balancer managed certificate from the dropdown.
    2. Select Paste SSL certificate.
    3. In the SSL certificate field, copy and paste a certificate directly into this field.
    4. Select Paste CA certificate.
    5. In the CA certificate field, enter the Oracle certificate by using /etc/security/serverKeys/bdsOracleCA.crt which is present in the cluster. For public certificate authorities(CAs), this certificate can be obtained directly from their site.
    6. (Optional) Select Specify private key.
      1. Select Paste private key.
      2. In the Private key field, paste a private key directly into this field.
  15. Click Show advanced options to access more options.
  16. Click the Backend set tab, and then enter the Backend set name. For example, JupyterHub-Backends.
  17. Click Session persistence, and then select Enable load balancer cookie persistence. Cookies are auto generated.
  18. Click Next. The Configure listener page appears. Complete the following:
    1. In the Listener name field, enter a name for the listener. For example: JupyterHub-Listener.
    2. Select HTTPS for the Specify the type of traffic your listener handles.
    3. In the Specify the port your listener monitors for ingress traffic field, enter 8000.
    4. Select Paste SSL certificate.
    5. In the SSL certificate field, copy and paste a certificate directly into this field.
    6. Select Load balancer managed certificate from the dropdown.
    7. Select Paste CA certificate.
    8. In the CA certificate field, enter CA certificate of the cluster.
    9. Select Specify private key.
      1. Select Paste private key.
      2. In the Private key field, paste a private key directly into this field.
  19. Click Next, and then click Submit.
Configure the Backend Set

For more information on creating a public Load Balancer, see Creating a Load Balancer, and complete the following details.

  1. Open the navigation menu, click Networking, and then click Load balancers. Click Load balancer. The Load balancers page appears.
  2. Select the Compartment from the list. All load balancers in that compartment are listed in tabular form.
  3. Click the load balancer to which you want to add a backend. The load balancer's details page appears.
  4. Select Backend sets, and then select the Backend set you created in Creating the Load Balancer.
  5. Select IP addresses, and then enter the required private IP address of the cluster.
  6. Enter 8000 for the Port.
  7. Click Add.
Configure the Backend Set

For more information on creating a public Load Balancer, see Creating a Load Balancer, and complete the following details.

  1. Open a browser and enter https://<loadbalancer ip>:8000.
  2. Select the Compartment from the list. All load balancers in that compartment are listed in tabular form.
  3. Be sure it redirects to one of the JupyterHub servers. To verify, open a terminal session on the JupyterHub to find which node has been reached.
Limitations
  • After add node operation, cluster admin must manually update Load Balancer host entry in the newly added nodes. Applicable to all the node additions to cluster. For example, worker node, compute only, and nodes.
  • Certificate must be manually updated to Load Balancer in case of expiry. This step ensures Load Balancer isn't using stale certificates and avoids health check/communication failures to backend sets. For more information, see Updating an Expiring Load Balancer Certificate to update expired certificate.

Launch Trino-SQL Kernels

JupyterHub PyTrino kernel provides an SQL interface that allows you to run Trino queries using JupySQL. This is available for Big Data Service 3.0.28 or later ODH 2.x clusters.

Launching PyTrino Kernel and Running Trino Queries
  1. Install Trino.
  2. Configure Trino Coordinator and port:
    1. Access Apache Ambari.
    2. From the side toolbar, under Services click JupyterHub.
    3. Click Configs, and then click Advanced.
    4. In the Advanced Jupyterhub-trino-kernel-configs section, configure the Trino Coordinator Hostname and the Trino Port.
  3. Click Save, and then restart JupyterHub.
  4. Access JupyterHub.
  5. Open a notebook server. You're redirected to the Launcher page.
  6. Click the PyTrino kernel.
  7. You can run Trino queries in PyTrino kernel in the following ways:
    • Run Trino sample queries using %sql <Trino-query>, and then click Run.

      Example:

      %sql select custkey, name, phone, acctbal from tpch.sf1.customer limit 10
    • You can write Python logic on top of the query result. For example:
      result = %sql select custkey, name, phone, acctbal from tpch.sf1.customer limit 10
      
       
      def classify_balance(acctbal):
          if acctbal < 1000:
              return 'Low'
          elif 1000 <= acctbal < 5000:
              return 'Medium'
          else:
              return 'High'
      df = result.DataFrame()
      df['balance_class'] = df['acctbal'].apply(classify_balance)
      print(df)
    • For multi-line queries, run %%sql. For example:
      # Using the %%sql magic command to execute a multi-line SQL query with the limit variable


      top_threshold = 3
       
      %%sql
      SELECT custkey, name, acctbal
      FROM tpch.sf1.customer
      WHERE acctbal > 1000
      ORDER BY acctbal DESC limit {{top_threshold}}
Setting Trino Session Parameters
Trino session parameters can be configured from the JupyterHub Ambari UI. These session parameters are applied to all user sessions.
For more information on session parameters, see Properties reference#.
  1. Access Apache Ambari.
  2. From the side toolbar, under Services click JupyterHub.
  3. Click Configs, and then click Advanced.
  4. In the Custom Jupyterhub-trino-kernel-configs section, add the following session parameters:
    trino_session_params_<SESSION_PARAM> = <VALUE>

    For example, trino_session_params_query_max_planning_time = 1200m.

  5. (Optional) To list of session parameters, run:
    %sql SHOW session
  6. To set parameters for the current notebook session, run: %sql SET SESSION For example:
    %sql SET SESSION query_max_run_time='2h'
Setting Trino Extra Credential Parameters
Trino extra credential parameters that are required to access Object Store data can be configured from the JupyterHub Ambari UI.
  1. Access Apache Ambari.
  2. From the side toolbar, under Services click JupyterHub.
  3. Click Configs, and then click Advanced.
  4. In the Custom Jupyterhub-trino-kernel-configs section, add the following extra credential parameters:
    trino_extra_credentials_<BDS_OSS_CLIENT_PARAM> = <VALUE>

    For example, trino_extra_credentials_BDS_OSS_CLIENT_REGION = us-region-1.

Setting SqlMagic Parameters
SqlMagic configurations provide you with flexible control over the behavior and appearance of SQL operations ran in Jupyter notebooks. These parameters can be configured from the JupyterHub Ambari UI and applied to all user sessions.

For more information on SqlMagic parameters, see https://jupysql.ploomber.io/en/latest/api/configuration.html#changing-configuration.

  1. Access Apache Ambari.
  2. From the side toolbar, under Services click JupyterHub.
  3. Click Configs, and then click Advanced.
  4. In the Custom Jupyterhub-sql-magic-configs section, add the following Magical parameters:
    SqlMagic.<PARAM> = <VALUE>
    Example:
    SqlMagic.displaycon = False
  5. To obtain the list of SqlMagic parameters, run:
    %config SqlMagic
  6. (Optional) You can set SqlMagic parameters for the current notebook session only.

    Example:

    %config SqlMagic.displaycon=False