Managing Compartments
This topic describes the basics of working with compartments.
Required IAM Policy
If you're in the Administrators group, then you have the required access for managing compartments.
For an additional policy related to compartment management, see Let a compartment admin manage the compartment.
If you're new to policies, see Getting Started with Policies and Common Policies. If you want to dig deeper into writing policies for compartments or other IAM components, see Details for IAM without Identity Domains.
Tagging Resources
Apply tags to resources to help organize them according to your business needs. You can apply tags when you create a resource, and you can update a resource later to add, revise, or remove tags. For general information about applying tags, see Resource Tags.
Working with Compartments
When you first start working with Oracle Cloud Infrastructure, you need to think carefully about how you want to use compartments to organize and isolate your cloud resources. Compartments are fundamental to that process. Most resources can be moved between compartments. However, it's important to think through your compartment design for your organization up front, before implementing anything. For more information, see Learn Best Practices for Setting Up Your Tenancy.
The Console is designed to display your resources by compartment within the current region. When you work with your resources in the Console, you must choose which compartment to work in from a list on the page. That list is filtered to show only the compartments in the tenancy that you have permission to access. If you're an administrator, you'll have permission to view all compartments and work with any compartment's resources, but if you're a user with limited access, you probably won't.
Compartments are tenancy-wide, across regions. When you create a compartment, it is available in every region that your tenancy is subscribed to. You can get a cross-region view of your resources in a specific compartment with the tenancy explorer. See Viewing All Resources in a Compartment.
For added security, you can associate a compartment with a security zone. For more information, see Security Zones.
This section contains the following topics:
- Limits on Compartments
- Creating Compartments
- Access Control for Compartments
- Putting Resources in a Compartment
- Moving Resources to a Different Compartment
- Viewing Resources in a Compartment
- Discovering Resources in Compartments
- Deleting Compartments
- Troubleshooting Tips When a Compartment Fails to Delete
- Recovering Compartments
- Adding Tag Defaults for a Compartment
Limits on Compartments
- Maximum compartments per tenancy: 6,000
- Maximum nested compartment hierarchy levels: 6
- Deleted compartment retention period: 90 days
Creating Compartments
When creating a compartment, you must provide a name for it (maximum 100 characters, including letters, numbers, periods, hyphens, and underscores) that is unique within its parent compartment. You must also provide a description, which is a non-unique, changeable description for the compartment, from 1 through 400 characters. Oracle will also assign the compartment a unique ID called an Oracle Cloud ID. For more information, see Resource Identifiers.
You can create subcompartments in compartments to create hierarchies that are six levels deep.
For information about the number of compartments you can have, see Limits by Service.
Access Control for Compartments
After creating a compartment, you need to write at least one policy for it, otherwise no one can access it (except administrators or users who have permissions set at the tenancy level). When creating a compartment inside another compartment, the compartment inherits access permissions from compartments higher up its hierarchy. For more information, see Policy Inheritance.
When you create an access policy, you need to specify which compartment to attach it to. This controls who can later modify or delete the policy. Depending on how you've designed your compartment hierarchy, you might attach it to the tenancy, a parent, or to the specific compartment itself. For more information, see Policy Attachment.
Putting Resources in a Compartment
To place a new resource in a compartment, you simply specify that compartment when creating the resource (the compartment is one of the required pieces of information to create a resource). If you're working in the Console, you just make sure you're first viewing the compartment where you want to create the resource. Keep in mind that most IAM resources reside in the tenancy (this includes users, groups, compartments, and any policies attached to the tenancy) and can't be created in or managed from a specific compartment.
Moving Resources to a Different Compartment
Most resources can be moved after they are created. There are a few resources that you can't move from one compartment to another. Also, you can't move certain resources from a security zone to a compartment that's not in the same security zone, because it might be less secure. For details about restrictions for resources in security zones, see Restrict Resource Movement.
Some resources have attached resource dependencies and some don't. Not all attached dependencies behave the same way when the parent resource moves.
For some resources, the attached dependencies move with the parent resource to the new compartment. The parent resource moves immediately, but in some cases attached dependencies move asynchronously and are not visible in the new compartment until the move is complete.
For other resources, the attached resource dependencies do not move to the new compartment. You can move these attached resources independently.
After you move the resource to the new compartment, the policies that govern the new compartment apply immediately and affect access to the resource. Depending on the structure of your compartment organization, metering, billing, and alarms can also be affected.
See the service documentation for individual resources to familiarize yourself with the behavior of each resource and its attachments.
Viewing Resources in a Compartment
It's not possible to get a list of all the resources in a compartment by using a single API call. Instead you can list all the resources of a given type in the compartment (e.g., all the instances, all the block storage volumes, etc.).
In the Console, the tenancy explorer allows you to get a list of resources in a compartment, across regions, with some limitations. For more information, see Viewing All Resources in a Compartment.
With Resource Manager you can capture deployed resources as Terraform configuration and state files using resource discovery. The created stack provides you with a Terraform configuration that you can use to programmatically manage, version, and persist your IT infrastructure as "infrastructure as code."
A stack created from a compartment represents all supported resources in the entire compartment, at the appropriate scope. If you select the root compartment for your tenancy, then the scope is the tenancy level, such as users and groups. If you select a non-root compartment, then the scope is compartment level, such as compute instances.
Stack creation is supported from a single compartment only. Stacks can't be created from nested compartments.
For instructions, see Creating a Stack from an Existing Compartment.
Deleting Compartments
To delete a compartment, it must be empty of all resources. Before you initiate deleting a compartment, be sure that all its resources have been moved, deleted, or terminated, including any policies attached to the compartment.
The delete action is asynchronous and initiates a work request. The state of the compartment changes to Deleting while the work request is executing. It typically takes several minutes for the work request to complete. While it is in the Deleting state it is not displayed on the compartment picker. If the work request fails, the compartment is not deleted and it returns to the Active state.
After a compartment is deleted, its state is updated to Deleted and a random string of characters is appended to its name, for example, CompartmentA might become CompartmentA.qR5hP2BD. Renaming the compartment allows you to reuse the original name for a different compartment. Oracle displays the deleted compartment on the Compartments page for 90 days.The deleted compartment is removed from the compartment picker. If any policy statements reference the deleted compartment, the name in the policy statement is updated to the new name.
If the compartment fails to delete, verify that you have removed all the resources:
-
For most resources, you can use the tenancy explorer to help you locate them. See Resources Supported by the Tenancy Explorer for the list of supported resources.
To view resources in a compartmentOpen the navigation menu and select Governance & Administration. Under Tenancy Management, select Tenancy Explorer.
The tenancy explorer opens with a view of the root compartment. Select the compartment you want to explore from the compartment picker on the left side of the Console. After you select a compartment, the resources that you have permission to view are displayed. The Name and Description of the compartment you are viewing are displayed at the top of the page.To also list all resources in the subcompartments of the selected compartment, select Show resources in subcompartments. When viewing resources in all subcompartments, it is helpful to use the Compartment column in the results list to see the compartment hierarchy where the resource resides. -
Verify that there are no policies in the compartment (polices are not included in Search results).
To find policies in a compartment- Open the navigation menu and select Identity & Security. Under Identity, select Policies.
- From the compartments list on the left, select the compartment you want to delete.
Policies attached to the compartment are displayed.
- If you can't locate any resources in the compartment, check with your Administrator; you might not have permission to view all resources.
There is a known issue causing deleted compartments to continue to count against your service limit of compartments. See Deleted compartments continue to count against service limits.
Recovering Compartments
To recover a compartment, you must first select it from the list on the Compartment page. You may have to use the state filter to see the deleted compartment. Remember that deleted compartments are renamed by appending a random string of characters to the original compartment name. For example, CompartmentA might become CompartmentA.qR5hP2BD. Oracle displays the deleted compartment on the Compartments page for 90 days.
When you recover a deleted compartment, the name is not changed. For example, if you recover a deleted compartment named CompartmentA.qR5hP2BD, the name remains the same. Because policy statements are updated to use the new names of deleted compartments, any policy statements that had referenced the deleted compartment now reference the recovered compartment.
Adding Tag Defaults for a Compartment
Tag defaults let you specify tags to be applied automatically to all resources, at the time of creation, in the current compartment. For more information, see Managing Tag Defaults.
Moving a Compartment to a Different Parent Compartment
You can move a compartment to a different parent compartment within the same tenancy. When you move a compartment, all its contents (subcompartments and resources) are moved with it. Moving a compartment has implications for the contents. These implications are described in the following sections. Ensure that you are aware of these before you move a compartment.
Required IAM Policy
To move a compartment, you must belong to a group that has manage all-resources permissions on the lowest shared parent compartment of the current compartment and the destination compartment.
Restrictions on Moving Compartments
- You can't move a compartment if the source or destination is part of a security zone. You must use the Security Zones console to manage compartments within a security zone.
-
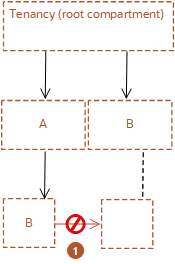
You can't move a compartment to a destination compartment with the same name as the compartment being moved.
For example, assume compartment A and compartment B are both under the root compartment. Under compartment A is a subcompartment, also called compartment B. You cannot move the compartment B to the parent compartment B.
- Two compartments within the same parent cannot have the same name. Therefore you can't move a compartment to a destination compartment where a compartment with the same name already exists.
Understanding the Policy Implications When You Move a Compartment
After you move a compartment to a new parent compartment, the access policies of the new parent take effect and the policies of the previous parent no longer apply. Before you move a compartment, ensure that:
- You are aware of the policies that govern access to the compartment in its current position.
- You are aware of the polices in the new parent compartment that will take effect when you move the compartment.
In some cases, when moving nested compartments with policies that specify the hierarchy, the polices are automatically updated to ensure consistency.
Policy Examples
Groups with Permissions in the Current Compartment Lose Access; Groups with Permissions in the Destination Compartment Gain Access
The following figure shows a compartment hierarchy in which compartment C, a child of A:B is moved to the hierarchy A:D.
The tenancy has the following policies defined for compartments B and D:
Policy1: Allow group G1 to manage instance-family in compartment A:B
Policy2: Allow group G2 to manage instance-family in compartment A:D
Impact when compartment C is moved from B to D:
Group G1 can no longer manage instance-families in compartment C.
Group G2 can now manage instance-families in compartment C.
Ensure that you are aware not only of what groups lose permissions when you move a compartment, but also what groups will gain permissions.
Automatic Update of Policies
When you move a compartment, some polices will be automatically updated. Policies that specify the compartment hierarchy down to the compartment being moved will automatically be updated when the policy is attached to a shared ancestor of the current and target parent. Consider the following examples:
Example 1: Policy automatically updated
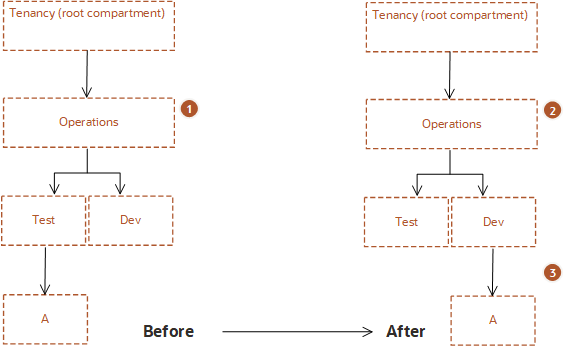
In this example, you move compartment A from Operations:Test to Operations:Dev. The policy that governs compartment A is attached to the shared parent, Operations. When the compartment is moved, the policy statement is automatically updated by the IAM service to specify the new compartment location.
The policy
Allow group G1 to manage buckets in compartment Test:A is updated to
Allow group G1 to manage buckets in compartment Dev:ANo manual intervention is required to allow group G1 to continue to access compartment A in its location.
Example 2: Policy not updated
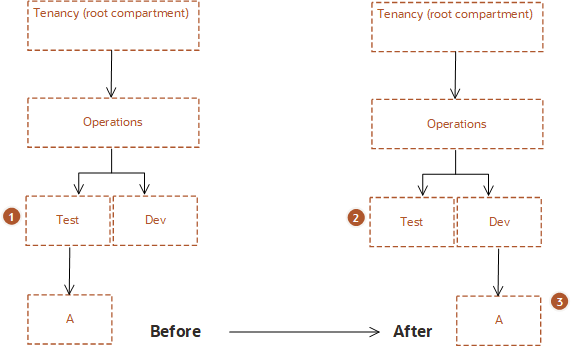
In this example, you move compartment A from Operations:Test to Operations:Dev. However, the policy that governs compartment A here is attached directly to the Test compartment. When the compartment is moved, the policy is not automatically updated. The policy that specifies compartment A is no longer valid and must be manually removed. Group G1 no longer has access to compartment A in its new location under Dev. Unless another existing policy grants access to group G1, you must create a new policy to allow G1 to continue to manage buckets in compartment A.
Example 3: Policy attached to the tenancy is updated
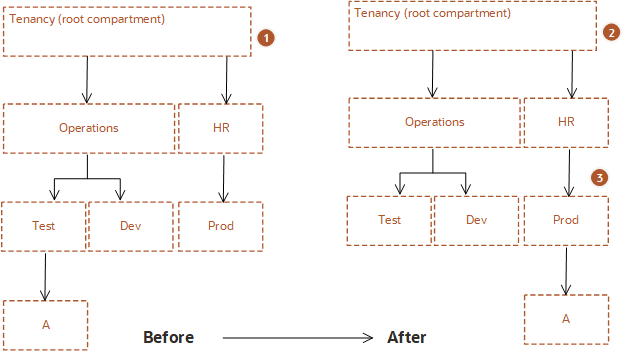
In this example, you move compartment A from Operations:Test to HR:Prod. The policy that governs compartment A is attached to the tenancy, which is a shared ancestor by the original parent compartment and the new parent compartment. Therefore, when the compartment is moved, the policy statement is automatically updated by the IAM service to specify the new compartment location.
The policy statement:
Allow group G1 to manage buckets in compartment Operations:Test:A is updated to
Allow group G1 to manage buckets in compartment HR:Prod:ANo manual intervention is required to allow group G1 to continue to access compartment A.
Understanding Compartment Quota Implications When You Move a Compartment
When you move one compartment to another, resource quotas in the destination compartment are not verified and are not enforced. Therefore, if the compartment move results in a quota violation in the destination compartment, the move is not blocked. After the move is complete, the destination compartment will be in an over-quota state. You will not be able to create new resources that are over-quota until you either adjust the quotas for the destination compartment or remove resources to comply with the existing quota. For more information on managing compartment quotas, see Overview of Compartment Quotas.
Understanding Tagging Implications When You Move a Compartment
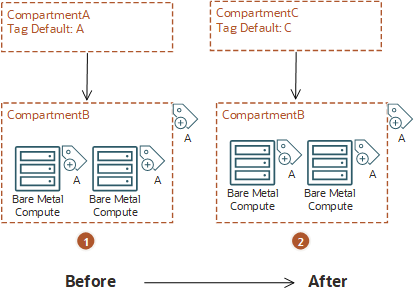
Tags are not automatically updated after a compartment move. If you have implemented a tagging strategy based on compartment, you must update the tags on the resources after the move. For example, assume CompartmentA has a child compartment, CompartmentB. CompartmentA is set up with tag defaults so that every resource in CompartmentA is tagged with TagA. Therefore CompartmentB and all its resources are tagged with default tag, TagA. When you move CompartmentB to CompartmentC, it will still have the default tags from CompartmentA. If you have set up default tags for CompartmentC, you'll need to add those to the resources in the moved compartment.
Using the Console
- Open the navigation menu and select Identity & Security. Under Identity, select Compartments. A list of the compartments you have access to is displayed.
-
Navigate to the compartment in which you want to create the new compartment:
- To create the compartment in the tenancy (root compartment) select Create Compartment.
- Otherwise, select through the hierarchy of compartments until you reach the detail page of the compartment in which you want to create the compartment. On the Compartment Details page, select Create Compartment.
- Enter the following:
- Name: A unique name for the compartment (maximum 100 characters, including letters, numbers, periods, hyphens, and underscores). The name must be unique across all the compartments in your tenancy. Avoid entering confidential information.
- Description: A friendly description. You can change this later if you want to.
- Compartment: The compartment you are in is displayed. To choose another compartment to create this compartment in, select it from the list.
- Tags: If you have permissions to create a resource, then you also have permissions to apply free-form tags to that resource. To apply a defined tag, you must have permissions to use the tag namespace. For more information about tagging, see Resource Tags. If you're not sure whether to apply tags, skip this option or ask an administrator. You can apply tags later.
- Select Create Compartment.
Next, you might want to write a policy for the compartment. See To create a policy.
-
Open the navigation menu and select Identity & Security. Under Identity, select Compartments.
A list of the compartments in your tenancy is displayed.
-
For the compartment you want to rename, select the , and then select Rename Compartment.
Tip
You can't change the name of your root compartment. - Enter the new Name. The name must be unique across all the compartments in your tenancy. The name can have a maximum of 100 characters, including letters, numbers, periods, hyphens, and underscores. Avoid entering confidential information.
- Select Rename Compartment.
-
Open the navigation menu and select Identity & Security. Under Identity, select Compartments.
A list of the compartments in your tenancy is displayed.
-
For the compartment you want to update, select the , and then select Edit Compartment Description.
- Enter the new description. Avoid entering confidential information.
- Select Save.
- Open the navigation menu and select the type of resource you want to view. For example, to view Compute resources: Open the navigation menu and select Compute. Under Compute, select Instances.
- Choose the compartment from the list on the left side of the page. The page updates to show only the resources in that compartment.
Remember that most IAM resources reside in the tenancy (this includes users, groups, and compartments). Policies can reside in either the tenancy (root compartment) or other compartments.
To move a compartment, you must belong to a group that has manage all-resources permissions on the lowest shared parent compartment of the current compartment and the destination compartment.
-
Open the navigation menu and select Identity & Security. Under Identity, select Compartments.
A list of the compartments in your tenancy is displayed. If the compartment you want to move is not directly beneath the root compartment, select through the hierarchy of compartments to view the wanted compartment.
-
For the compartment you want to move, select the , and then select Move Compartment.
- Select the destination compartment.
- Confirm that you are aware of the implications of the move.
- Select Move Compartment.
- Open the Console.
- Open the navigation menu and select the type of resource you want to work with. For example, to view Compute resources: Open the navigation menu and select Compute. Under Compute, select Instances.
- In the List Scope section, select a compartment. Resources in the selected compartment are displayed.
- Find the resource in the list, select the the , and follow the prompts to move the resource to a new compartment. See the resource documentation for specific steps.
The resource is moved immediately. If attached resource dependencies move with the parent resource, the resource dependencies are moved asynchronously, and do not appear in the new compartment until the move is complete.
You must remove all resources from a compartment before you can delete it.
- Open the navigation menu and select Identity & Security. Under Identity, select Compartments. A list of the compartments in your tenancy is displayed.
- For the compartment you want to delete, select the , and then select Delete Compartment.
- At the prompt, select OK.
After you select OK, a work request is submitted to delete the compartment. The compartment state changes to Deleting. If the work request fails, the state returns to Active.
- Open the navigation menu and select Identity & Security. Under Identity, select Compartments. A list of the compartments in your tenancy is displayed.
- In State, select Deleted.
- For the compartment you want to recover, select the , and then select Recover.
- At the prompt, select OK.
Using the API
For information about using the API and signing requests, see REST API documentation and Security Credentials. For information about SDKs, see SDKs and the CLI.
Use these API operations to manage compartments:
- CreateCompartment
- ListCompartments
- GetCompartment: Returns the metadata for the compartment, not its contents.
- UpdateCompartment
- DeleteCompartment
- MoveCompartment
- GetWorkRequest: Gets the work requests spawned by the DeleteCompartment operation.
- RecoverCompartment
You can retrieve the contents of a compartment only by resource type. There's no API call that lists all resources in the compartment. For example, to list all the instances in a compartment, call the Core Services API ListInstances operation and specify the compartment ID as a query parameter.

