Create Entities
Here's how you create an entity.
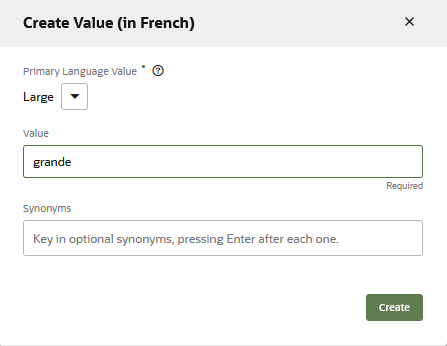
Value List Entities for Multiple Languages
Tip:
To ensure that your skill consistently outputs responses in the detected language, always includeuseFullEntityMatches: true in Common Response, Resolve
Entities, and Match Entity states. As described in Add Natively-Supported Languages to a Skill, setting this
property to true (the default) returns the entity value as an
object whose properties differentiate the primary language from the detected
language. When referenced in Apache FreeMarker expressions, these properties ensure
that the appropriate language displays in the skill's message text and
labels.
Word Stemming Support in Fuzzy Match
Starting with Release 22.10, fuzzy matching for list value entities is based on word stemming, where a value match is based on the lexical root of the word. In previous versions, fuzzy matching was enabled through partial matching and auto correct. While this approach was tolerant of typos in the user input, including transposed words, it could also result in matches to more than one value within the value list entity. With stemming, this scatter is eliminated: matches are based on the word order of the user input, so either a single match is made, or none at all. For example, "Lovers Veggie" would not result in any matches, but "Veggie Lover" would match to the Veggie Lovers value of a pizza type entity. (Note that "Lover" is stemmed.) Stop words, such as articles and prepositions, are ignored in extracted values, as are special characters. For example, both "Veggie the Lover" and "Veggie////Lover" would match the Veggie Lovers value.
Create ML Entities
ML Entities are a model-driven approach to entity extraction. Like intents, you create ML Entities from training utterances – likely the same training utterances that you used to build your intents. For ML Entities, however, you annotate the words in the training utterances that correspond to an entity.
To get started, you can annotate some of the training data yourself, but as is the case for intents, you can develop a more varied (and therefore robust) training set by crowd sourcing it. As noted in the training guidelines, robust entity detection requires anywhere from 600 - 5000 occurrences of each ML entity throughout the training set. Also, if the intent training data is already expansive, then you may want to crowd source it rather than annotate each utterance yourself. In either case, you should analyze your training data to find out if the entities are evenly represented and if the entity values are sufficiently varied. With the annotations complete, you then train the model, then test it. After reviewing the entities detected in the test runs, you can continue to update the corpus and retrain to improve the accuracy.
- Click + Add Entity.
- Complete the Create Entity dialog. Keep in mind that the Name and
Description appear in the crowd worker pages for Entity Annotation Jobs.
- Enter a name that identifies the annotated content. A unique name helps crowd workers.
- Enter a description. Although this is an optional property, crowd workers use it, along with the Name property, to differentiate entities.
- Choose ML Entity from the list.
- Switch on Exclude System Entity Matches when the training annotations contain names, locations, numbers, or other content that could potentially clash with system entity values. Setting this option prevents the model from extracting system entity values that are within the input that's resolved to this ML entity. It enforces a boundary around this input so that the model recognizes it only as an ML entity value and does not parse it further for system entity values. You can set this option for composite bag entities that reference ML entities.
- Click Create.
- Click +Value List Entities to associate this entity with up to five Value List Entities. This is optional, but associating an ML Entity with a Value List Entity combines the contextual extraction of the ML Entity and the context-agnostic extraction of the Value List Entity.
- Click the DataSet tab. This page lists all
the utterances for each ML Entity in your skill, which include the utterances that you've
added yourself to bootstrap the entity, those submitted from crowd sourcing jobs, or have
been imported as JSON objects. From this page, you can add utterances manually or in bulk
by uploading a JSON file. You can also manage the utterances from this page by editing
them (including annotating or re-annotating them), or by deleting, importing, and
exporting them.
- Add utterances manually:
- Click Add Utterance. After you've added the
utterance, click Edit Annotations to open the Entity List.
Note
You can only add one utterance at a time. If you want to add utterances in bulk, you can either add them through an Entity Annotation job, or you can upload a JSON file. - Highlight the text relevant to the ML Entity, then complete the
labeling by selecting the ML Entity from the Entity List. You can remove an
annotation by clicking x in the label.

- Click Add Utterance. After you've added the
utterance, click Edit Annotations to open the Entity List.
- Add utterances from a JSON file. This JSON file contains a list of
utterance
objects.
You can upload it by clicking More > Import to retrieve it from your local system.[ { "Utterance": { "utterance": "I expensed $35.64 for group lunch at Joe's on 4/7/21", "languageTag": "en", "entities": [ { "entityValue": "Joe's" "entityName": "VendorName", "beginOffset": 37, "endOffset": 42 } ] } }, { "Utterance": { "utterance": "Give me my $30 for Coffee Klatch on 7/20", "languageTag": "en", "entities": [ { "entityName": "VendorName", "beginOffset": 19, "endOffset": 32 } ] } } ]Theentitiesobject describes the ML entities that have been identified within the utterance. Although the preceding example illustrates a singleentitiesobject for each utterance, an utterance may contain multiple ML entities which means multipleentitiesobjects:[ { "Utterance": { "utterance": "I want this and that", "languageTag": "en", "entities": [ { "entityName": "ML_This", "beginOffset": 7, "endOffset": 11 }, { "entityName": "ML_That", "beginOffset": 16, "endOffset": 20 } ] } }, { "Utterance": { "utterance": "I want less of this and none of that", "languageTag": "en", "entities": [ { "entityName": "ML_This", "beginOffset": 15, "endOffset": 19 }, { "entityName": "ML_That", "beginOffset": 32, "endOffset": 36 } ] } } ]entityNameidentifies the ML Entity itself andentityValueidentifies the text labeled for the entity.entityValueis an optional key that you can use to validate the labeled text against changes made to the utterance. The label itself is identified by thebeginOffsetandendOffsetproperties, which represent the offset for the characters that begin and end the label. This offset is determined by character, not by word, and is calculated from the first character of the utterance (0-1).Note
You can't create the ML Entities from this JSON. They must exist before you upload the file.If you don't want to determine the offsets, you can leave theThe system checks for duplicates to prevent redundant entries. Only changes made to theentitiesobject undefined and then apply the labels after you upload the JSON file.[ { "Utterance": { "utterance": "I expensed $35.64 for group lunch at Joe's on 4/7/21", "languageTag": "en", "entities": [] } }, { "Utterance": { "utterance": "Give me my $30 for Coffee Klatch on 7/20", "languageTag": "en", "entities": [] } } ]entitiesdefinition in the JSON file are applied. If an utterance has been changed in the JSON file, then it's considered a new utterance. - Edit an annotated utterance:
- Click Edit
 to remove the annotation.
Note
A modified utterance is considered a new (unannotated) utterance. - Click Edit Annotations to open the Entity List.
- Highlight the text, then select an ML Entity from the Entity List.
- If you need to remove an annotation, click x in the label.
- Click Edit
- Add utterances manually:
- When you've completed annotating the utterances. Click Train to update both trainer Tm and the Entity model.
- Test the recognition by entering a test phrase in the Utterance Tester, ideally one with a value not found in any training data. Check the results to find out if the model detected the correct ML Entity and if the text has been labeled correctly and completely.
- Associate the ML Entity with an intent.
Exclude System Entity Matches
Switching on Exclude System Entity Matches prevents the model from replacing previously extracted system entity values with competing values found within the boundaries of an ML entity. With this option enabled, "Create a meeting on Monday to discuss the Tuesday deliverable" keeps the DATE_TIME and ML entity values separate by resolving the applicable DATE_TIME entity (Monday) and ignoring "Tuesday" in the text that's recognized as the ML entity ("discuss the Tuesday deliverable").
You can set the Exclude System Entity Matches option for composite bag entities that reference an ML entity.
Import Value List Entities from a CSV File
Rather than creating your entities one at a time, you can create entire sets of them when you import a CSV file containing the entity definitions.
This CSV file contains columns for the entity name,
(entity), the entity value (value) and any synonyms
(synonyms). You can create this file from scratch, or you can reuse
or repurpose a CSV that has been created from an export.
entity, value, and
synonyms. For
example:entity,value,synonyms
PizzaSize,Large,lrg:lrge:big
PizzaSize,Medium,med
PizzaSize,Small,little
value and synonyms
column headers. For example, if the skill's primary native language is English
(en), then the value and synonyms
columns are en:value and
en:synonyms:entity,en:value,en:synonyms
PizzaSize,Large,lrg:lrge:big
PizzaSize,Medium,med
PizzaSize,Small,
PizzaSize,Extra Large,XL
value and synonyms columns for each secondary
language. If a native English language skill's secondary language is French
(fr), then the CSV has fr:value and
fr:synonyms columns as counterparts to the en
columns:entity,en:value,en:synonyms,fr:value,fr:synonyms
PizzaSize,Large,lrg:lrge:big,grande,grde:g
PizzaSize,Medium,med,moyenne,moy
PizzaSize,Small,,petite,p
PizzaSize,Extra Large,XL,pizza extra large,
- If you import a pre-20.12 CSV into a 20.12 skill (including those that support native languages or use translation services), the values and synonyms are imported as primary languages.
- All entity values for both the primary and secondary languages must
be unique within an entity, so you can't import a CSV if the same value has been
defined more than once for a single entity. Duplicate values may occur in
pre-20.12 versions, where values can be considered unique because of variations
in letter casing. This is not true for 20.12, where casing is more strictly
enforced. For example, you can't import a CSV if it has both
PizzaSize, SmallandPizzaSize, SMALL. If you plan to upgrade Version 20.12, you must first resolve all entity values that are the same, but differentiated only by letter casing before performing the upgrade. - Primary language support applies to skills created using Version 20.12 and higher, so you must first remove language tags and any secondary language entries before you can import a Version 20.12 CSV into a skill created with a prior version.
- You can import a multi-lingual CSV into skills that do not use native language support, including those that use translation services.
- If you import a multi-lingual CSV into a skill that supports native languages or uses translation services, then only rows that provide a valid value for the primary language are imported. The rest are ignored.
-
Click Entities (
 ) in the side navbar.
-
Click More, choose Import Value list entities, and then select the
.csvfile from your local system.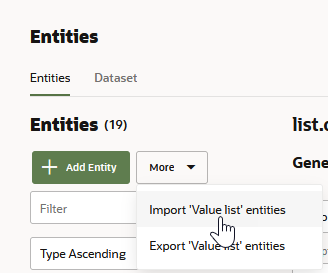
Description of the illustration import-entities.png -
Add the entity or entities to an intent (or to an entity list and then to an intent).
Export Value List Entities to a CSV File
entity, value, and
synonyms columns. The these CVS have release-specific requirements
which can impact their reuse.
- The CSVs exported from skills created with, or upgraded to, Version
20.12 are equipped for native language support though the primary (and sometimes
secondary) language tags that are appended to the
valueandsynonymscolumns. For example, the CSV in the following snippet has a set ofvalueandsynonymscolumns for the skill's primary language, English (en) and another set for its secondary language, French (fr):
The primary language tags are included in all 20.12 CSVs regardless of native language support. They are present in skills that are not intended to perform any type of translation (native or through a translation service) and in skills that use translation services.entity,en:value,en:synonyms,fr:value,fr:synonyms - The CSVs exported from skills running on versions prior to 20.12 have the entity, value, and synonyms columns, but no language tags.
-
Click Entities (
 ) in the side navbar.
-
Click More, choose Export Value list entities and then save the file.
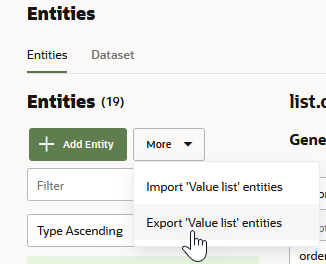
Description of the illustration export-entities.pngThe exported
.csvfile is named for your skill. If you're going to use this file as an import, then you may need to perform some of the edits described in Import Intents from a CSV File if you're going to import it to, or export it from, Version 20.12 skills and prior versions.
Create Dynamic Entities
Dynamic entity values are managed through the endpoints of the Dynamic
Entities API that are described in the REST API for Oracle Digital Assistant. To add,
modify, and delete the entity values and synonyms, you must first create a dynamic
entity to generate the entityId that's used in the REST
calls.
- Click + Entity.
- Choose Dynamic Entities from the Type list.
- If the backend service is unavailable or hasn't yet pushed any values, or if you do not maintain the service, click + Value to add mock values that you can use for testing purposes. Typically, you would add these static values before the dynamic entity infrastructure is in place. These values are lost when you clone, version, or export a skill. After you provision the entity values through the API, you can overwrite, or retain, these values (though in most cases you would overwrite them).
- Click Create.
Tip:
If the API refreshes the entity values as you're testing the conversation, click Reset to restart the conversation.- You can query for the dynamic entities configured for a skill using
the generated
entityIdwith thebotId. You include these values in the calls to create the push requests and objects that update the entity values. - An entity cannot have more than 150,000 values. To reduce the likelihood of exceeding this limit when you're dealing with large amounts of data, send
PATCHrequests with your deletions before you sendPATCHrequests with your additions.
Dynamic entities are only supported on instances of Oracle Digital Assistant that were provisioned on Oracle Cloud Infrastructure (sometimes referred to as the Generation 2 cloud infrastructure). If your instance is provisioned on the Oracle Cloud Platform (as are all version 19.4.1 instances), then you can't use feature.
Guidelines for Creating ML Entities
- Create concise ML Entities. The ML Entity definition is at the base
of a useful training set, so clarity is key in terms of its name and the
description which help crowd workers annotate utterances.
Because crowd workers rely on the ML Entity descriptions and names, you must ensure that your ML Entities are easily distinguishable from each other, especially when there's potential overlap. If the differences are not clear to you, it's likely that crowd workers will be confused. For example, the Merchant and Account Type entities may be difficult to differentiate in some cases. In "Transfer $100 from my savings account to Pacific Gas and Electric," you can clearly label "savings" as Account Type and Pacific Gas and Electric as Merchant. However, the boundary between the two can be blurred in sentences like "Need to send money to John, transfer $100 from my savings to his checking account." Is "checking account" an Account type, or a Merchant name? In this case, you may decide that any recipient should always be a merchant name rather than an account type.
- In preparation of crowd sourcing the training utterances, consider the typical
user input for different entity extraction contexts. For example, can the value
be extracted in the user's initial message (initial utterance context), or is it
extracted from responses to the skill's prompts (slot utterance context)?
Context Description Example Utterances (detected ML Entity values in bold) Initial utterance context A message that's usually well-structured and includes ML Entity values. For an expense reporting skill, for example, the utterance would include a value that the model can detect for an ML Entity called Merchant. Create an expense for team dinner at John's Pasta Shop for $85 on May 3 Slot utterance context A user message that provides the ML Entity in response to a prompt, either because of conversation design (the skill prompts with "Who is the merchant?") or to slot a value because it hasn't been provided by a previously submitted response. In other circumstances, the ML Entity value may have already been provided, but may be included in other user messages in the same conversation. For example, the skill might prompt users to provide additional expense details or describe the image of an uploaded receipt.
- Merchant is John's Pasta Shop.
- Team dinner. Amount $85. John's Pasta Shop.
- Description is TurboTaxi from home to CMH airport.
- Grandiose Shack Hotel receipt for cloud symposium
- Gather your training and testing data.
- If you already have a sufficient collection of utterances, you may want to assess them for entity distribution and entity value diversity before you launch an Entity Annotation job.
- If you don't have enough training data, or if you're starting from scratch, launch an Intent Paraphrasing Job. To gather viable (and abundant) utterances for training and testing, integrate the entity context into the job by creating tasks for each intent. To gather diverse phrases, consider breaking down each intent by conversation context.
- For the task's prompt, provide crowd workers context and
ask them, "How would you respond?" or "What would you say?" Use the
accompanying hints to provide examples and to illustrate different
contexts. For example:
This task asks for phrases that not only initiate the conversation, but also include a merchant name. You might also want utterances that reflect responses prompted by the skill when the user doesn't provide a value. For example, "Merchant is John's Pasta Shop" in response to the skill's "Who is the merchant?" prompt.
Prompt Hint You're talking to an expense reporting bot, and you want to create an expense. What would be the first thing you would say? Ensure that the merchant name is in the utterance. You might say something like, "Create an expense for team dinner at John's Pasta Shop for $85 on May 3." To test false positives for testing – words and phrases that the model should not identify as ML Entities – you may also want to collect "negative examples". These utterances do include an ML Entity value.Prompt Hint You've submitted an expense to the an expense reporting bot, but didn't provide a merchant name. How would you respond? Identify the merchant. For example, "Merchant is John's Pasta Shop." You've uploaded an image of a receipt to an expense reporting bot. It's now asking you to describe the receipt. How would you respond? Identify the merchant's name on the receipt. For example: "Grandiose Shack Hotel receipt for cloud symposium." Context Example Utterances Initial utterance context Pay me back for Tuesday's dinner Slot utterance context - Pos presentation dinner. Amount $50. 4 people.
- Description xerox lunch for 5
- Hotel receipt for interview stay
- Gather a large training set by setting an appropriate number of paraphrases per intent. For the model to generalize successfully, your data set must contain somewhere between 500 and 5000 occurrences for each ML entity. Ideally, you should avoid the low end of this range.
- Once the crowd workers have completed the job (or have completed enough utterances that you can cancel the job), you can either add the utterances, or launch an Intent Validation job to verify them. You can also download the results to your local system for additional review.
- Reserve about 20% of the utterances for testing. To create CSVs for the Utterance Tester from the downloaded CSVs for Intent
Paraphrasing and Intent Validation jobs:
- For Intent Paraphrasing jobs: transfer the contents in the
resultcolumn (the utterances provided by crowd workers) to theutterancecolumn in the Utterance Tester CSV. Transfer the contents of theintentNamecolumn to theexpectedIntentcolumn in the Utterance Tester CSV. - For Intent Validation jobs: transfer the contents in the
promptcolumn (the utterances provided by crowd workers) to theutterancecolumn in the Utterance Tester CSV. Transfer the contents of theintentNamecolumn to theexpectedIntentcolumn in the Utterance Tester CSV.
- For Intent Paraphrasing jobs: transfer the contents in the
- Add the remaining utterances to a CSV file with a single column,
utterance. Create an Entity Annotation Job by uploading this CSV. Because workers are labeling the entity values, they will likely classify negative utterances as "I'm not sure" or "None of the entities apply." - After the Entity Annotation job is complete, you can add the
results, or you can launch an Entity Validation job to verify the labeling. Only
the utterances that workers deem correct in an Entity Validation job can be
added to the corpus.
Tip:
You can add, remove, or adjust the annotation labels in the Dataset tab of the Entities page. - Train the entity by selecting Entity.
- Run test cases to evaluate entity recognition using the
utterances that you reserved from the Intent Paraphrasing job. You can divide up
these utterances into different test suites to test different behaviors (unknown values, punctuation
that may not be present in the training data, false positives, and so on).
Because there may be a large number of these utterances, you can create test
suites by uploading a CSV into the Utterance Tester.Note
The Utterance Tester only displays entity labels for passing test cases. Use a Quick Test instead to view the labels for utterances that resolve below the confidence threshold. - Use the results to refine the data set. Iteratively add, remove, or
edit the training utterances until test run results indicate the model is
effectively identifying ML Entities.
Note
To prevent inadvertant entity matches that degrade the user experience, switch on Exclude System Entity Matches if the training data contains names, locations, numbers.
ML Entity Training Guidelines
The model generalizes an entity using both the context around a word (or words) and the lexical information about the word itself. For the model to generalize effectively, we recommend that the number of annotations per entity to range somewhere between 500 and 5000. You may already have a training set that’s both large enough and has the variation of entity values that you’d expect from end users. If this is the case, you can launch an Entity Annotation job and then incorporate the results into the training data. However, if you don’t have enough training data, or if the data that you do have lacks sufficient coverage for all the ML entities, then you can collect utterances from crowd-sourced Intent Paraphrasing jobs.
- Do not overuse the same entity values in your trainining data. Repetitive entity values in your training data prevent the model from generalizing on unknown values. For example, you expect the ML Entity to recognize a variety of values, but the entity is represented by only 10-20 different values in your training set. In this case, the model will not generalize, even if there are two or three thousand annotations.
- Vary the number of words for each entity value. If you expect users to input entity values that are three-to-five words long, but your training data is annotated with one- or two-word entity values, then the model may fail to identify the entity as the number of words increase. In some cases, it may only partially identify the entity. The model assumes the entity boundary from the utterances that you've provided. If you've trained the model on values with one or two words, then it assumes the entity boundary is only one or two words long. Adding entities with more words enables the model to recognize longer entity boundaries.
- Utterance length should reflect your use case and the anticipated user input. You can train the model to detect entities for messages of varying lengths by collecting both short and long utterances. The utterances can even have multiple phrases. If you expect short utterances that reflect the slot-filling context, then gather your sample data accordingly. Likewise, if you're anticipating utterances for the initial context scenario, then the training set should contain complete phrases.
- Include punctuation. If entity names require special characters, such as '-' and '/', include them in the entity values in the training data.
- Ensure that all ML Entities are equally represented in your training data. An unbalanced training set has too many instances of one entity and too few of another. The models produced from unbalanced training sets sometimes fail to detect the entity with too few instances and over-predict for the entities with disproportionately high instances. This leads to false-positives.
ML Entity Testing Guidelines
- Use only slot context utterances to find out how well the model predicts entities with less context.
- Use utterances with "unknown" values to find out how well the model generalizes with values that are not present in the training data.
- Use utterances without ML Entities to find out if the model detects any false positives.
- Use utterances that contain ML Entity values with punctuation to find out how well the model performs with unusual entity values.

