Task 5: Set Up Role Based Access Control
Use role based access control (RBAC) to control user access to Oracle Database@Google Cloud resources.
Use Google Cloud RBAC for both Oracle Autonomous Database and Oracle Exadata Database Service to control user access.
Note the following:
- Pay as You Go customers only need to complete the instructions for Autonomous Database.
- Private offer customers who want to provision both Oracle Autonomous Database and Exadata Database Service need to complete both sets of instructions in this topic. Otherwise, complete the set of instructions that matches the database service you plan to use.
The following table provides details for the Google Cloud groups and roles for Autonomous Database. The Google Cloud Group email values provided in the table are suggested values, but you can use other group email names as needed. Note that you must replace the <email_domain> string with your organization's email domain. For example: odbg-adbs-db-administrators@example.com
| Google Cloud Group name | Google Cloud Group email | Google Cloud Role assignment | Purpose |
|---|---|---|---|
| odbg-adbs-db-administrators | odbg-adbs-db-administrators@<email_domain> |
Oracle Database@Google Cloud Autonomous Database Admin |
This group is for administrators who need to manage all Oracle Autonomous Database resources in Google Cloud . |
| odbg-adbs-db-readers | odbg-adbs-db-readers@<email_domain> | Oracle Database@Google Cloud Autonomous Database Viewer | This group is for viewers who need to view all Oracle Autonomous Database resources in Google Cloud. |
| odbg-db-family-administrators | odbg-db-family-administrators@<email_domain> | Oracle Database@Google Cloud admin |
This group is for administrators who need to manage all Oracle Database Service resources in OCI. This group is replicated in OCI during the optional identity federation process. |
| odbaa-db-family-readers | odbaa-db-family-readers@<email_domain> | Oracle Database@Google Cloud viewer |
This group is for readers who need to view all Oracle Database resources in OCI. This group is replicated in OCI during the optional identity federation process. |
| odbg-network-administrators | odbg-network-administrators@<email_domain> | not applicable |
This group is for administrators who need to manage all network resources in OCI. This group is replicated in OCI during the optional identity federation process. |
| odbg-costmgmt-administrators | odbg-costmgmt-administrators@<email_domain> | not applicable |
This group is for administrators who need to manage cost and billing resources in OCI. This group is replicated in OCI during the optional identity federation process. |
To configure role based access control for Oracle Autonomous Database in the Google Cloud console
-
Sign in to the Google Cloud Admin console using the URL https://admin.google.com/ac/groups. The Groups list view page is displayed.
-
On the Groups list view page, click Create group.
-
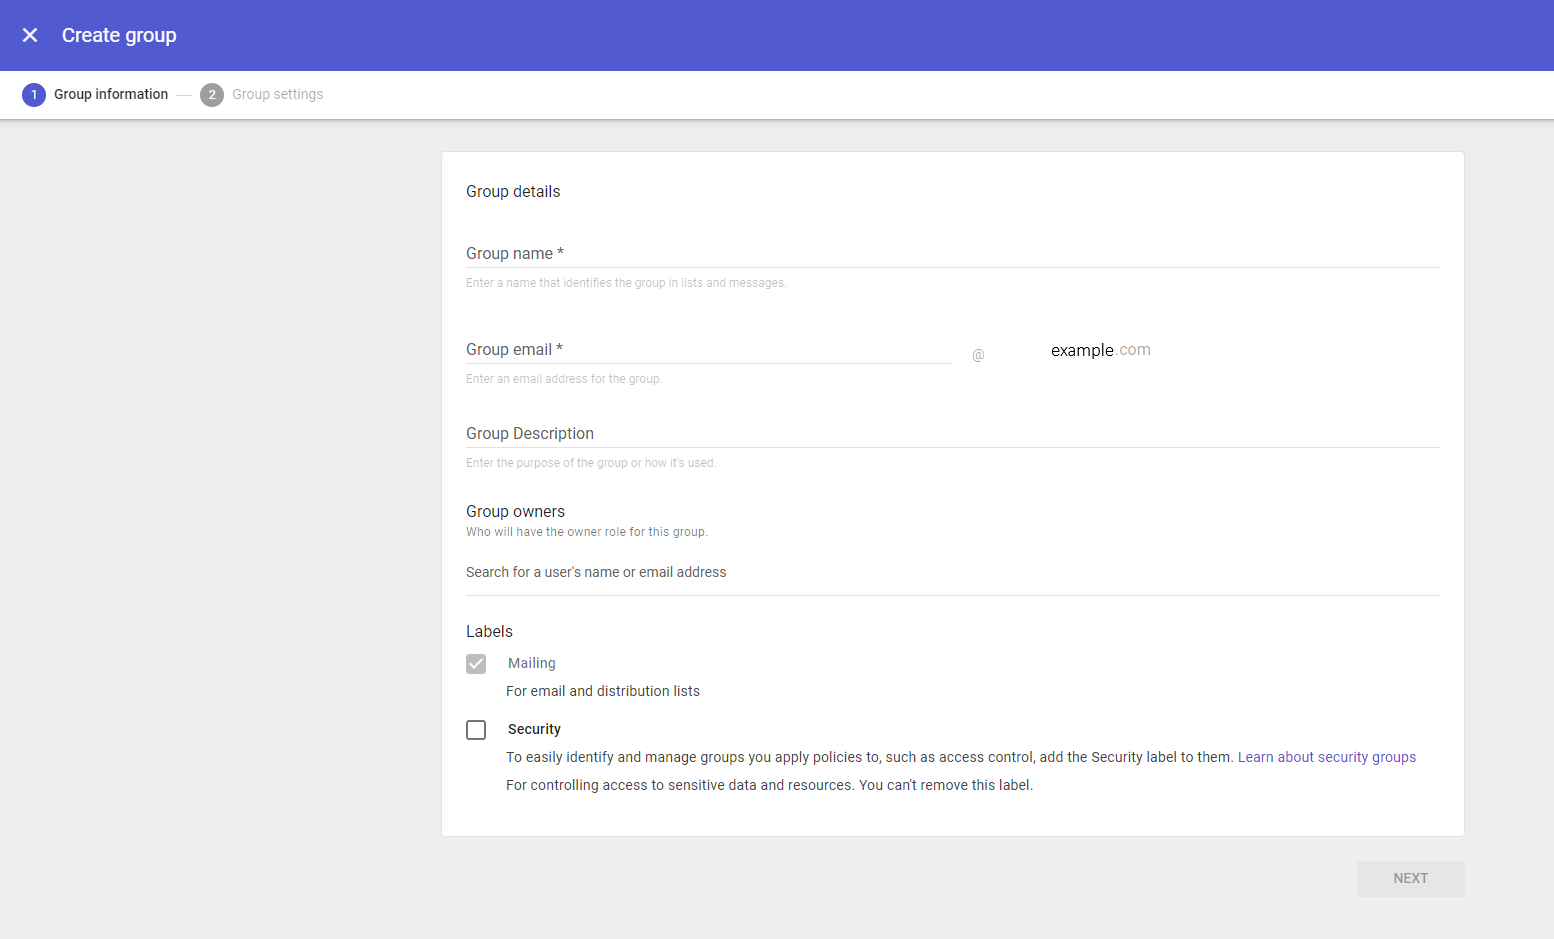
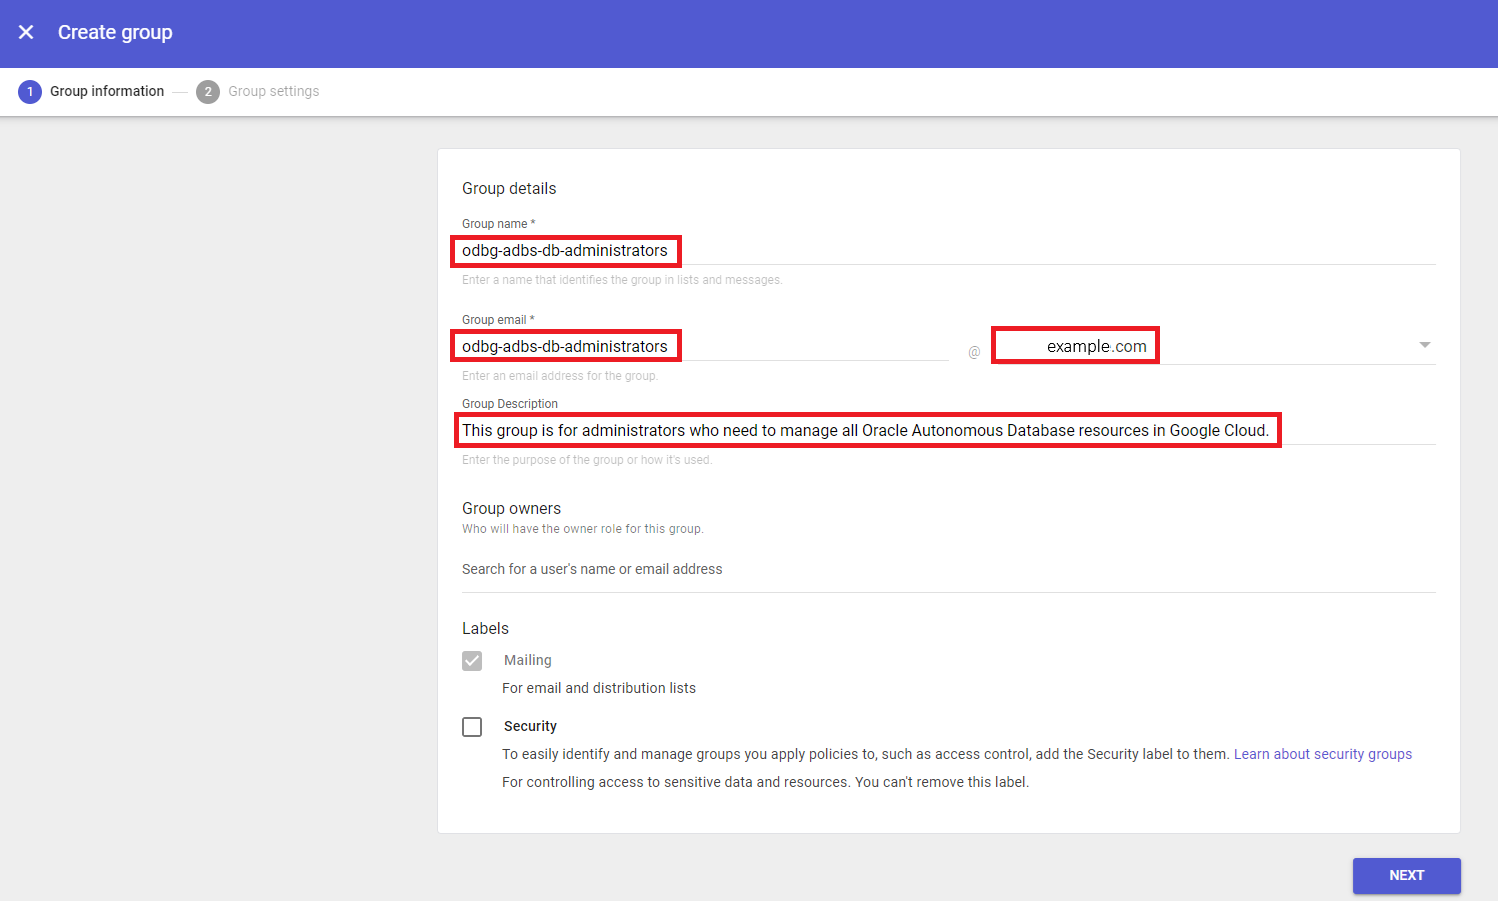
In Group information tab, enter the following details for the group your are creating. For each row in the table in this topic, you will need to create a group using the steps in this task. Follow the steps in the task for a single group to create that group, then repeat the steps for the additional groups listed in the table.
- Group name: Use the "Google Cloud Group name" values from the table in this topic. For example:
odbg-adbs-db-administrators. - Group email: You can use the "Google Cloud Group email" values in the table in this topic, or create your own values, as needed. For example:
odbg-adbs-db-administrators@example.com - Group Description: You can use the descriptions found in the "Purpose" column in the table in this topic. For example: "This group is for administrators who need to manage all Oracle Autonomous Database resources in Google Cloud."
Before entering information:
After entering information:
After entering these values, click NEXT.
- Group name: Use the "Google Cloud Group name" values from the table in this topic. For example:
-
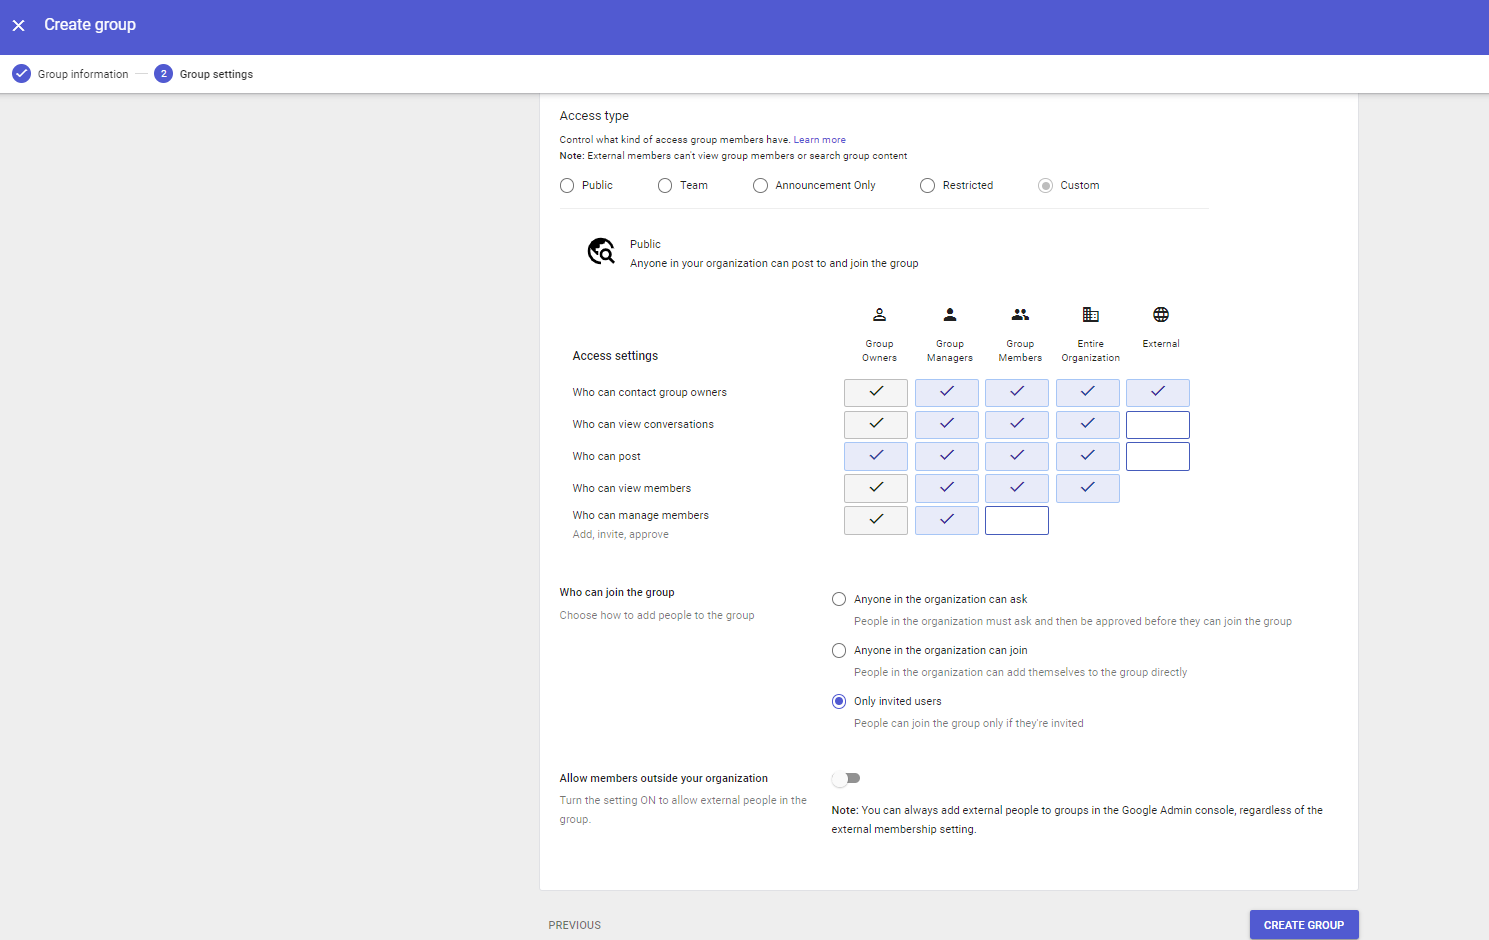
In the Group settings tab, update the access settings based on your company's security best practices, then click CREATE GROUP.
-
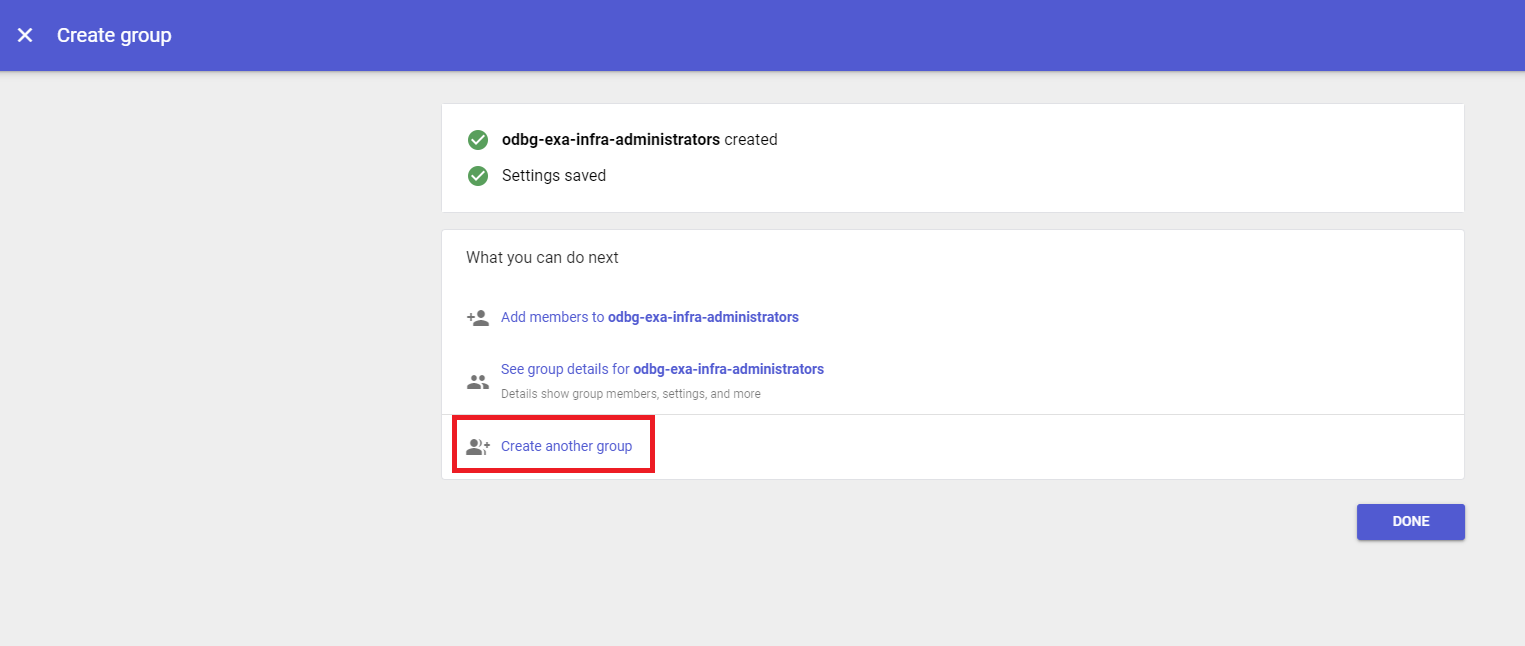
Click Create another group to begin creating the next group in the table of groups in this topic.
- After repeating steps 3 to 5 to create the rest of the required groups, click DONE.
-
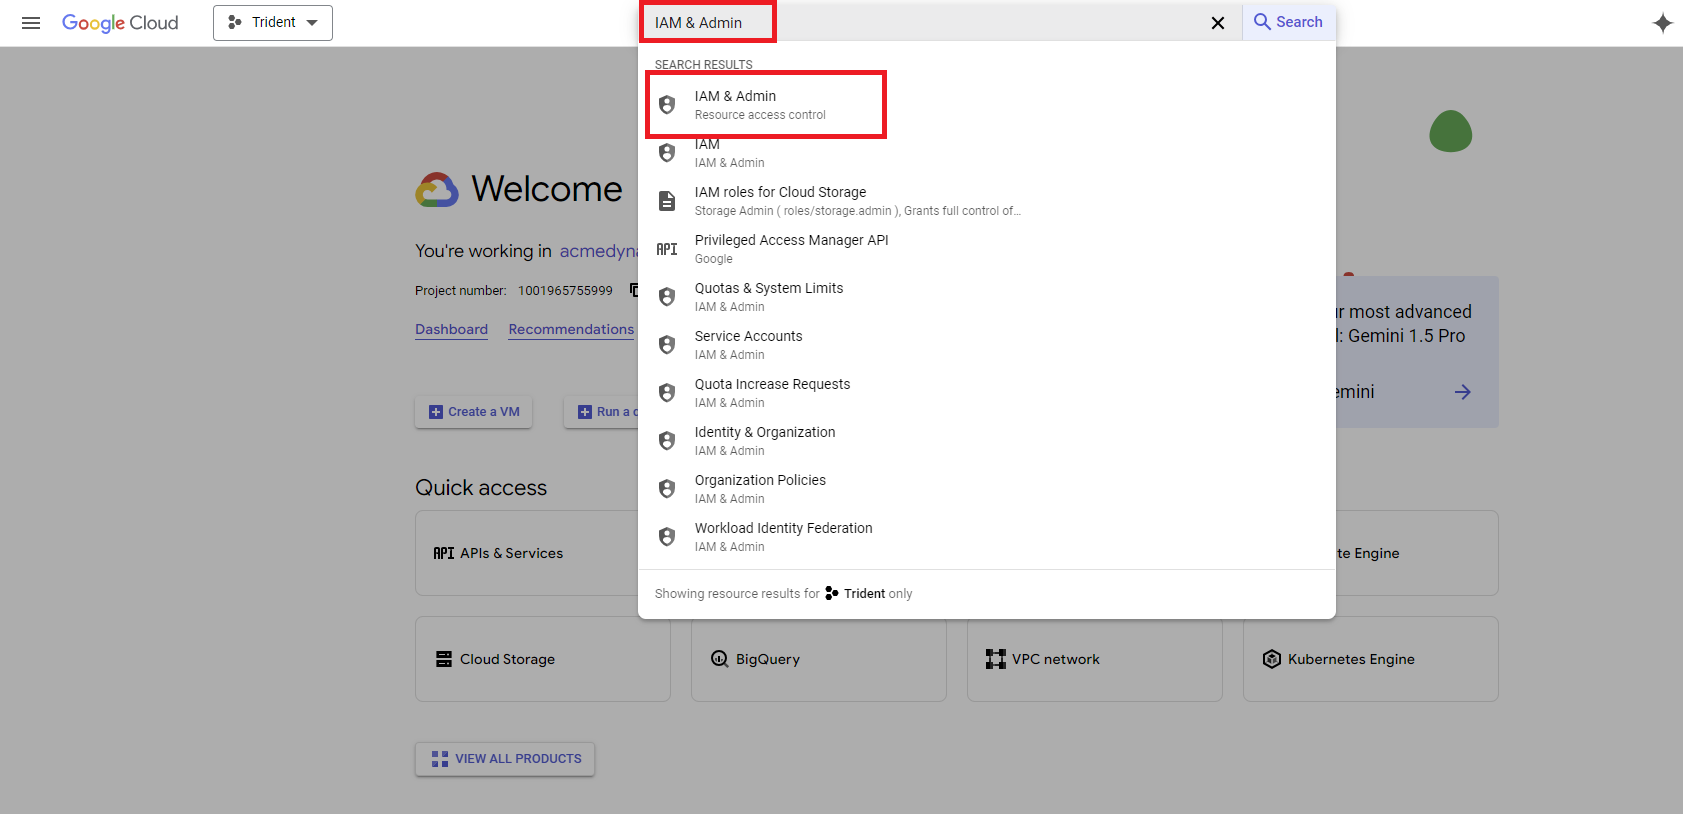
Assign roles to the Google Cloud groups you have just created in IAM & Admin. Search "IAM & Admin" in the Google Cloud console and click on the search result to navigate to this service in the console.
-
In the IAM & Admin navigation menu, click IAM, and then select Grant access.
-
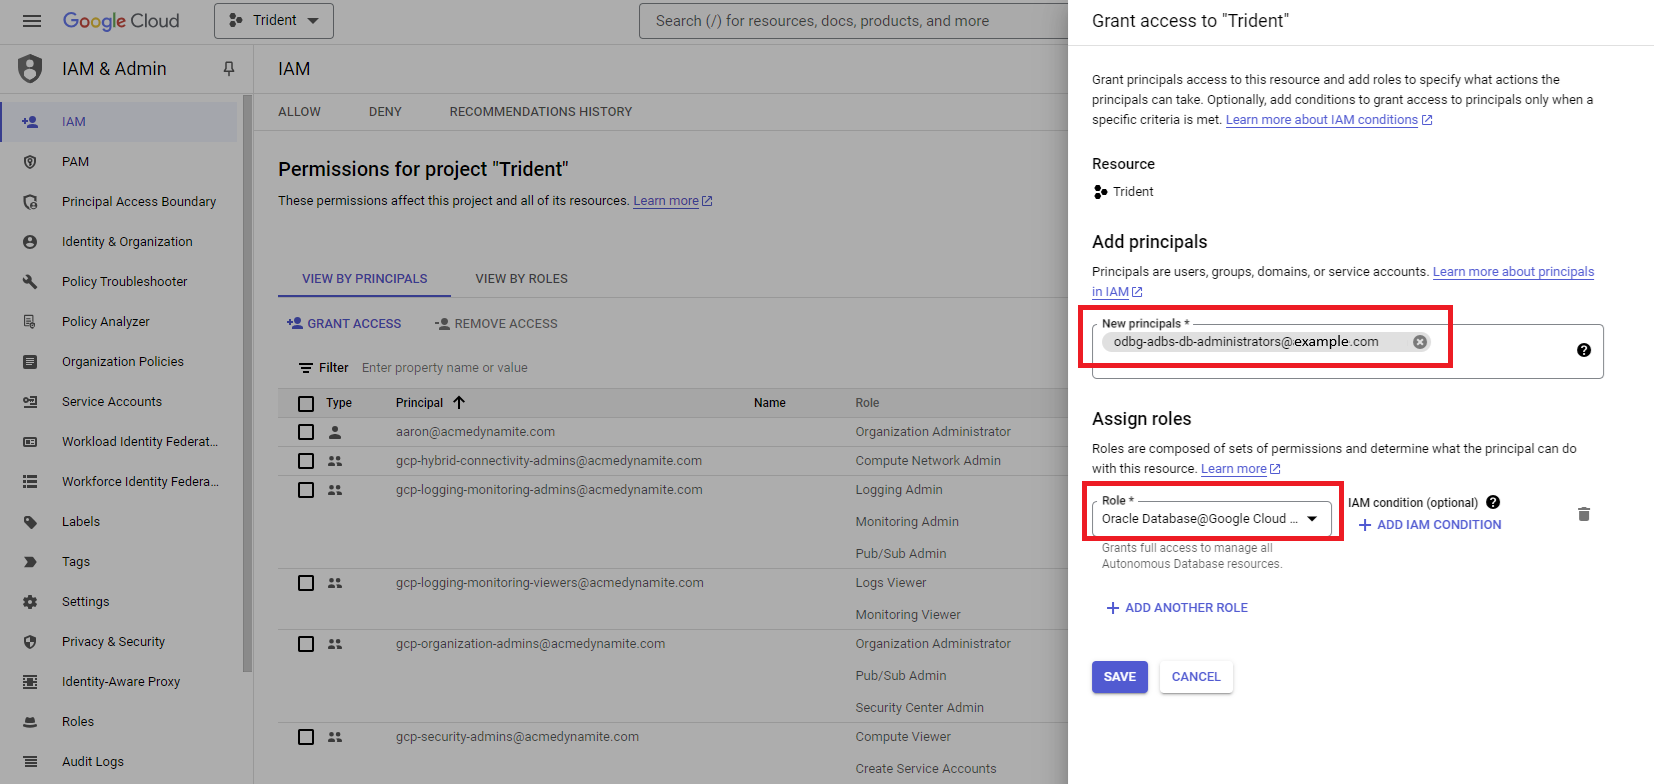
On the Grant access to dialog, assign roles to the groups created in steps 2 to 5 of this task.
Enter the following, then click SAVE and repeat this step until you have assigned roles to all the groups listed in the table at the beginning of this topic.
- Add principals: In the New principals field, enter the Google Cloud group email for the group you are assigning roles to. In the table at the beginning of this topic, you can find a suggested naming pattern for the group email names. For example:
odbg-adbs-db-administrators@example.com - Assign roles: in the Role field, select the Google Group Role Assignment listed in the table at the beginning of this topic that corresponds to the group email you entered in the New principals field. For example: "Oracle Database@Google Cloud Autonomous Database Admin"
- Add principals: In the New principals field, enter the Google Cloud group email for the group you are assigning roles to. In the table at the beginning of this topic, you can find a suggested naming pattern for the group email names. For example:
Use the information in the following table to create new Google Cloud groups and roles for Exadata Database Service. The Google Cloud Group email values provided in the table are suggested values, but you can use other group email names as needed. Note that you must replace the <email_domain> string with your organization's email domain. For example: odbg-adbs-db-administrators@example.com
| Google Cloud Group name | Google Cloud Group email | Google Cloud Role assignment | Purpose |
|---|---|---|---|
|
odbg-exa-infra-administrators |
odbg-exa-infra-administrators@<email_domain> |
Oracle Database@Google Cloud Exadata Infrastructure Admin |
This group is for administrators who need to manage all Oracle Exadata Database Service resources in Google Cloud. |
|
odbg-exa-infra-readers |
odbg-exa-infra-readers@<email_domain> |
Oracle Database@Google Cloud Exadata Infrastructure Viewer |
This group is for viewers who need to view all Oracle Exadata Database Service resources in Google Cloud |
|
odbg-vm-cluster-administrators |
odbg-vm-cluster-administrators@<email_domain> |
Oracle Database@Google Cloud VM Cluster Admin |
This group is for administrators who need to manage VM Clusters resources in Google Cloud. |
|
odbg-vm-cluster-readers |
odbg-vm-cluster-readers@<email_domain> |
Oracle Database@Google Cloud VM Cluster Viewer |
This group is for viewers who need to view VM Clusters resources in Google Cloud |
|
odbg-db-family-administrators |
odbg-db-family-administrators@<email_domain> |
Oracle Database@Google Cloud admin |
This group is for administrators who need to manage all Oracle Database Service resources in OCI. This group is replicated in OCI during the optional identity federation process. |
|
odbaa-db-family-readers |
odbaa-db-family-readers@<email_domain> |
Oracle Database@Google Cloud viewer |
This group is for readers who need to view all Oracle Database resources in OCI. This group is replicated in OCI during the optional identity federation process. |
|
odbg-exa-cdb-administrators |
odbg-exa-cdb-administrators@<email_domain> |
none |
This group is for administrators who need to manage all CDB resources in OCI. This group is replicated in OCI during the optional identity federation process. |
|
odbg-exa-pdb-administrators |
odbg-exa-pdb-administrators@<email_domain> |
none |
This group is for administrators who need to manage all PDB resources in OCI. This group is replicated in OCI during the optional identity federation process. |
|
odbg-network-administrators |
odbg-network-administrators@<email_domain> |
none |
This group is for administrators who need to manage all network resources in OCI. This group is replicated in OCI during the optional identity federation process. |
|
odbg-costmgmt-administrators |
odbg-costmgmt-administrators@<email_domain> |
none |
This group is for administrators who need to manage cost and billing resources in OCI. This group is replicated in OCI during the optional identity federation process. |
To configure role based access control for Exadata Database Service in the Google Cloud console
-
Sign in to the Google Cloud Admin console using the URL https://admin.google.com/ac/groups. The Groups list view page is displayed.
-
On the Groups list view page, click Create group.
-
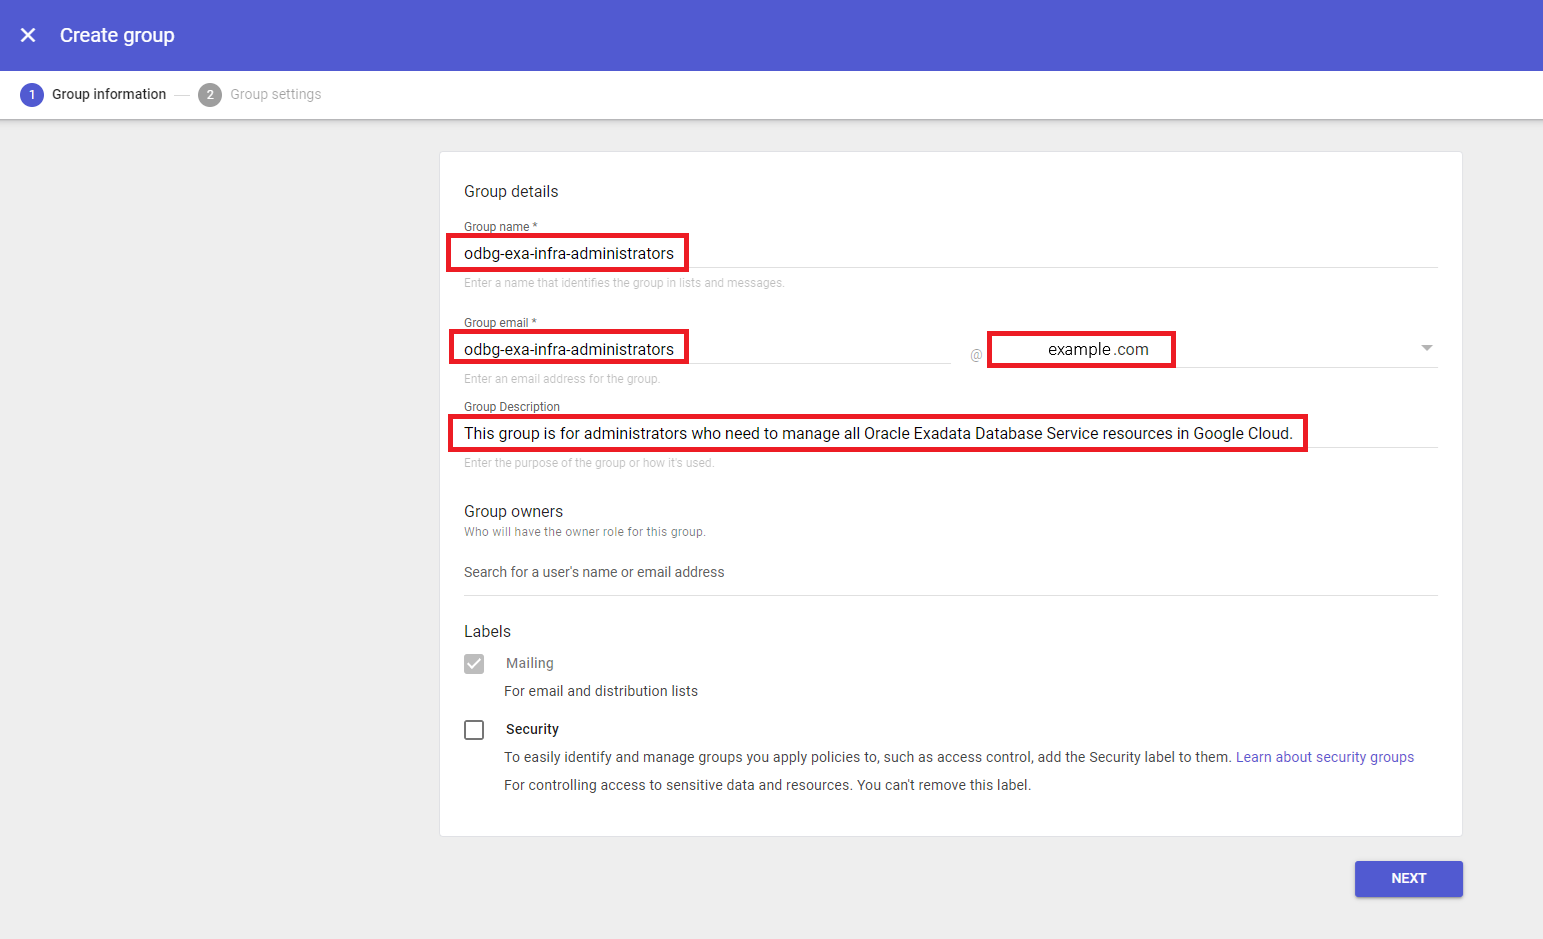
In Group information tab, enter the following details for the group your are creating. For each row in the table in this topic, you will need to create a group using the steps in this task. Follow the steps in the task for a single group to create that group, then repeat the steps for the additional groups listed in the table.
- Group name: Use the "Google Cloud Group name" values from the table in this topic. For example:
odbg-exa-infra-administrators. - Group email: You can use the "Google Cloud Group email" values in the table in this topic, or create your own values, as needed. For example:
odbg-exa-infra-administrators@example.com - Group Description: You can use the descriptions found in the "Purpose" column in the table in this topic. For example: "This group is for administrators who need to manage all Oracle Exadata Database Service resources in Google Cloud."
Before entering information:
After entering information:
After entering these values, click NEXT.
- Group name: Use the "Google Cloud Group name" values from the table in this topic. For example:
-
In the Group settings tab, update the access settings based on your company's security best practices, then click CREATE GROUP.
-
Click Create another group to begin creating the next group in the table of groups in this topic.
- After repeating steps 3 to 5 to create the rest of the required groups, click DONE.
-
Assign roles to the Google Cloud groups you have just created in IAM & Admin. Search "IAM & Admin" in the Google Cloud console and click on the search result to navigate to this service in the console.
-
In the IAM & Admin navigation menu, click IAM, and then select Grant access.
-
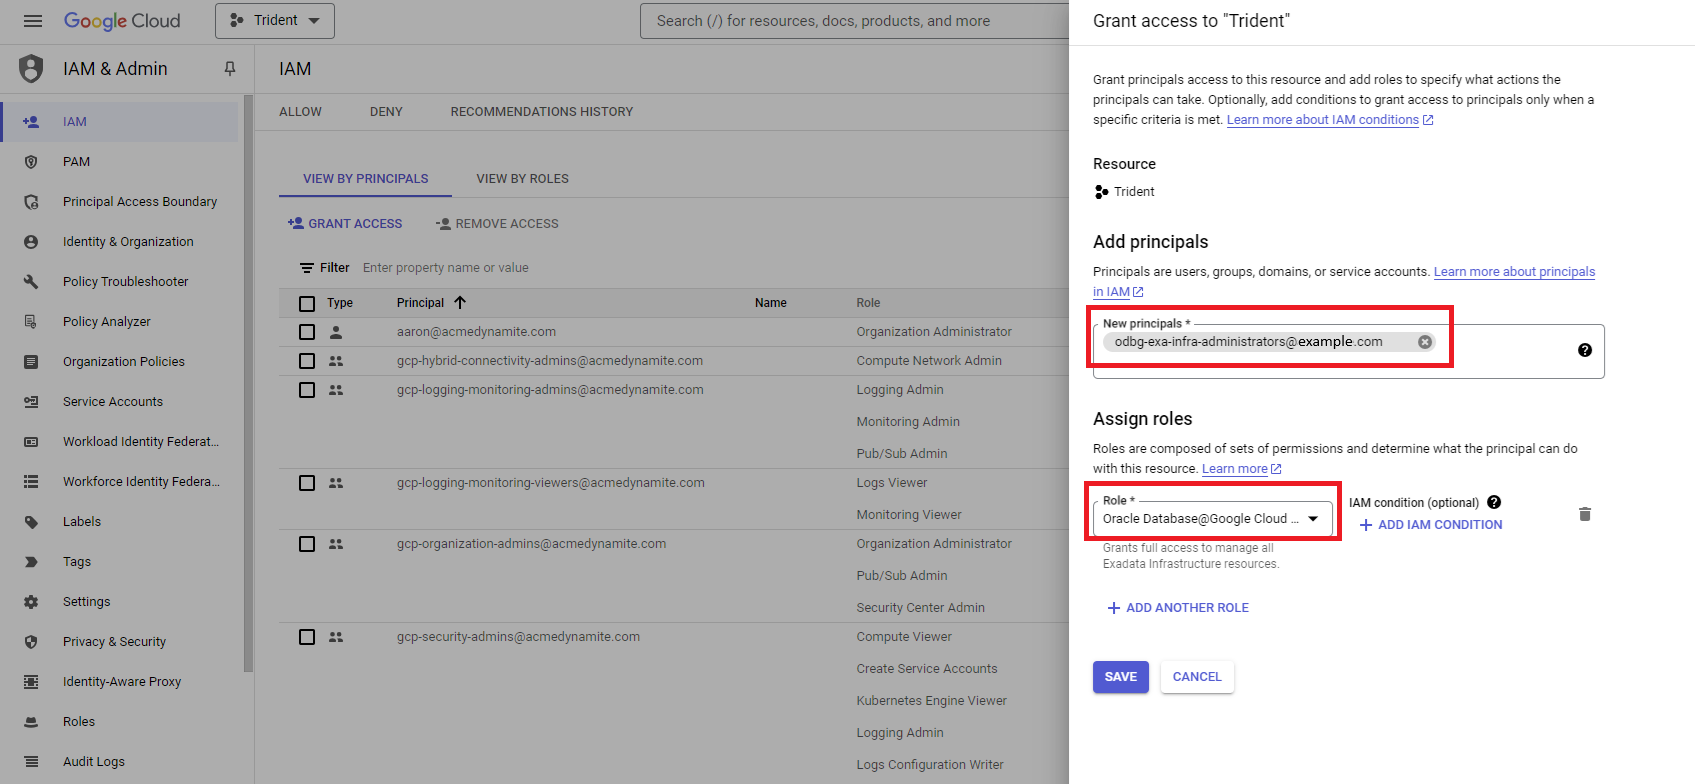
On the Grant access to dialog, assign roles to the groups created in steps 2 to 5 of this task.
Enter the following, then click SAVE and repeat this step until you have assigned roles to all the groups listed in the table at the beginning of this topic.
- Add principals: In the New principals field, enter the Google Cloud group email for the group you are assigning roles to. In the table at the beginning of this topic, you can find a suggested naming pattern for the group email names. For example:
odbg-adbs-db-administrators@example.com - Assign roles: in the Role field, select the Google Group Role Assignment listed in the table at the beginning of this topic that corresponds to the group email you entered in the New principals field. For example: "Oracle Database@Google Cloud Autonomous Database Admin"
- Add principals: In the New principals field, enter the Google Cloud group email for the group you are assigning roles to. In the table at the beginning of this topic, you can find a suggested naming pattern for the group email names. For example:
What's Next?
Oracle Database@Google Cloud is ready for use. You can now do the following:
- Set up identity federation for Oracle Database@Google Cloud (optional). Federation lets users sign in to the OCI tenancy associated with the service using Google Cloud credentials. See Task 6: Set Up Identity Federation (Optional) for details.
- If you do not use identity federation, you can add additional users in the OCI Console. See Overview of IAM and Managing Users for more information. Optionally, you can register users with My Oracle Support to allow them to open service requests.
- Review the suggestions at What's Next After Onboarding?

