Integrate with Oracle Identity Governance
You can integrate with Oracle Identity Governance(OIG) for enabling identity orchestration, automating onboarding of accounts and entitlements, roles, and reconciliation of accounts. You can integrate only one active OIG application at a time.
Certified Components
The target system can be any one of the following:
- Oracle Identity Governance 12.2.1.4 Bundle Patch Number 11 (12.2.1.4.220703) or later. If the current version of Oracle Identity Governance isn't compatible then contact Oracle Support, who can arrange a patch for the Oracle Identity Governance system
- Oracle Identity Governance 14.1.2.1.0 or later.
Prerequisites
Oracle Identity Governance source data must meet the following requirements in Oracle Access Governance
Step 1: Enable Certifiable Flag for Application, Entitlements and Roles
The Certifiable flag must be selected for applications, entitlements and roles, as follows:
- Select Certifiable flag for Applications and Entitlements
- Sign in to the Oracle Identity Governance self service application.
- Go to Manage, and then Request for Self
- Search for application, and select the information icon.
- Select the Certifiable flag.
- For Roles,
- Sign in to the Oracle Identity Governance self service application.
- Go to Manage, and then Roles
- Search for role, and select the information icon.
- Under Catalog Attributes, select the Certifiable checkbox.
Step 2: Grant Types in Oracle Identity Governance
As a user in Oracle Identity Governance, you must have the following grant types:
- Direct Provision accounts and Entitlements
- Request Provision accounts and Entitlements
- Reconciled accounts and Entitlements from the targets
- Bulkloaded accounts and Entitlements
- Request or Direct provision Role which are associated with access policy
Step 3: Obtain JDBC URL
You need the JDBC URL of OIG in connection settings.
- Sign in to the Oracle WebLogic Server Administration Console associated with the Oracle Identity Governance instance.
- Navigate to Services → Data Sources.
- Select oimOperationsDB from the Configurations tab.
- Select Connections Pool, and copy the value from the URL: field to use as the JDBC URL of Oracle Identity Governance.
Reference: 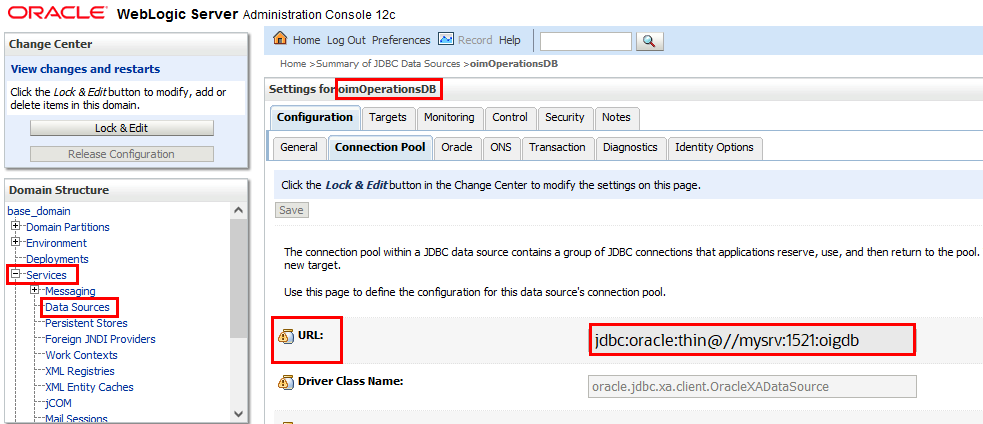
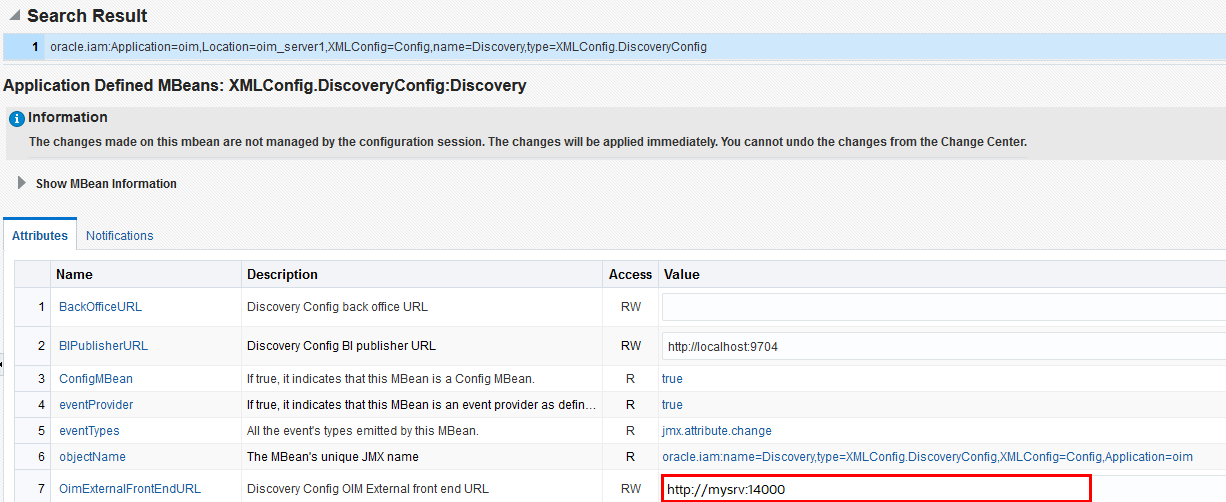
Step 4: Obtain Server URL of Oracle Identity Governance
- Log on to the Oracle Enterprise Manager Fusion Middleware Control.
- Navigate to the System MBean Browser and find the XMLConfig.DiscoveryConfig MBean.
- Copy the value of the OimExternalFrontEndURL attribute and use this as the value for the Oracle Identity Governance Server URL.
Configure Integration for Oracle Identity Governance
You can configure Oracle Identity Governance agent to connect to Oracle Access Governance, you need to enter connection details and credentials for the target system, and build an agent specific to the environment.
Navigate to the Orchestrated Systems Page
The Orchestrated Systems page of the Oracle Access Governance Console is where you start configuration of your orchestrated system.
- From the Oracle Access Governance
navigation menu icon
 , select Service Administration → Orchestrated Systems
.
, select Service Administration → Orchestrated Systems
. - Select the Add an orchestrated system button to start the workflow.
Select system
On the Select system step of the workflow, you can specify which type of system you would like to integrate with Oracle Access Governance.
You can search for the required system by name using the Search field.
- Select Oracle Identity Governance.
- Select Next.
Add details
Add details such as name, description, and supported modes. You can't edit the mode after you have created the orchestrated system.
With the integration, you can configure Oracle Identity Governance to operate either as a full identity source, as a source of identity attributes for existing identities, or as a managed system.
- Enter a name for the system you want to connect to in the Name field.
- Enter a description for the system in the Description field.
- Decide if this orchestrated system is an authoritative source, Oracle Access Governance always manages permissions for this orchestrated system.
-
This is the authoritative source for my identities
Select one of the following:
- Source of identities and their attributes: System acts as a source identities and associated attributes. New identities are created through this option.
- Source of identity attributes only: System ingests additional identity attributes details and apply to existing identities. This option doesn't ingest or creates new identity records.
-
This is the authoritative source for my identities
- Select Next.
Add Owners
Add primary and additional owners to the orchestrated system to manage resources.
When setting up the first Orchestrated System for your service instance, you can assign owners only after you enable the identities from the Manage Identities section.
- Select an Oracle Access Governance active user as the primary owner in the Who is the primary owner? field.
- Select one or more additional owners in the Who else owns it? list. You can add up to 20 additional owners for the resource.
Integration Settings
Enter connection details for the Oracle Identity Governance system.
- In the What is the JDBC URL of your OIG database server? field, enter the JDBC URL of the OIG database you want to connect with. To obtain JDBC URL, see Step 3: Obtain JDBC URL.
- In the What is the OIG database username? field, enter the database user, with read access, to connect to the OIG database. For details, see Step 4: Obtain Server URL of Oracle Identity Governance
- In the Password field, enter the password for the OIG database user you have specified.
- In the What is the URL of your OIG server? field, enter the URL of the OIG server you want to integrate with.
- In the What is the OIG server username? field, enter the OIG user used for remediation and schema discovery. The Oracle Identity Governance Server user must belong to the System Administrator role to support both remediation and schema discovery for custom attributes. If only remediation is needed, the user can instead belong to the OrclOAGIntegrationAdmin role, but schema discovery would not work for that user.
- In the OIG server password field, enter to authenticate the OIG server user when calling OIG APIs to perform remediation.
- Do you want to enable OIG database incremental data load?: Select to perform incremental data load. If Day-N option is selected, data loads would use an event-driven mode which applies changes to Oracle Access Governance as they happen, rather than as a periodic snapshot. If you select this option, ensure that you have completed the prerequisite tasks in the OIG database defined in Database Setup Steps for Event-driven Data Load.Note
Use this option to see events from OIG in real-time rather than periodically. For example, if the organization creates an identity for a user which needs to be reflected in Oracle Access Governance immediately then you must use this option. When the identity is added, the event isn't noted by the integration and reconciled with Oracle Access Governance. The default snapshot data load would not reconcile the new identity until its next scheduled run. With the event-driven data load, changes are identified in real-time and loaded into Oracle Access Governance as each event takes place. - Verify the details entered are correct, and select the Add button.
- On the Download Agent step, select the Download link and download the agent zip file to the environment in which the agent would run.
Finish Up
Finish up configuration of the orchestrated system by providing details of whether to perform further customization, or activate and run a data load.
The final step of the workflow is Finish Up.
On the Finish Up step of the workflow, you're asked to download the agent you would use to interface between Oracle Access Governance and Oracle Identity Governance. Select the Download link to download the agent zip file to the environment in which the agent would run.
After downloading the agent, follow the instructions explained in the Agent Administration article.
- Customize before enabling the system for data loads
- Activate and prepare the data load with the provided defaults
Configure Database Steps for Event-driven Data Load
When creating or updating an Oracle Access Governance orchestrated system you can enable the event-driven data load option. This option switches Day-N data load from the default snapshot-based model, to an event-driven one. A prerequisite for this option requires you to create a read-only user in the OIG database and grant required roles and system privileges.
Supported Attributes for User Data Load Filtering
When configuring an Orchestrated System to on-board data from Oracle Identity Governance, it's possible to filter the user data you want to ingest in Oracle Access Governance. You can restrict which users are on-boarded by setting filters on identity attributes such as department, employee type, location, and others.
User Data Load Filtering Characteristics
You should be aware of the following characteristics of user data load filtering befire configuring filters in the Orchestrated System.
- Matching of user search filters and user data values filtering is case-sensitive. For example. a filter of
department = Human Resourceswould not return users with a value ofdepartment = HUMAN RESOURCES, orDepartment = Human Resources. - If no users or accounts match the user data load filter, then no data would be ingested from Oracle Identity Governance by Oracle Access Governance. In this case, however, the data load itself would be labelled as successful in the activity log, even though no identities or accounts are on-boarded.
- User data load filter values can't exceed 1000 for any specific filter attribute.
- If an agent is already installed, an agent upgrade is required to enable user data load filters. See Agent Example Usage for details on how to upgrade the agent.
List of Supported Attributes for User Data Load Filtering
You can filter users ingested from Oracle Identity Governance based on the following attributes.
| Oracle Access Governance Attribute Name | Oracle Identity Governance Attribute Name |
|---|---|
| employeeType | usr_emp_type |
| jobCode | usr_job_code |
| department | usr_dept_no |
| location | usr_location |
| state | usr_state |
| postalCode | usr_postal_code |
| country | usr_country |
| managerUid | usr_manager_key |
| managerLogin | usr_login (usr_login of manager) |
| organizationUid | act_key |
| organizationName | act_name act_name of act table |
| territory | usr_territory |
Example User Data Load Filters
| Usecase | Configuration Parameters |
|---|---|
|
User with department=Product Development and jobCode=IC004 or M0003 |
|
|
User with state =Kent and organizationUid=1 or 4 |
|
|
User with postalCode = 78045 or 12204 with custom delimiter ## |
|
|
User with managerUid = 17981 or 17854 and managerLogin = DINORAH.PREWITT or JOELLA.SHANNON |
|
Filter value name and the value of the filter are both case-sensitive. Using the examples, any of the following would be an invalid filter, and return no results:
- Example 1:
- userFilter1Name=MANAGERUID
- userFilter1Value=17981~17854
- userFilter2Name=managerLogin
- userFilter2Value=DINORAH.PREWITT~SHIRLEY.THOMAS
- Example 2:
- userFilter1Name=managerUid
- userFilter1Value=17981~17854
- userFilter2Name=managerLogin
- userFilter2Value=Dinorah.Prewitt~SHIRLEY.THOMAS
- Example 3:
- USERFilter1Name=managerUid
- userFilter1Value=17981~17854
- userFilter2Name=managerLogin
- userFilter2Value=DINORAH.PREWITT~SHIRLEY.THOMAS
- Example 4:
- userFilter1Name=managerUid
- userFilter1Value=17981~17854
- userFilter2Name=managerLogin
- USERFILTER2VALUE=DINORAH.PREWITT~SHIRLEY.THOMAS
Supported Configuration Modes for Oracle Identity Governance Orchestrated System
You can setup different configuration modes depending on the requirement for on-boarding identities, identity attributes, and provisioning accounts.
Oracle Identity Governance supports the following
- Both (Authoritative - Source of Identity) and Managed system
- Both (Authoritative - Source of Identity Attribute) and Managed system
- Managed system only
Safety Checks to Prevent Unintended Data Loss
Set safety checks to prevent accidental or unintended data loss in Oracle Access Governance.
Default Matching Rules
To map accounts to identities, apply the following matching rules.
| Mode | Default Matching Rules |
|---|---|
| Authoritative Source | User login = Employee user name |
| Managed System | Not supported. Matching is based on UID. |