OCI Identity Domains with Postman
In this tutorial, you make REST application programming interface (API) calls to an identity domain using Postman, a software that's typically used for REST API tests.
The identity domains REST APIs provide a way to integrate identity domains with REST clients to manage users, groups, applications, and settings, and perform federated single sign-on (SSO) and authorization in the cloud. The APIs support OAuth 2.0, OpenID Connect, and System for Cross-Domain Identity Management (SCIM).
In this tutorial, you:
- Register an OAuth client application
- Set the environment parameters in Postman
- Import the identity domains Postman collection
- Request an OAuth access token
- Create a user
- Get a user
- Delete a user
This tutorial takes about 20 minutes to complete.
This tutorial is specific to OCI Identity and Access Management with identity domains.
Before You Begin
To perform this tutorial, you must have the following:
- Access to an identity domain with the identity domain administrator role. Ensure that you have the following values:
- The tenancy name, identity domain name, and the credentials (user name and password) to sign in to a tenancy in the Oracle Cloud Infrastructure Console with an identity domain.
- The domain URL that's shown on the identity domain details page after signing in. For example,
https://<idcs-letterandnumberstring>.identity.oraclecloud.com. If you need help to find the domain URL, see Finding an Identity Domain URL in the documentation. The identity domain URL is used to construct a REST request.
- Familiarity with the REST architecture style
- The Postman desktop app installed.
- Familiarity with Postman is not necessary.
- Create a Postman account. An account is required to use environment variables.
- (Optional) Create a workspace in Postman.
1. Register a Client Application
To authenticate a REST API call to an identity domain, register an OAuth client application in the identity domain.
This task is required to obtain the credentials (client ID and client secret) that are used for authentication. The credentials are equivalent to service credentials (ID and password) that the client uses to communicate with an identity domain. This task also helps you determine which requests are authorized through the REST API.
- Open the navigation menu and select Identity & Security. Under Identity, select Domains.
- Select the name of the identity domain that you want to work in. You might need to change the compartment to find the domain that you want.
- On the domain details page, select Integrated applications.
- Select Add application.
- In the Add application dialog, select Confidential Application, and then select Launch workflow.
- On the Add application details step of the workflow, enter an application name and description, and then select Next.
- On the Configure OAuth step, perform the following actions:
- In the Client configuration box, select Configure this application as a client now.
The box expands, showing more options.
- Under Authorization, select only Client Credentials as the allowed grant type.
- Scroll down to the end of the box. Select Add app roles and then select Add roles.
- In the Add app roles panel, select Identity Domain Administrator, and then select Add.
- In the Client configuration box, select Configure this application as a client now.
- On the Configure OAuth step, select Next and then select Finish.
You can skip the policy configuration step in this tutorial.
When the application is created, its initial state is Inactive.
- On the application details page, select Activate. Then select Activate application to confirm activation of this application.
- On the application details page, scroll down to General Information and follow these steps to copy the client ID and client secret values.
- Highlight the value that's displayed next to Client ID and copy the value to a text file.
- Under Client Secret, select Show secret. In the dialog that appears, select Copy and then select Close. The value is copied to the clipboard. Paste the value in a text file.
- Store the client ID and client secret values that you copied in a safe place.
2. Set the Environment Parameters in Postman
To successfully perform this tutorial in Postman, import the idcs-rest-clients REST variable samples and set the environment parameters.
- Open the Postman desktop app and sign in using your account. If you have a workspace, select Workspace and select the workspace. Otherwise, you can use the default workspace.
- In the workspace, select Import.
- In the Import dialog, paste the following GitHub environment variables URL into the field.
https://github.com/oracle/idm-samples/raw/master/idcs-rest-clients/example_environment.jsonPostman starts importing as soon as you paste the URL. When import is complete, select Dismiss to close the message box.
- In the sidebar on the left, select Environments. Then right-click Oracle Identity Cloud Service Example Environment with Variables and select Duplicate.
- In the list of environments, right-click Oracle Identity Cloud Service Example Environment with Variables Copy that appears below the original environment and select Rename. In the field, type
Environment A for REST API Testingand press Enter. - To update the variables in the renamed environment, enter the following values in the Initial Value and Current Value fields.
-
HOST: The domain URL that you obtained from the identity domain details page after signing in to the Oracle Cloud Infrastructure
Console. For example,
https://<idcs-letterandnumber123string>.identity.oraclecloud.com. If you need help to find the domain URL, see Finding an Identity Domain URL in the documentation. - CLIENT_ID and CLIENT_SECRET: The client ID and the client secret that you copied into a text file from the identity domain's trusted application, as described in the tutorial task Register a Client Application.
-
USER_LOGIN and USER_PW: Your login user name and password
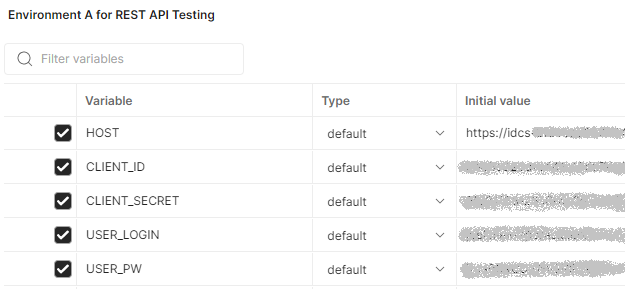
-
HOST: The domain URL that you obtained from the identity domain details page after signing in to the Oracle Cloud Infrastructure
Console. For example,
- Select Save.
- In the list of environments, select the check mark on the name
Environment A for REST API Testingto make it the active environment.The active environment is shown in the environment selector at the top-right corner of the workbench.
3. Import the Identity Domains Postman Collection
To successfully perform this tutorial in Postman, import the REST_API_for_Oracle_Identity_Cloud_Service collection, which contains sample API requests that can be used to make calls.
- In the Postman workspace, select Import.
-
In the Import dialog, paste the following URL into the field to import the identity domains REST API Postman collection.
https://github.com/oracle/idm-samples/raw/master/idcs-rest-clients/REST_API_for_Oracle_Identity_Cloud_Service.postman_collection.jsonPostman starts importing as soon the collection as you paste the URL. When import is complete, you can select Dismiss to close the message box.
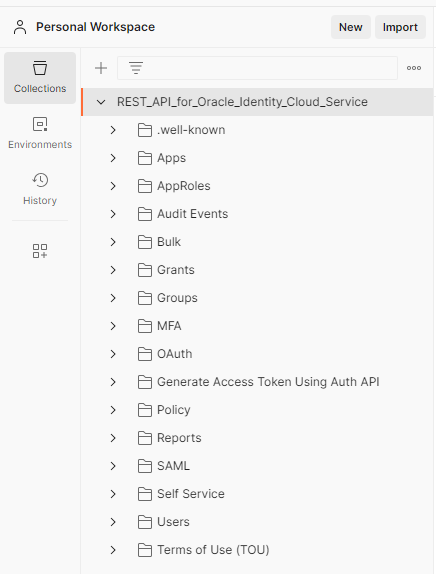
- In the sidebar on the left, select Collections.
- Select the name REST_API_for_Oracle_Identity_Cloud_Service.
The requests in the collection are organized in folders.
4. Request an Access Token
To make API calls to an identity domain, you must authenticate the client against the identity domain, and then obtain an OAuth access token.
The access token provides a session between a client (in this tutorial, Postman) and the identity domain.
By default, an access token has a timeout interval of 60 minutes. To perform REST API calls beyond the interval, you must request a new access token.
- In the sidebar on the left, select Collections. Expand REST_API_for_Oracle_Identity_Cloud_Service, if it's not expanded.
- Expand OAuth, and then expand Tokens.
- Under Tokens, select POST Obtain access_token (client credentials).
The API's
POSTtab appears in the workbench. The request pane of the API is separated from the response pane by a line. You can drag the separator line to show more or less of each pane.In the request pane, the URL field shows:
POST {{HOST}}/oauth2/v1/tokenThe variables for
{{HOST}}, signing in, and authentication credentials are already set when you completed the tutorial task Set the Environment Parameters in Postman. - Select Send.
In the response viewer, confirm that the status
200 OKappears and that the access token is returned in the response body. An access token is a very long string of letters and numbers. - To assign the access token value to an environment variable, use the following steps.
- In the response, highlight the access token content that's between the quotation marks and right-click. In the shortcut menu, select Set: Environment A for REST API Testing and then select access_token in the secondary menu to assign the highlighted content as the access token environment value.
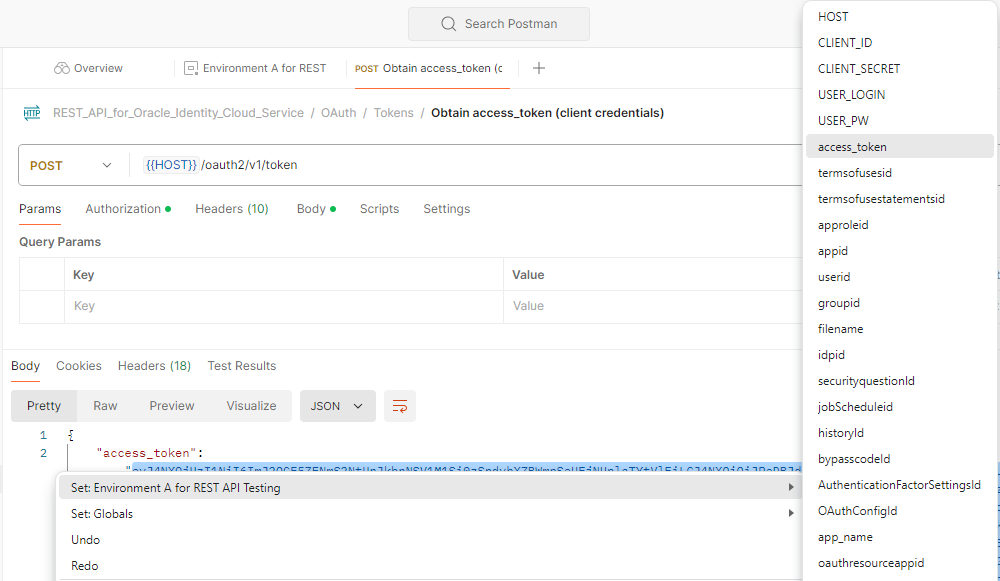
- In the upper-right of the workbench, select the icon to open the variables pane.
The assigned
access_tokenvalue is shown under All variables.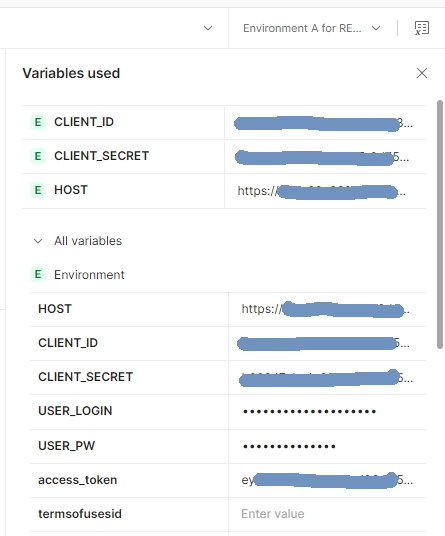
- In the response, highlight the access token content that's between the quotation marks and right-click. In the shortcut menu, select Set: Environment A for REST API Testing and then select access_token in the secondary menu to assign the highlighted content as the access token environment value.
- To close the variables pane, select X in the upper-right of the pane or select the variables icon.
If you send the next REST API call to the identity domain before the token expires, the API call contains the access token and other information related to the request. REST information is sent through a request Universal Resource Identifier, a header, parameters, or JSON code, and varies according to the REST API call and method that you request.
5. Create a User
This task assumes that you requested an access token within the past hour.
If necessary, request a new token before creating a user.
- In the sidebar on the left, select Collections. Expand Users and then expand Create.
- Under Create, select Create a user.
The API's
POSTtab appears in the workbench. - Select the Body tab.
The sample uses raw mode and JSON format for the body data.
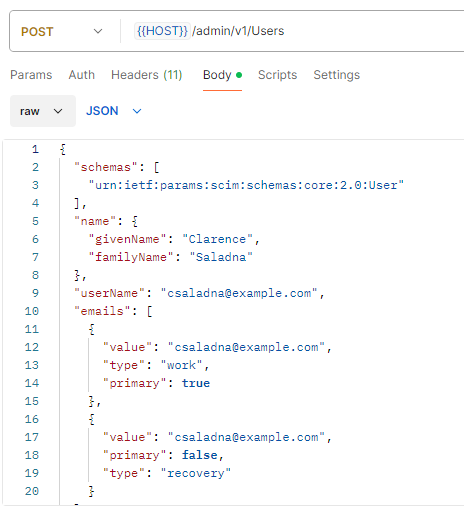
- Select Send.
-
In the response viewer, confirm that the status
201 Createdappears and that the response body contains details about the user that was successfully created in the identity domain. -
If the status
401 Unauthorizedappears, with the error messageProper authorization is required for this area, request a new access token and try creating the user again.
-
- In the response body of a successful creation, scroll down to line 40, which has the OCID value for the user that's created.
For example:
ocid1.user.oc1..aabaaacaaaq7xxxxxx - Highlight the OCID value that's between the double quotation marks. In the shortcut menu, select Set: Environment A for REST API Testing and then select userid in the secondary menu.
- In the upper-right of the workbench, select the icon to open the variables pane.
The assigned
useridvalue is shown under All variables.
6. Get a User
This task retrieves the details of a specific user by using the userid variable.
The following procedure assumes that you have completed the preceding task Create a User.
- In the sidebar on the left, select Collections. Expand Users and then expand Search.
- Under Search, select Get a specific user.
The API's
GETtab appears in the workbench. - Select Send.
-
If successful, confirm that the status
200 OKappears in the response viewer. You should also see details about that specific user in the Body tab. -
If you see the status
401 Unauthorizedwith the error messageProper authorization is required for this area, request a new access token and try retrieving the specific user again.
-
7. Delete a User
This task deletes a user that's specified by the userid variable.
The following procedure assumes that you have completed the tutorial tasks Create a User and Get a User.
If necessary, request a new access token before performing this task.
- In the sidebar on the left, select Collections. Expand Users and then expand Delete.
- Select Delete user.
The API's
DELETEtab appears in the workbench. - In the upper-right of the workbench, select the icon to open the variables pane.
Under All variables, confirm that the
useridvariable still shows the same OCID value that was used to retrieve the user's details. - Select Send.
-
If successful, confirm that the status
204 No contentappears in the response viewer. The Body tab is blank because no response body is returned for aDELETEoperation. -
If you see the status
401 Unauthorizedwith the error messageProper authorization is required for this area, request a new access token and try deleting the specific user again.
-
- When deletion is successful, select the GET a specific user tab in the workbench. Then select Send.
In the response viewer, confirm that the status
404 Not foundappears, which indicates that the user has been deleted.
What's Next
To explore guidelines for building requests and typical use cases using the OCI identity domains REST APIs, see: