New Console Experience
Oracle Cloud Infrastructure (OCI) has introduced new designs in the Oracle Cloud Console to enhance usability and consistency across services and experiences.
The following experiences are updated with the new designs:
Navigating Within a Service
In the new Console experience, a persistent navigation pane is available on the left side of all pages that provides access to related resources.

You can collapse the pane or expand it as you work with service resources. You can traverse back and forth in the navigation pane without losing the primary page that you're working on.
Listing Resources
After you navigate to a service, find what you're looking for in the Console by searching and filtering the resources on the resource list page.
On a resource list page, you can view the resources in the service and find details for individual resources. You have options to search and filter all the resources listed on the page, sort and apply filters on the table directly, and also manage the columns that you want to display in the table.
Compartment Selection
Compartment is a filter on the resource list page. By default, the filter is set to the root compartment of the tenancy. Unlike other filters, the compartment filter can't be removed. You can change the scope of the filter to the compartment that you require.
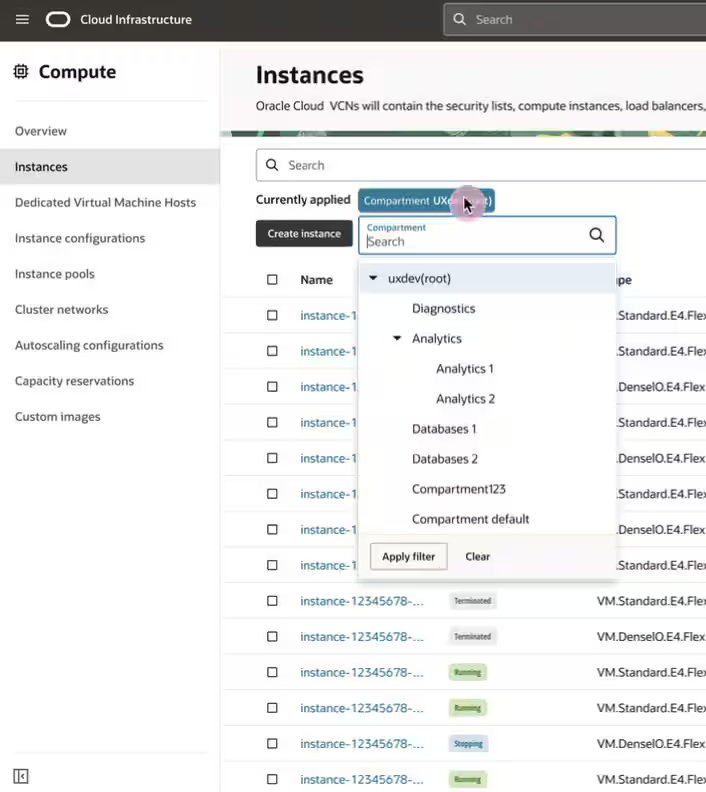
Search and Filter
To help you locate a resource, every list page has a Search and Filter box that you can use to search for specific resources in the list table and to apply filters to limit the list that's displayed. Following are common filters:
State: Display only the resources that are in the state you select. Valid values for this filter can vary by resource type. Some example states are as follows:
- Any state (includes all lifecycle states for the resource)
- Available
- Provisioning
- Terminating
- Terminated
Availability domain: Limit the list of resources to those that reside in the availability domain that you select. For a list of availability domain-specific resources, see Resource Availability.
Tags: Filter the list by tags for the resources that support tagging.

To filter by using the search box:
- Put the focus in to the search box to reveal the available filters. Some common filters are Name, State, Availability domain, Resource type, and Tags.

- Select a filter or type in the filter that you're looking for. As you type into the search box, the available options are dynamically filtered.
- After you select a filter, the value options for the selected filter are displayed. Select the options you want to use and select Apply Filter.

The table is filtered and the filters that you applied are listed under the search box. You can add or remove filters as needed.
If you want to simply search on the resources in the table, you can type your search terms in the Search and Filter box.
Table Sort and Filter
Columns with the option to sort have an icon displayed next to the column name. Select an icon to sort .

Manage Table Columns
The list table has a manage columns option. To manage the list table columns:
- Select the Manage Columns icon to open the Manage Columns panel.
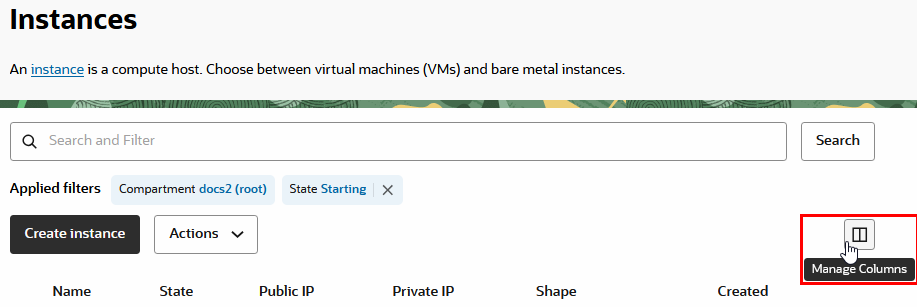
- Select the columns that you want to show in the table. Reorder the columns, if needed, and select Apply changes.

Viewing Resource Details
A resource details page provides all the information and metadata related to a resource and its subresources.
To open the details page for a resource, select the resource in the table on the resource list page.
The resources details page displays the name of the resource and its current status at the top of the page.
All information, metadata, and subresources for the resource are organized into categories and displayed as tabs on the details page. Some common tabs are Details, Monitoring, Policies, Work requests, and Tags. Other tabs are displayed depending on the primary resource and service that you're working with.
An Actions menu provides options for tasks you can perform on the resource.

Creating a Resource
You create the various OCI resources by using a single panel or a multiple-step workflow.
For more complicated resources that need a multiple-step workflow, the details that you need to provide are grouped into sections in the same page. You can expand or collapse each section while creating the resource.
