Maintenance Windows
A Maintenance Window is a period of time designated to perform regular maintenance activities on monitored resources, when alarm notifications on the respected resources are temporarily suppressed. This prevents unwanted notifications from being sent when resources are deliberately shut down for maintenance.
A Maintenance Window can be scheduled to run immediately or in the future, and to run for a maximum of one year or stop after a specific duration. It can be created on an as-needed basis, or scheduled to run at regular intervals. Notifications, such as emails and webhooks, are suppressed during the Maintenance Window. However, OCI continues to monitor resources and display resource status, while indicating that the resource is currently under maintenance. Also, alarms are evaluated and generated during the Maintenance Window, but notifications are suppressed.
Prerequisites
Policies
If Stack Monitoring has already been enabled using the StackMonitoringPolicyEasyOnboarding policy, recompile the policy statement to propagate the permissions needed for Maintenance Windows. The Easy Onboarding process creates two user groups, StackMonitoringAdminGrp (Administrator) and StackMonitoringViewGrp (Viewer). By recompiling the StackMonitoringPolicyEasyOnboarding policy, users in StackMonitoringAdminGrp will be able to create/update/delete Maintenance Windows and users in StackMonitoringViewerGrp will be able to view Maintenance Windows.
The following is the list of statements to be recompiled to allow the users that can perform viewer operations, i.e., the users that belong to the StackMonitoringViewerGrp group. The examples below reference the viewer group StackMonitoringViewerGrp. If your viewer group is different, replace this group name with your viewer group name.
To recompile the policies, follow these steps:
- Navigate to Identity & Security, then Identity, and click Policies.
- Select the compartment where Easy Onboarding was done.
- Identify the policy
StackMonitoringPolicyEasyOnboardingto manage stack-monitoring-family. - Click on Edit Policy Statements.
- Add a space at the end of the following statments:
ALLOW GROUP StackMonitoringAdminGrp TO MANAGE stack-monitoring-family IN COMPARTMENT <compartment_name>ALLOW GROUP StackMonitoringAdminGrp TO MANAGE alarms IN COMPARTMENT <compartment_name>ALLOW GROUP StackMonitoringViewerGrp TO READ stack-monitoring-family IN COMPARTMENT <compartment_name>
- Click Save.
Privileges to view and manage (create/delete/and update) Maintenance Windows can be granted to any group
-
For Administrators who manage resources and will also create Maintenance Windows, grant the following policy to custom admin user group:
ALLOW GROUP <custom_admin_user_group> TO MANAGE stack-monitoring-maintenance-windows IN COMPARTMENT <compartment_name>ALLOW GROUP <custom_admin_user_group> TO MANAGE alarms IN COMPARTMENT <compartment_name> -
For monitoring users who want view access to Maintenance Windows, grant the following policy to custom viewer user group:
ALLOW GROUP <custom_view_user_group> TO READ stack-monitoring-maintenance-windows IN COMPARTMENT <compartment_name>
Licensing
Enterprise Edition must be enabled on the resources to be included in the Maintenance Window. For more information on configuring licensing, see Configuring Licensing.
Alarm configuration
Alarms for resources included in the Maintenance Window must be configured to split notifications per metric stream.
For more information on creating an alarm that splits messages by metric stream, see Split Messages by Metric Stream.
Maintenance Window Operations
Maintenance Window State
A Maintenance Window can be scheduled to run immediately or in the future, therefore, it has three states:
- Active: while active and running.
- Scheduled: when planned for the future.
- Completed: after it finishes successfully, or after it's stopped.
Depending on the Maintenance Window state, certain operations can be performed.
After a Maintenance Window is created, administration tasks are available in the actions menu to the right of the Maintenance Window displaying its available operations.
Create a Maintenance Window
-
Select Maintenance Windows in the Stack Monitoring navigation menu.
-
On the Maintenance Windows home page, click Create.
-
On the Create Maintenance Window page:
- Enter a name for the Maintenance Window.
- Enter details of the Maintenance Window for other users under Description.
- In the Resources section, click Add resources to open the Resources slide out.
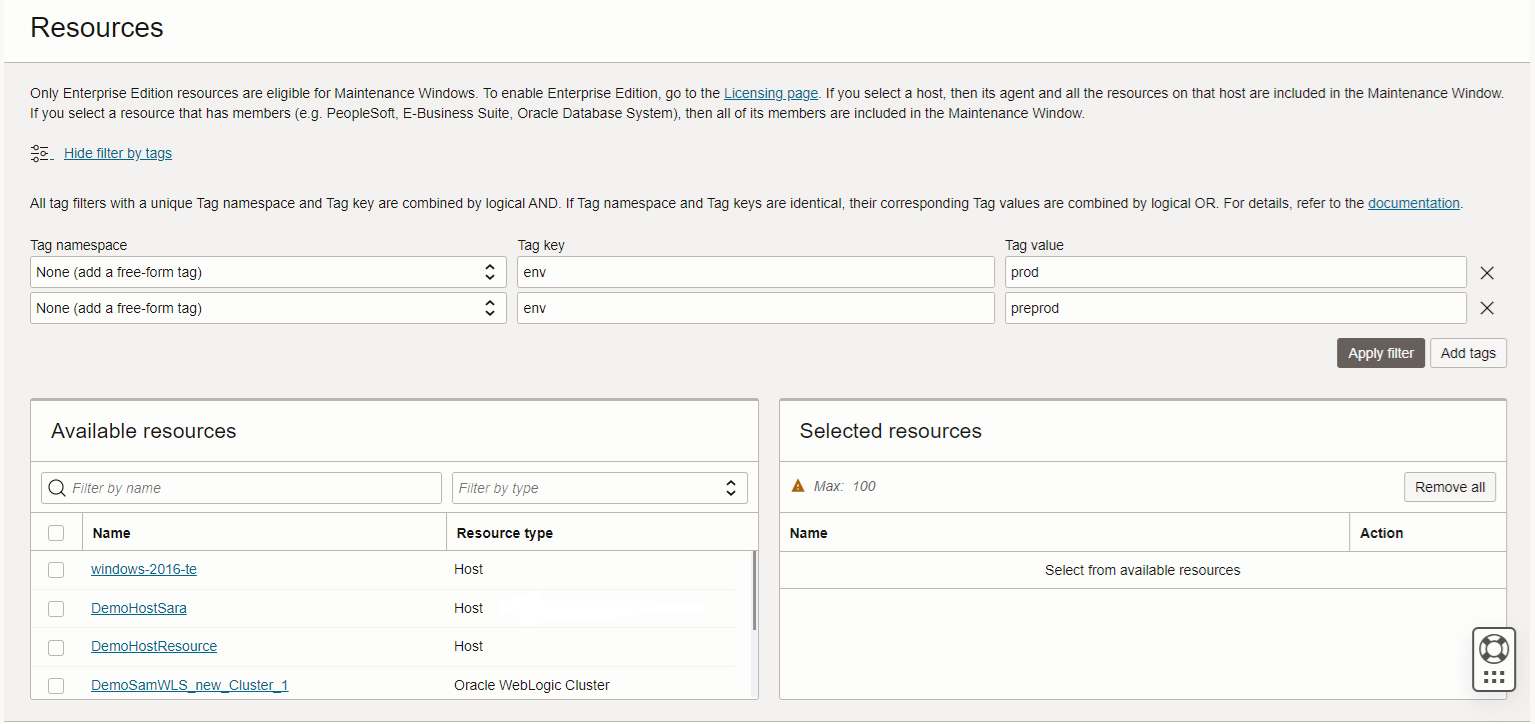
Filter the available resources by name and by type as needed, or click the Show filter by tags link to open the tags section which allows adding multiple tags to ease finding the needed resources. All tag filters with a unique Tag namespace and Tag key are combined by logical
AND. If Tag namespace and Tag keys are identical, their corresponding Tag values are combined by logicalOR.Example:
Filtering with two tags, with the same Tag namespace and Tag key (
env), but with different Tag values,prodandpreprod, applies anORoperation, filtering resources bypreprod OR prod.
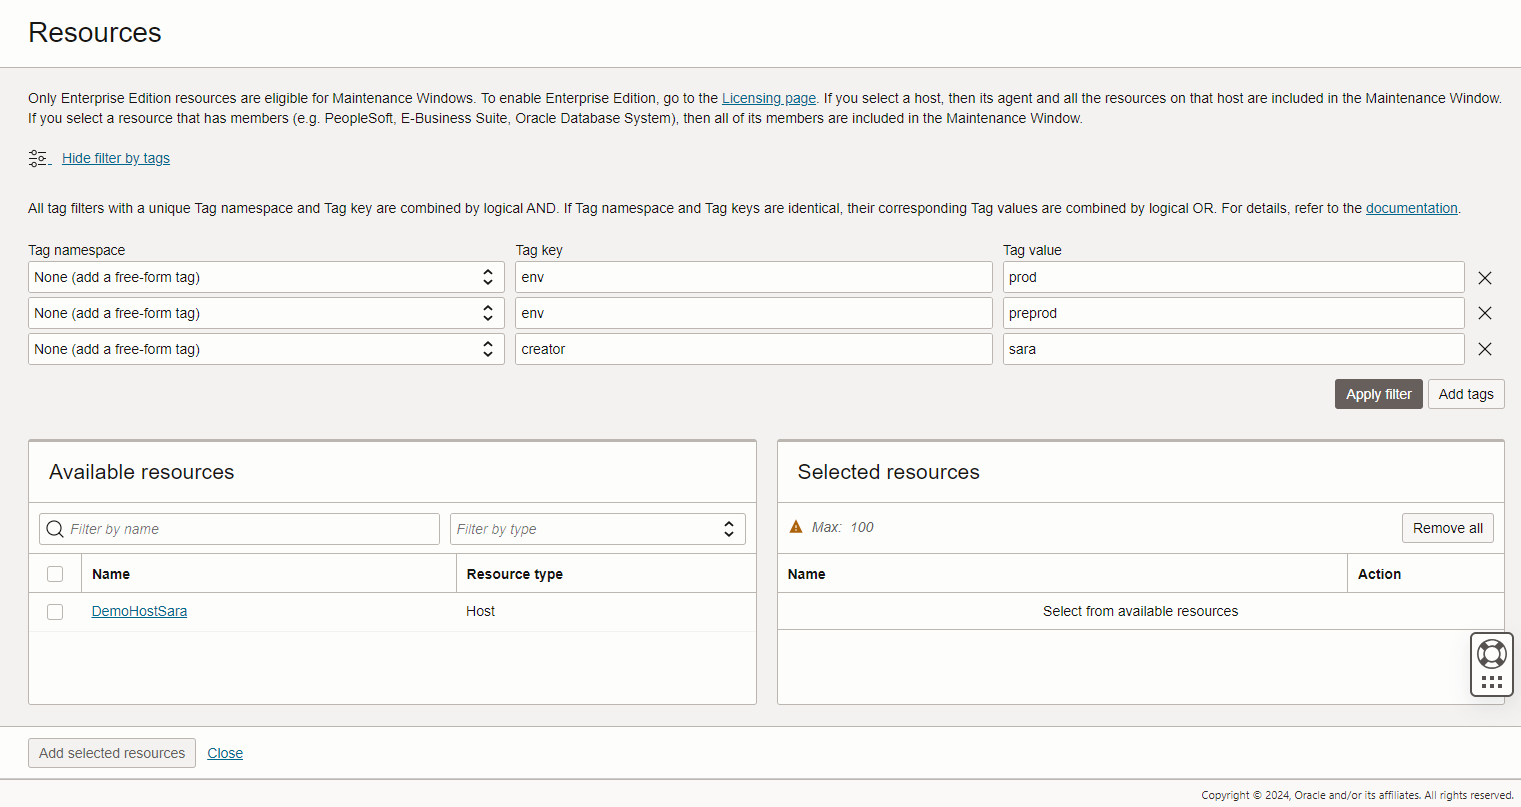
Next, by adding one more tag, with Tag key
creatorand Tag valuesara, the resources already filtered will show less results, since the new condition is: get all resources withenvequal toprod OR preprodANDacreatorequal tosara. In this example, only one resource is found.
Select the resources that you want to add to the Maintenance Window from the Available resources left panel to be added under Selected resources.
- If a host resource is added, then all resources that use that host will also be included in the Maintenance Window. The list of these resources can be reviewed in the Topology page of the host resource homepage. In the host home page, look for all resources with
Used byassociation. - If some resources are not included in the host Topology page, you can use the Add association feature to add the missing resource. Make sure you keep the
Usesoption. - When a host is included in the Maintenance Window, the alarms configured for the agent monitoring that host are as well included and suppressed in the Maintenance Window.
-
Resources Contained By a composite resource will be automatically added, but resources Used By a composite resource wont be included.
If a composite resource such as an E-Business Suite, a PeopleSoft application or an Oracle Database System is included, then all of its members are automatically included in the Maintenance Window. Members are those which are contained by a parent resource. However, resources that are used by the parent resource will have to be manually added to the Maintenance Window.
For example, by adding an EBS instance, the Concurrent Processing and the Workflow Group will be added automatically, since the EBS instance contains them. However, any Database or WebLogic Domain that the EBS instance uses will not be added by default.
- There is currently a limit of 100 resources that can be added to a Maintenance Window. If you need to add more resources, create another Maintenance Window for these resources.
Click Add selected resources to continue creating the Maintenance Window.
While creating the Maintenance Window, click on the number of resources to view the selected and added resources. Click on the resource name to view its home page.
- If a host resource is added, then all resources that use that host will also be included in the Maintenance Window. The list of these resources can be reviewed in the Topology page of the host resource homepage. In the host home page, look for all resources with
-
In the Schedule section, select the options that are best suited for the goals of the Maintenance Window. The available options include recurrence, the start date, whether that's immediate or in the future, and a specific duration, a specific end date or the maximum duration allowed, one year from the creation date.
- When recurrence is set to daily, the chosen day must have at least one occurrence in the time duration period.
- When recurrence is set to weekly, duration must be of at least one week.
Note
Maintenance Window schedule is saved and displayed in UTC timezone by default. Different timezones can be set for easiness only while creating or updating a Maintenance Window, however all dates will still be saved and handled as UTC.
- Click Create.
For debugging and administrative purposes, any request status of a Maintenance Window different than Successful is a link that opens up the logs of the worker pertaining to that status. The logs will be available for seven days.
The alarms of all resources included are suppressed and a Maintenance Window is created for the selected resources which can be viewed by clicking on the number of resources.
Each resource's member can be viewed by clicking on the number of members.
The table with the Maintenance Windows can be manually refreshed or a refresh interval can be set from the Refresh Interval drop menu.
The home pages of the resources included in an active Maintenance Window will show a banner notifying the inclusion of the resource in a specific Maintenance Window and its duration. If the resource is part of multiple Maintenance Windows the banner will show the duration of the Maintenance Windows that ends the last.
Edit a Maintenance Window
While editing the following details for a scheduled Maintenance Window can be updated:
-
Scope of the Maintenance Window - Resources can be added or previously added resources can be removed.
-
Schedule of the Maintenance Window - The start and end date, and the duration of the Maintenance Window can be updated. When editing the schedule, UTC time zone is set as default.
This option is disabled for Active or Completed Maintenance Windows.
Clone a Maintenance Window
Duplicates a Maintenance Window. When cloned, the same resources are included and the schedule of the Maintenance Window is set to UTC time zone as default.
Stop a Maintenance Window
Stops an Active Maintenance Window that is in progress, and updates its state to Completed.
For an active recurrent Maintenance Window, stopping it will end the whole series of recurrences, not only the current occurrence.
This option is not available for Scheduled or Completed Maintenance Windows.
Delete a Maintenance Window
Deletes a Scheduled or Completed Maintenance Window.
This option is not available for Active Maintenance Windows.
Filter Maintenance Windows
The Maintenance Windows can be filtered in two different ways: by Maintenance Windows name and by the resources associated to it.
- Filter by Maintenance Windows name:
To filter by name, type the name of the Maintenance Windows in the search bar. It is not case sensitive and will automatically update the results as you type each letter.
- Filter by Maintenance Windows resource:
To search by resource, click on Search by Resource. Next to this text, there is a number that indicates how many resources are already selected.
- When the slide-out panel opens, select the resources you want to use to filter the Maintenance Windows list.
- After selecting the resources, click on Add selected resources. The panel will close and the list will only show the Maintenance Windows containing those resources.
- To remove the resources filter, open the panel again and unselect all the resources.
Known Issues
Host: Derived associations will not be added to Maintenance Windows
When adding a host to the Maintenance Window, the directly associated resources will be automatically added to the window. However, other derived associated resources will not be added.
Example:
A host is added to a Maintenance Window. The host has a used by association with two WLS managed servers. The two servers will be added to the Maintenance Window. However, the cluster containing the servers will not be added.
Scheduled Maintenance Windows cannot be stoped
Only active windows can be stopped. Scheduled windows can be edited or deleted.
To stop future occurrence of a Maintenance Window from happening, edit the definition of the Maintenance Window and specify an end date that will stop it before its next scheduled run.
Maintenance Window does not supress alarms after refresh
Once a Maintenance Window is created, it will be refreshed based on future events such as a new child resource is added to a member of the window. However, the alarms on that resource will not be suppressed.
For information regarding troubleshooting a Maintenance Window, see Troubleshoot a Maintenance Window.