Configuring the Edge Platform Software from the Graphical User Interface
After self-provisioning a Roving Edge device, as an alternative to the Service CLI, you can configure the OCI Edge Platform software using the installation GUI.
This entire procedure is best performed as one workflow. It's broken down into sections to improve navigation and clarity.
Create an Administration Account
Connect to the Roving Edge device to create a primary administration account.
-
From your controlling host such as a laptop, connected to the same subnet as the Roving Edge device, go to
https://<device_ip>:30099. -
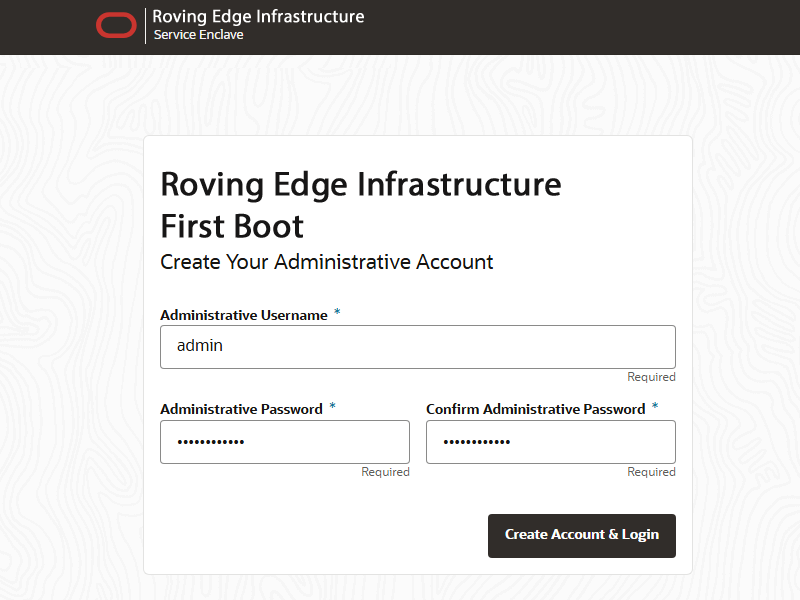
From the First Boot page, create the primary administrative account for your device, which is used for initial configuration and persists after the first boot process.
-
Enter an Administrative Username.
-
Enter and confirm the Administrative Password.
Note
Passwords must contain a minimum of 12 characters with at least one of each: uppercase character, lowercase character, digit, and any punctuation character – except for double quote ('"') characters, which aren't allowed.
-
Select Create Account & Login.
Caution
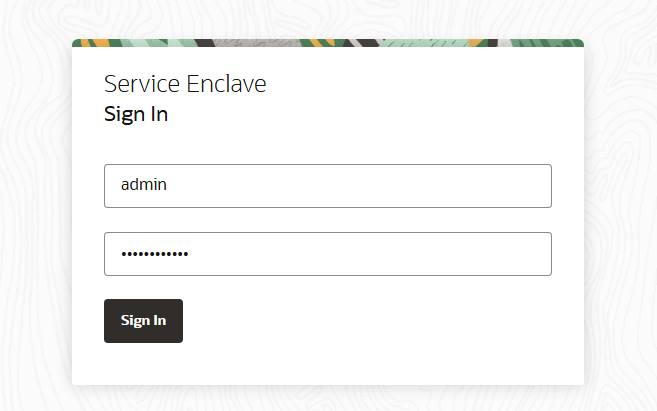
At the Service Enclave Sign In page, Don't sign in and don't refresh your browser. Proceed to the next section.
-
Unlock the Device
Unlock the device. This step must be performed from the Service CLI.
-
Open a terminal window and log in to the management node using the primary administrative account.
$ ssh admin@pcamn01 -p 30006 Password authentication Password: RED2-ADMIN> -
Enter the
systemStateUnlockcommand.RED2-ADMIN> systemStateUnlock -
Verify the system is unlocked.
RED2-ADMIN> show pcaSystem Data: Id = 5709f72b-c439-4c3a-8959-758df94eff25 Type = PcaSystem System Config State = Config System Params System State Locked = false -
Enter the
exitcommand or close the terminal window.
Setting the System Operating Mode
Set the parameters that determine the operating mode. The Roving Edge device operates disconnected from OCI, but is always configured in connected state.
-
Return to the browser window displaying the Service Enclave Sign In page. Use the primary administrative account to sign in.
-
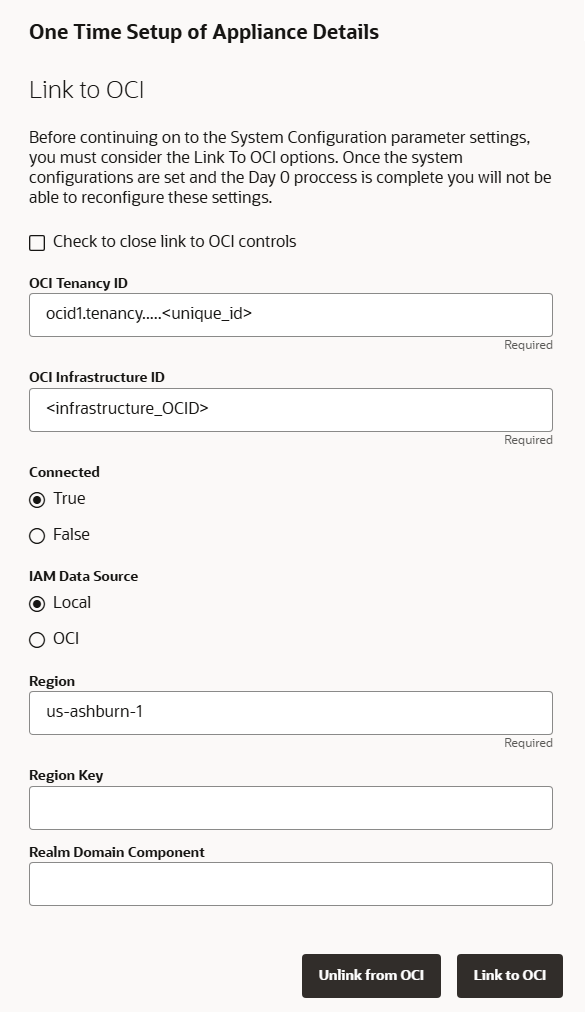
In the One Time Setup page, configure the operating mode and related system parameters.
-
The Roving Edge device must be linked to OCI.
Clear the checkbox under Link to OCI. The controls to link the system to OCI are displayed.
-
Provide the following device details.
Required entries are marked with an asterisk. Pay special attention to the highlighted parameters: connection mode and IAM data source.
-
OCI Tenancy ID*
-
OCI Infrastructure ID*
-
Connected Mode*: select True
-
IAM Data Source*: select Local
-
Region*
-
Region Key
-
Realm Domain Component
-
-
To confirm the settings, select Link to OCI.
At this point you can unlink and relink to update the link settings. When you select Save Changes in the next step, all one time setup parameters are locked in and can no longer be changed.
-
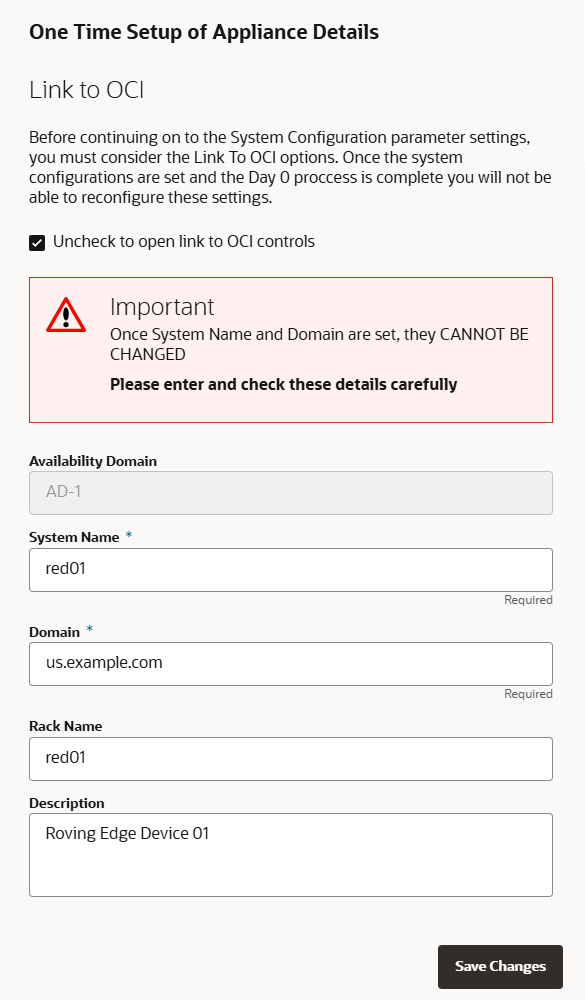
Select the checkbox under Link to OCI to hide the OCI link controls, and display the system parameters.
-
Provide the following device details.
The Availability Domain can't be modified. Required entries are marked with an asterisk.
-
System Name*
-
Domain*
-
Rack Name
-
Description
-
-
-
Confirm the parameters you entered are correct. After this step they can no longer be changed. Select Save Changes when you're ready to proceed.
Keep the browser window open. Proceed to the next section.
Configuring the System Network
When the operating mode and base system parameters are locked in, you must configure the system network. The Network Configuration wizard guides you through the sets of parameters you must provide. Use the data you prepared in advance. See Network Resource Planning.
If traffic must pass through a proxy server in the network environment where the Roving Edge device is installed, configure a system-wide proxy AFTER system network configuration (Configure Network Params wizard). See Configuring Appliance Proxy Settings.
-
Return to the browser window you left open at the end of the preceding section. Refresh the page and sign in to the system with the primary administrative account.
Note
You might need to accept the self-signed SSL certificate again before signing in.
-
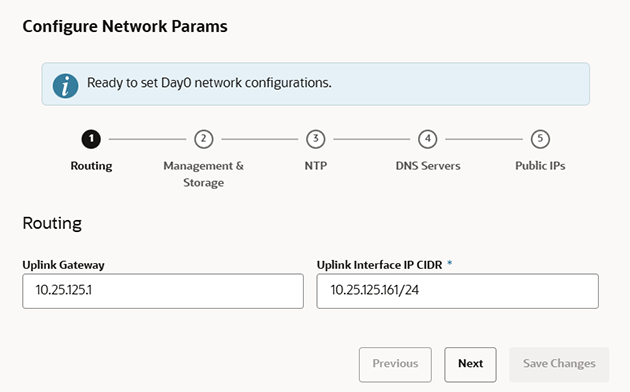
In the Configure Network Params wizard, enter the uplink gateway IP address for the subnet the Roving Edge device is connected to, and the uplink interface IP address in CIDR notation.
-
Select Next to proceed to the wizard page for management node network parameters.
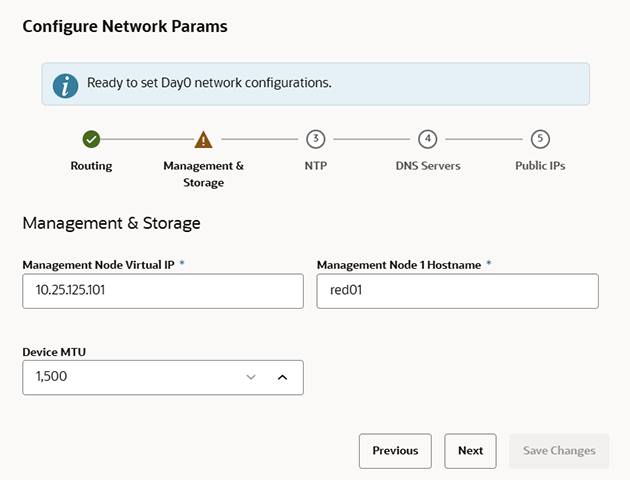
Enter a virtual IP address and hostname for the management node of the device.
If the default MTU of 1500 bytes is not suitable for your connection, change the packet size.
-
Select Next to proceed to the wizard page for NTP parameters.
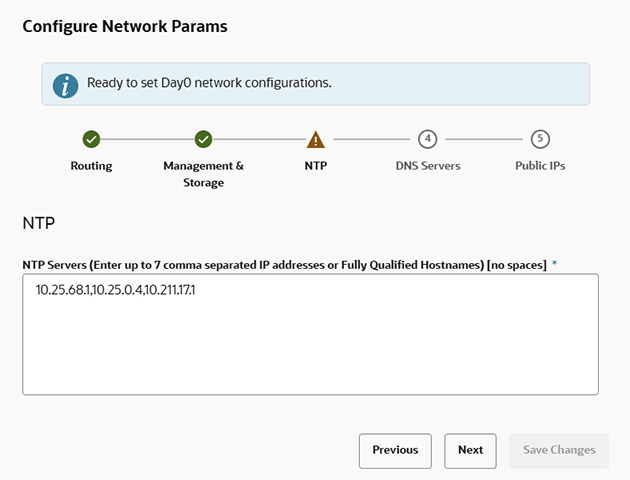
Enter the IP address or fully qualified domain name of at least one NTP server. Use a comma separated list to specify multiple NTP servers.
Note
When the network configuration has been applied, you can check the NTP connection status.
In the Service Web UI, it's displayed in the NTP tab of the Network Environment Information page. In the Service CLI you can run this command:
PCA-ADMIN> checkNtpServers Data: id Accessible -- ---------- 10.64.0.252 true 192.0.2.2 true -
Select Next to proceed to the wizard page for DNS parameters.
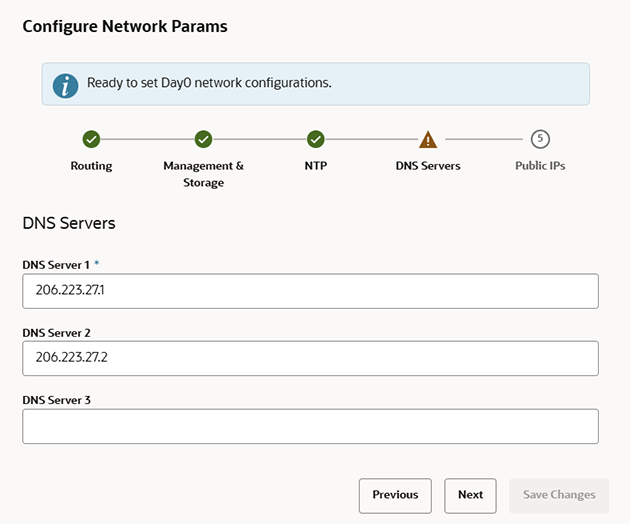
Enter at least one and up to three DNS servers in the respective fields.
-
Select Next to proceed to the wizard page for public IP addresses.
Enter the data center IP addresses that the system controller software can assign to resources as public IPs.
-
Public IP list of CIDRs in a comma-separated list
-
Object Storage Public IP (must be outside the public IP range)
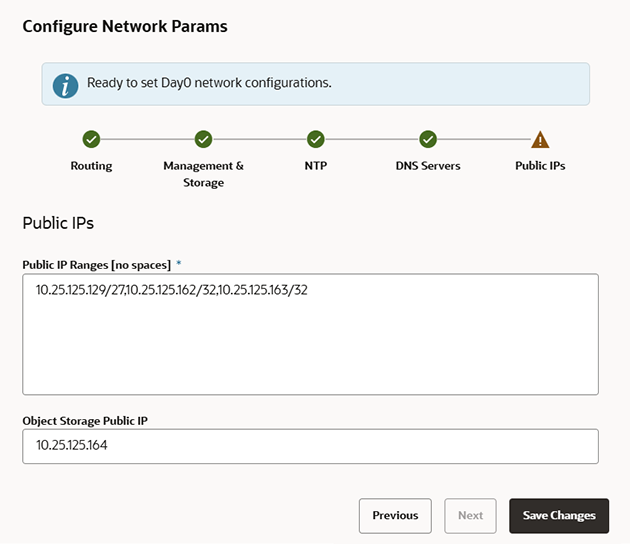
-
-
Keep the browser window open. Proceed to the next section of this initial setup procedure.
Verifying and Applying the Network Configuration
All parameters in all pages of the Network Configuration wizard have been entered. However, you must still verify and apply the configuration.
-
Verify the parameters you entered in each of the wizard. Use the Previous/Next buttons to scroll through the pages.
The network configuration information is persisted when a test procedure is completed successfully. Testing starts when you save the network configuration in the next step. If you need to change any parameters after testing begins, you must reenter all information.
-
Save the network configuration parameters by selecting Save Changes.
A network configuration test begins, and can take several minutes. Don't close the browser window before it's completed.
If a problem is encountered, the Configure Network Params wizard reopens and the error is displayed.
-
In the Testing Network Parameters page, select the appropriate option:
-
Select Reenter Network Configuration.
You are returned to a blank Configure Network Params wizard where you must enter all your information again.
-
Select Commit Changes.
The network parameters are locked.
Caution
When you select Commit Changes, system initialization begins and can take several minutes. Don't close the browser window during this time.
If a problem is encountered, the Configure Network Params wizard reopens and the error is displayed. Otherwise, a Configuration Complete message is displayed.
-
-
Select Sign Out. You're returned to the Service Enclave sign in page.
-
Verify the system configuration.
-
Connect to the Service Web UI at the new virtual IP address of the management node cluster:
https://<virtual_ip>:30099. -
From the Dashboard, select Appliance to view the system details and select Network Environment to view the network configuration.
-
As part of initial setup, you may create a customer administrator user and a Grafana Editor user. This must be done during setup because permissions to create these accounts are time-limited. You have two hours after the Edge Platform network configuration is completed to add them. After that, you must submit a service request to create the accounts. Use the Service CLI to create these accounts.