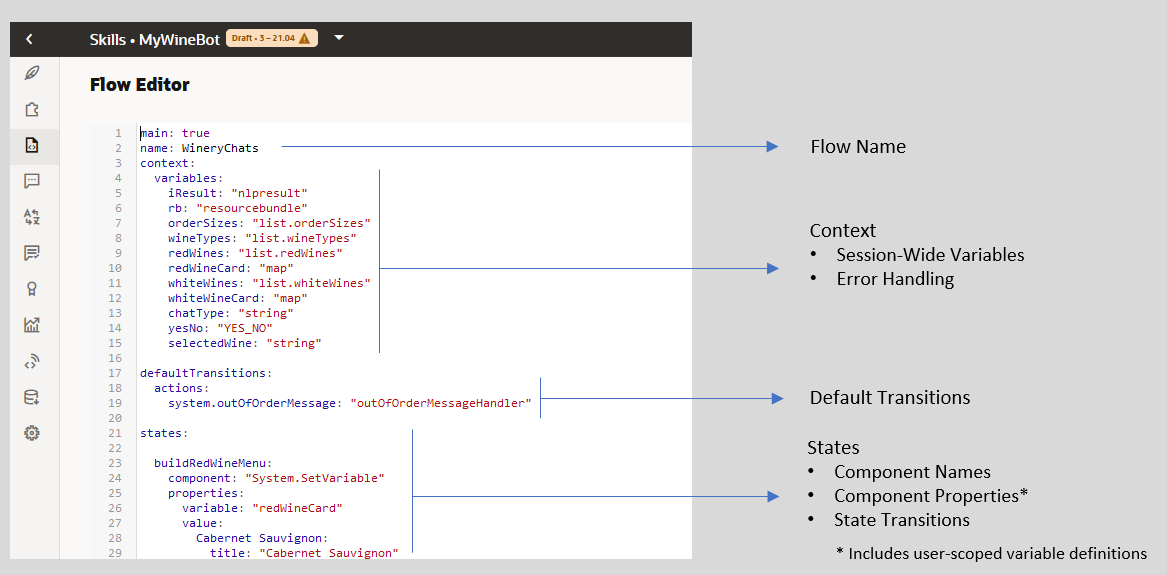
The Dialog Flow Structure in YAML Mode
Your OBotML definition is divided into three main parts: context,
defaultTransitions, and states. You define the variables
that are available across the session within the context node. The definition
of the flow itself is described in the states section.
The dialog flow is laid out as follows:
main: true
name: "HelloKids"
context:
  variables:
    variable1: "entity1"
    variable2: "error"
...
States
    state1:
      component: "a custom or built-in component"
      properties:
        property1: "component-specific property value"
        property2: "component-specific property value"
      transitions:
        actions:
          action1: "value1"
          action2: "value2"
    state2:
      component: "a custom or built-in component"
      properties:
        property1: "component-specific property value"
        property2: "component-specific property value"
      transitions:
        actions:
          action1: "value1"
          action2: "value2"
...
Note
In platform version previous to 20.12, the dialog flow starts off with the
In platform version previous to 20.12, the dialog flow starts off with the
metadata node, which contains a platformVersion node. Starting with platform version 20.12 these nodes are deprecated.
The context Node
The variables that you define within the context node can be primitive types like int, string, boolean, double, or float. You can define a variable as a map, which is a JSON object, or you can use variables to describe error handling.
As illustrated by the following snippet from the PizzaBot dialog flow definition, you can name variables for built-in or custom entities (which in this case, are the
PizzaSize and PizzaCrust variables). Along with built-in entities and the custom entities, you can also declare a variable for the nlpresult entity, which holds the intent that's resolved from the user input. These variables are scoped to the entire flow. How Do I Write Dialog Flows in OBotML? tells you how to assemble the different parts of the dialog flow. You can also scope user variable values to enable your bot to recognize the user and persist user preferences after the first conversation. User-Scoped Variables in YAML Dialog Flows describes these variables.main: true
name: "PizzaBot"
context:
variables:
size: "PizzaSize"
type: "PizzaType"
crust: "PizzaCrust"
iResult: "nlpresult"
The defaultTransitions Node
You can set transitions in two places: as part of the component definitions in
the dialog flow's states, or in the
defaultTransitions node. This node sets
the global navigation. For
example:defaultTransitions
next: "..."
error: "..."
actions:
action_name1: "..."
action_name2: "..."
Use the
defaultTransitions node to define routing that allows
your skill bot to gracefully handle unexpected user actions. In particular, you can use it to
enable your skill bot to react appropriately when a user taps an option in a previous reply
instead of one of the options presented in the bot's current (and more appropriate) reply. As
shown by the NONE action in the following snippet, you can configure this
transition to route to a state that handles all of the unexpected
actions.defaultTransitions:
error: "globalErrorHandler"
...
globalErrorHandler:
component: System.Switch
properties:
source: "${system.errorState}"
values:
- "getOrderStatus"
- "displayOrderStatus"
- "createOrder"
transitions:
actions:
NONE: "unhandledErrorToHumanAgent"
getOrderStatus: "handleOrderStatusError"
displayOrderStatus: "handleOrderStatusError"
createOrder: "handleOrderStatusError"
The states Node
In YAML-based dialogs, you define each bit of dialog and its related operations as a
sequence of transitory states, which manage the logic within the dialog flow. To cue the
action, each
state node within your OBotML definition names a component that
provides the functionality needed at that point in the dialog. States are essentially built
around the components. They contain component-specific properties and define the transitions
to other states that get triggered after the component
executes. state_name:
component: "component_name"
properties:
component_property: "value"
component_proprety: "value"
transitions:
actions:
action_string1: "go_to_state1"
action_string2: "go_to_state2"next, error, actions, or
return transitions (which are described in Flow Navigation and Transitions) that you can define for any component. Transitions set within states can be
overriden by the global transitions defined in the defaultTransitions
node.
The PizzaBot includes a sequence of
state nodes that verify a
customer’s age. These states include components that take the user-supplied integer value,
check it, and then output a text string as appropriate. To start off the process, the
askage state’s component requests the user input then moves on to the
checkAge state, whose AgeChecker component validates the
user input. Here, the dialog is at a juncture: its transitions key defines
the block or allow states. If the allow
state is triggered, then the user can continue on. The subsequent state definitions will track
the user input to preserve the user’s context until she completes her order. If the user input
causes the AgeChecker component to trigger the block action,
however, then conversation ends for the under-age user because the dialog transitions to the
underage
state.main: true
name: "PizzaBot"
context:
variables:
size: "PizzaSize"
type: "PizzaType"
crust: "PizzaCrust"
cheese: "CheeseType"
iResult: "nlpresult"
...
askage:
component: "System.Output"
properties:
text: "How old are you?"
transitions:
next: checkage
checkage:
component: "AgeChecker"
properties:
minAge: 18
transitions:
actions:
allow: "crust"
block: "underage"
crust:
component: "System.List"
properties:
options: "Thick,Thin,Stuffed,Pan"
prompt: "What crust do you want for your Pizza?"
variable: "crust"
transitions:
...
underage:
component: "System.Output"
properties:
text: "You are too young to order a pizza"
transitions:
return: "underage"